Keyless Entry Keypad Code Programming
Remote Function Actuator (RFA) Module Keyless Entry Keypad Code Reset
NOTE: This step is for transferring the factory keyless entry keycode from the BCM and programming it into the RFA module.
- Using a scan tool, follow the on-screen instructions to perform the
keyless entry keypad code reset.
- The keyless entry keypad code reset procedure is found on the scan tool under Toolbox>Body>Security.
Programming a Personal Entry Code
NOTE: The system allows 4 personal codes to be programmed using the keyless entry keypad.
NOTE: Multiple personal codes can be programmed in a single step. When programming multiple codes in a single step, each code must be programmed by entering each button within 5 seconds of each other. If 5 seconds elapse between any button press, programming mode is exited.
NOTE: If only a single personal code is desired or unable to program multiple codes in one step, each personal code can be programmed individually by repeating Steps 1-5 for each code desired.
- Enter the factory set 5-digit keyless entry keypad code.
- Within 5 seconds, press the 1/2 button on the keypad to activate the programming mode.
- Enter the new 5-digit keyless entry keypad code. Each number must be entered within 5 seconds of each other.
- NOTE: For vehicles equipped with memory seats, the factory-set
code cannot be associated with a memory setting.
To associate the entry code with a new memory setting, enter a sixth digit to indicate which driver should be set in a memory recalled by the personal entry code:
- Pressing 1/2 stores the first personal code (and recalls Driver 1 settings if equipped with memory seats).
- Pressing 3/4 stores the second personal code (and recalls Driver 2 settings if equipped with memory seats).
- Pressing 5/6 stores the third personal code (does not recall a memory setting if equipped with memory seats).
- Pressing other keypad buttons stores the fourth personal code (does not recall a memory setting if equipped with memory seats).
- The doors lock and unlock to confirm the new code is programmed.
Erasing a Personal Entry Code
- Carry out the procedure to program a personal keyless entry code, but enter the factory set 5-digit keyless entry keypad code into all 4 personal code slots.
- All personal codes are now erased and only the factory set 5-digit code works.
Remote Memory Activation
- Position the driver seat, steering column and exterior mirrors to the desired positions.
- Press and hold a memory button (1 or 2) for 5 seconds. A tone sounds after 1-1/2 seconds when the memory store is done. Continue to hold until a second tone sounds after 5 seconds.
- Within 3 seconds, press the LOCK button on the Remote Keyless Entry (RKE) transmitter.
- If a second memory setting is desired, repeat the procedure with the second RKE transmitter.
Remote Memory Deactivation
- Press and hold either memory button (1 or 2) for 5 seconds. A tone sounds after 1-1/2 seconds when the memory store is done. Continue to hold until a second tone sounds after 5 seconds.
- Within 3 seconds, press the UNLOCK button on the Remote Keyless Entry (RKE) transmitter.
- If a second memory setting is to be deactivated, repeat the procedure with the second RKE transmitter.
Stepped Unlock Programming
- With the ignition OFF, press and hold the lock and unlock buttons on
the RKE transmitter simultaneously for 4 seconds.
- The turn signals flash twice to indicate the mode change.
- Repeat Step 1 to enable/disable the stepped unlocking feature.
Latch Lubrication
Material

- Open the door.
- Using a screwdriver, fully close the latch (2 clicks).
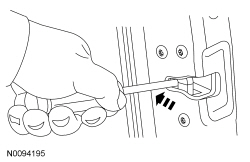
- Spray the multi-purpose grease into the opening on the door latch for approximately 5 seconds.
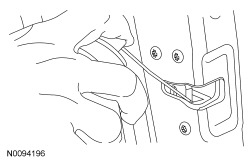
- Open the latch using either the interior or exterior door handle.
- Open and close the door several times to circulate the lubricant inside the latch.
- Wipe off any excess grease.
 Diagnosis and Testing
Handles, Locks, Latches and Entry Systems
Special Tool(s)
Material
DTC Charts
Diagnostics in this manual assume a certain skill level and knowledge of
Ford-specific diagnostic practices. Refer to D ...
 Removal and Installation
Hood Latch
Removal and Installation
Remove the upper radiator sight shield.
Remove the 8 screws.
Remove the 4 bolts.
Remove the 2 pin-type retainers.
NOTE: Mark the p ...
Other materials:
Ford Extended Service Plan
PROTECT YOURSELF FROM THE RISING COST OF VEHICLE REPAIRS
WITH A FORD EXTENDED SERVICE PLAN.
SERVICE PLANS (U.S. only)
More than 32 Million Ford and Lincoln owners have discovered the
powerful protection Ford ESP. It is the only extended service plan
backed by Ford Motor Company, and provides pe ...
Diagnosis and Testing
Instrumentation, Message Center and Warning Chimes
Special Tool(s)
DTC Chart(s)
Diagnostics in this manual assume a certain skill level and knowledge of
Ford-specific diagnostic practices. REFER to Section 100-00 for information
regarding these diagnostic practices.
DTC Chart - IPC ...
Steering System
DESCRIPTION AND OPERATION
Steering System
Electronic Power Assist Steering (EPAS) System
The Electronic Power Assist Steering (EPAS) system consists of the following
components:
Power Steering Control Module (PSCM) - the PSCM controls the functions
of the EPAS system and com ...
