SPECIFICATIONS
General Specifications
Torque Specifications

DESCRIPTION AND OPERATION
Fuel Tank and Lines
2.0L Gasoline Turbocharged Direct Injection (GTDI)
Fuel Tank and Lines
The fuel tank and lines consists of:
- a single container (L-shaped) fuel tank.
- a fuel level sensor assembly.
- a Fuel Pump (FP) module that operates on 5.5 or 12 volts depending on load, that supplies fuel under pressure to the high pressure FP.
- a lifetime fuel filter (serviced as part of the FP module).
- an Easy Fuel TM (capless) fuel tank filler pipe assembly, which cannot be modified in any way and is serviced only by the installation of a new fuel tank filler pipe assembly.
- a supplemental refueling adapter located in the luggage compartment.
- fuel tubes (liquid and vapor) along with brake tubes mounted on the underside of the vehicle in a bundle.
- a Fuel Tank Pressure (FTP) sensor (part of the fuel vapor tube assembly).
- a serviceable fuel level sender mounted on the FP module.
- a serviceable fuel level sender mounted on the fuel level sensor assembly.
3.5L Gasoline Turbocharged Direct Injection (GTDI)
Fuel Tank and Lines
The fuel tank and lines consists of:
- a dual-container (saddle-type) fuel tank.
- a fuel level sensor assembly.
- a Fuel Pump (FP) module that operates on 5.5 or 12 volts depending on load, that supplies fuel under pressure to the high pressure FP.
- a lifetime fuel filter (serviced as part of the FP module).
- an Easy Fuel TM (capless) fuel tank filler pipe assembly, which cannot be modified in any way and is serviced only by the installation of a new fuel tank filler pipe assembly.
- a supplemental refueling adapter located in the luggage compartment.
- fuel tubes (liquid and vapor) along with brake tubes mounted on the underside of the vehicle in a bundle.
- a Fuel Tank Pressure (FTP) sensor (part of the fuel vapor tube assembly).
- a serviceable fuel level sender mounted on the FP module.
- a serviceable fuel level sender mounted on the fuel level sensor assembly.
3.5L Ti-VCT
Fuel Tank and Lines
The fuel tank and lines consist of:
- either a single container (L-shaped) or a dual-container (saddle-type) fuel tank.
- a fuel level sensor assembly (saddle-type fuel tank).
- a Fuel Pump (FP) module that supplies fuel under pressure to the fuel rail.
- a lifetime fuel filter (serviced as part of the FP module).
- an Easy Fuel TM (capless) fuel tank filler pipe assembly, which cannot be modified in any way and is serviced only by the installation of a new fuel tank filler pipe assembly.
- a supplemental refueling adapter located in the luggage compartment.
- a Fuel Pump (FP) module that operates on 10 or 12 volts depending on load, that supplies fuel under pressure to the fuel rail.
- fuel tubes (liquid and vapor) along with brake tubes mounted on the underside of the vehicle in a bundle.
- a Fuel Tank Pressure (FTP) sensor (part of the fuel vapor tube assembly).
- a serviceable fuel level sender mounted on the FP module.
- a serviceable fuel level sender mounted on the fuel level sensor assembly (saddle-type fuel tank).
Fuel Pump (FP) Shut-off Feature
NOTE: Refer to the Description and Operation, Intelligent Access with Push Button Start in Section 419-01A to review the procedures for achieving the various ignition states (ignition OFF, ignition in ACCESSORY, ignition ON and ignition START) on vehicles with this feature.
In the event of a moderate to severe collision, the vehicle is equipped with a Fuel Pump (FP) shut-off feature that is initiated by the event notification signal.
The event notification signal is a signal provided by the Restraints Control Module (RCM) to the FP control module. Signal communication between the RCM and the FP control module allows the PCM to shut-off the FP.
Should the vehicle shut off after a collision due to this feature, the vehicle may be restarted by first turning the ignition to the OFF position and then turn the ignition to the ON position. In some instances the vehicle may not start the first time and may take one additional ignition cycle.
DIAGNOSIS AND TESTING
Fuel Tank and Lines
Refer to the Powertrain Control/Emissions Diagnosis (PC/ED) manual.
REMOVAL AND INSTALLATION
Fuel Tank - L-Shaped
Special Tool(s)
Removal and Installation
WARNING: Do not smoke, carry lighted tobacco or have an open flame of any type when working on or near any fuel-related component. Highly flammable mixtures are always present and may be ignited. Failure to follow these instructions may result in serious personal injury.
WARNING: Do not carry personal electronic devices such as cell phones, pagers or audio equipment of any type when working on or near any fuel-related component. Highly flammable mixtures are always present and may be ignited. Failure to follow these instructions may result in serious personal injury.
WARNING: Before working on or disconnecting any of the fuel tubes or fuel system components, relieve the fuel system pressure to prevent accidental spraying of fuel. Fuel in the fuel system remains under high pressure, even when the engine is not running. Failure to follow this instruction may result in serious personal injury.
WARNING: When handling fuel, always observe fuel handling precautions and be prepared in the event of fuel spillage. Spilled fuel may be ignited by hot vehicle components or other ignition sources. Failure to follow these instructions may result in serious personal injury.
WARNING: Always disconnect the battery ground cable at the battery when working on an evaporative emission (EVAP) system or fuel-related component. Highly flammable mixtures are always present and may be ignited. Failure to follow these instructions may result in serious personal injury.
- With the vehicle in NEUTRAL, position it on a hoist. For additional information, refer to Section 100-02.
- Drain the fuel tank. For additional information, refer to Section 310-00.
- Remove the muffler and tail pipe assembly. For additional information, refer to Section 309-00.
- Remove the Evaporative Emission (EVAP) canister. For additional information, refer to Section 303-13.
- Remove the fuel tank shield push pin retainer, if equipped.
- NOTE: Some residual fuel may remain in the fuel tank filler pipe
after draining the fuel tank. Carefully drain any residual fuel into a
suitable container.
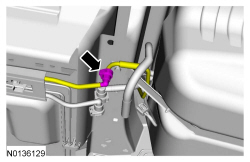
Release the clamp and remove the fuel tank filler pipe hose from the filler pipe.
- To install, tighten to 3 Nm (27 lb-in).

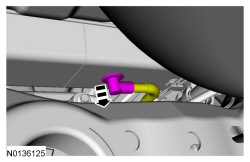
- Disconnect the fuel vapor tube assembly-to-fuel tank filler pipe recirculation tube quick connect coupling. For additional information, refer to Section 310-00.
- Release the fresh air hose vent cap and pin-type retainer from the body.

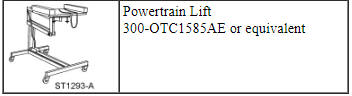
- Position the Powertrain Lift under the fuel tank.
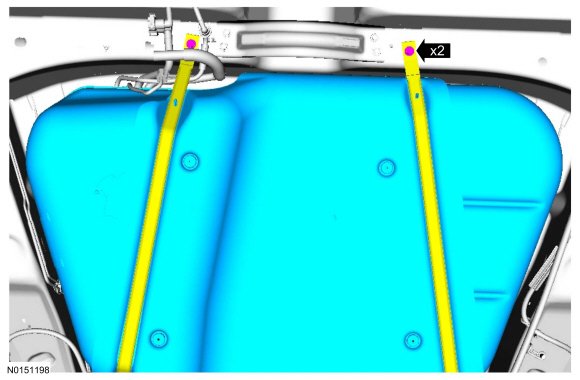
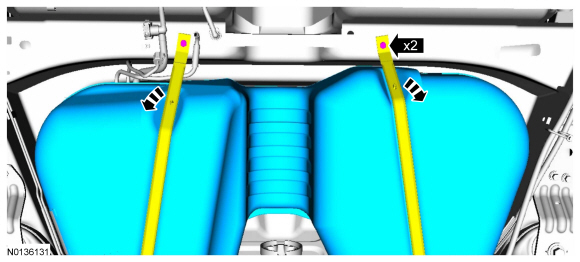
- Remove the 2 front fuel tank strap bolts, carefully lower and remove the
fuel tank from the vehicle.
- To install, tighten to 35 Nm (26 lb-ft).
- NOTE: Prior to performing the Evaporative Emission (EVAP) System
Leak Test, reconnect the Fuel Pump Driver Module (FPDM) electrical
connector.
To install, reverse the removal procedure.
Fuel Tank - Saddle Type
Special Tool(s)
Removal and Installation
WARNING: Do not smoke, carry lighted tobacco or have an open flame of any type when working on or near any fuel-related component. Highly flammable mixtures are always present and may be ignited. Failure to follow these instructions may result in serious personal injury.
WARNING: Do not carry personal electronic devices such as cell phones, pagers or audio equipment of any type when working on or near any fuel-related component. Highly flammable mixtures are always present and may be ignited. Failure to follow these instructions may result in serious personal injury.
WARNING: Before working on or disconnecting any of the fuel tubes or fuel system components, relieve the fuel system pressure to prevent accidental spraying of fuel. Fuel in the fuel system remains under high pressure, even when the engine is not running. Failure to follow this instruction may result in serious personal injury.
WARNING: When handling fuel, always observe fuel handling precautions and be prepared in the event of fuel spillage. Spilled fuel may be ignited by hot vehicle components or other ignition sources. Failure to follow these instructions may result in serious personal injury.
WARNING: Always disconnect the battery ground cable at the battery when working on an evaporative emission (EVAP) system or fuel-related component. Highly flammable mixtures are always present and may be ignited. Failure to follow these instructions may result in serious personal injury.
- With the vehicle in NEUTRAL, position it on a hoist. For additional information, refer to Section 100-02.
- Drain the fuel tank. For additional information, refer to Section 310-00.
- Remove the muffler and tail pipe. For additional information, refer to Section 309-00.
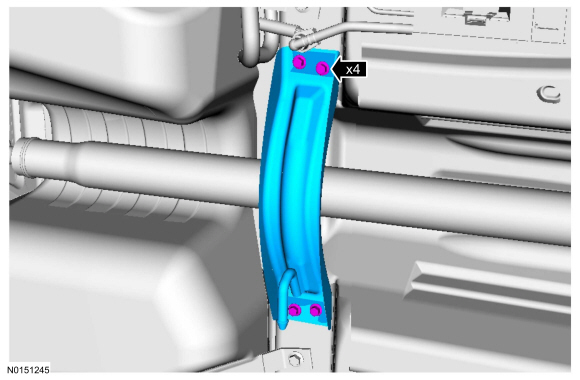
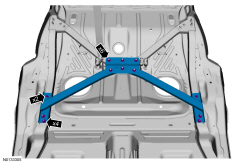
- NOTE: Support the driveshaft.
Remove the 4 exhaust support brace bolts and the exhaust brace.
- To Install, tighten to 30 Nm (22 lb-ft).
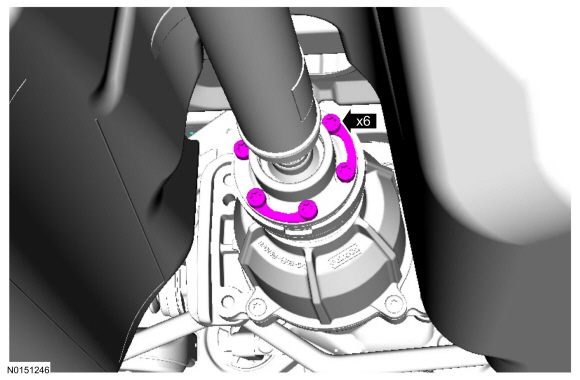
- NOTICE: Do not reuse the bolt and washer assemblies for the
rear Constant Velocity (CV) joint flange. Install new assemblies or damage
to the vehicle may occur.
NOTE: Index mark the rear driveshaft flange.
Remove and discard the 3 Rear Drive Unit (RDU) pinion flange bolt and washer assemblies.- To Install, tighten to 25 Nm (18 lb-ft).
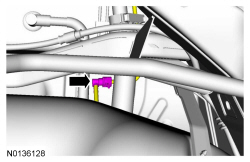
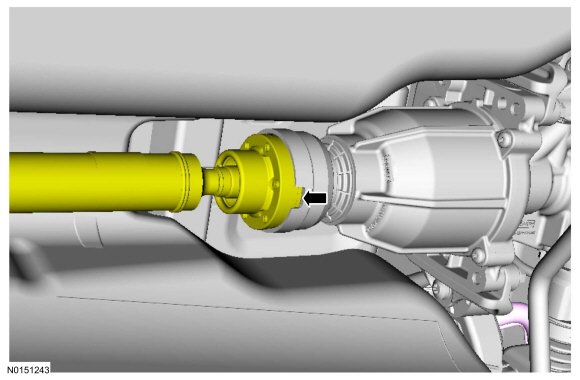
- Separate the driveshaft CV flange from the RDU flange using a flat-blade screwdriver in the area shown. Position rear of driveshaft aside and support with mechanics wire.
- Remove the Evaporative Emission (EVAP) canister. For additional information, refer to Section 303-13.
- NOTE: Some residual fuel may remain in the fuel tank filler pipe
after draining the fuel tank. Carefully drain any residual fuel into a
suitable container.
Release the clamp and remove the fuel tank filler pipe hose from the fuel filler pipe.
- To install, tighten to 3 Nm (27 lb-in).

- Disconnect the fuel vapor tube assembly-to-fuel tank filler pipe recirculation tube quick connect coupling. For additional information, refer to Section 310-00.

- Disconnect the fuel tank jumper tube-to-fuel tube quick connect coupling. For additional information, refer to Section 310-00.
- Release the fresh air hose vent cap and pin-type retainer from the body.
- Position the Powertrain Lift under the fuel tank.
- Remove the 2 front fuel tank strap bolts and release the 2 straps from
the fuel tank and carefully position aside.
- To install, tighten to 35 Nm (26 lb-ft).
- Carefully lower and remove the fuel tank from the vehicle.
- NOTE: Prior to performing the Evaporative Emission (EVAP) System
Leak Test, reconnect the Fuel Pump Driver Module (FPDM) electrical
connector.
To install, reverse the removal procedure.
Fuel Tank Filler Pipe
Special Tool(s)
Removal and Installation
WARNING: Do not smoke, carry lighted tobacco or have an open flame of any type when working on or near any fuel-related component. Highly flammable mixtures are always present and may be ignited. Failure to follow these instructions may result in serious personal injury.
WARNING: Do not carry personal electronic devices such as cell phones, pagers or audio equipment of any type when working on or near any fuel-related component. Highly flammable mixtures are always present and may be ignited. Failure to follow these instructions may result in serious personal injury.
WARNING: When handling fuel, always observe fuel handling precautions and be prepared in the event of fuel spillage. Spilled fuel may be ignited by hot vehicle components or other ignition sources. Failure to follow these instructions may result in serious personal injury.
WARNING: Always disconnect the battery ground cable at the battery when working on an evaporative emission (EVAP) system or fuel-related component. Highly flammable mixtures are always present and may be ignited. Failure to follow these instructions may result in serious personal injury.
- With the vehicle in NEUTRAL, position it on a hoist. For additional information, refer to Section 100-02.
- Disconnect the battery ground cable. For additional information, refer to Section 414-01.
- NOTE: The supplemental refueling adapter is located in the
luggage compartment.
Install the supplemental refueling adapter and a length of semi-rigid fuel drain tube into the Easy Fuel TM (capless) fuel tank filler pipe.
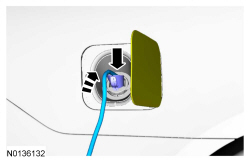
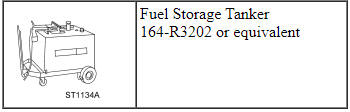
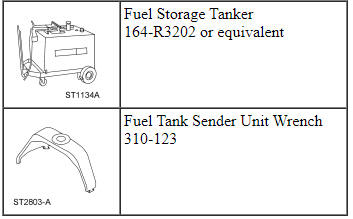
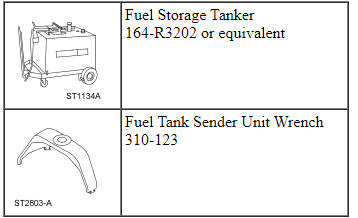
- Attach the Fuel Storage Tanker to the fuel drain tube and remove any residual fuel in the fuel tank filler pipe.
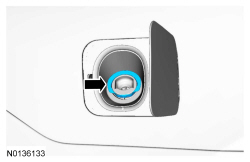
- Remove the information bezel.
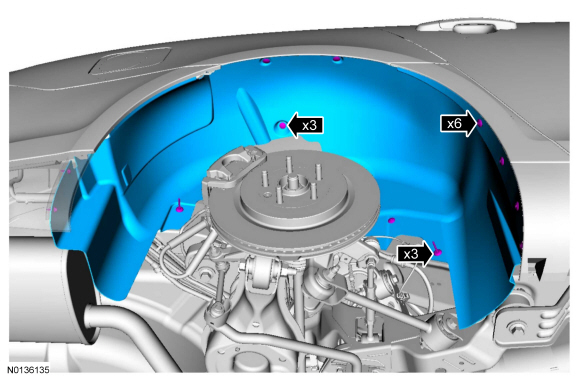
- Remove the RR wheel and tire. For additional information, refer to Section 204-04.
- Remove the 8 screws, 3 pushpins, 3 scrivets and the RR fender splash shield.
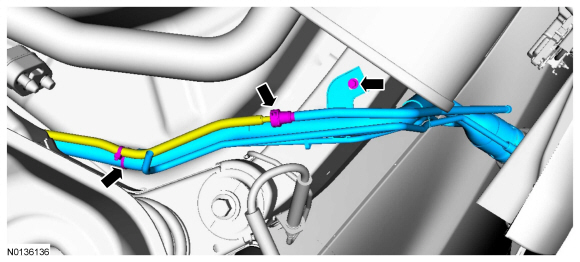
- NOTE: Some residual fuel may remain in the fuel tank filler pipe
after draining the fuel tank. Carefully drain any residual fuel into a
suitable container.
Release the clamp and remove the fuel tank filler pipe hose from the fuel tank.
- To install, tighten to 3 Nm (27 lb-in).

- Disconnect and detach the fuel vapor tube assembly-to-fuel tank filler
pipe recirculation tube quick connect coupling. For additional information,
refer to Section 310-00. Remove the fuel tank filler pipe bolt, and release
the fuel tank filler pipe from the fuel filler door cup bezel and remove the
filler pipe from the vehicle.
- To install, tighten to 9 Nm (80 lb-in).
- To install, reverse the removal procedure.
Fuel Pump Module
Special Tool(s)
Removal
All Vehicles
WARNING: Do not smoke, carry lighted tobacco or have an open flame of any type when working on or near any fuel-related component. Highly flammable mixtures are always present and may be ignited. Failure to follow these instructions may result in serious personal injury.
WARNING: Do not carry personal electronic devices such as cell phones, pagers or audio equipment of any type when working on or near any fuel-related component. Highly flammable mixtures are always present and may be ignited. Failure to follow these instructions may result in serious personal injury.
WARNING: Before working on or disconnecting any of the fuel tubes or fuel system components, relieve the fuel system pressure to prevent accidental spraying of fuel. Fuel in the fuel system remains under high pressure, even when the engine is not running. Failure to follow this instruction may result in serious personal injury.
WARNING: When handling fuel, always observe fuel handling precautions and be prepared in the event of fuel spillage. Spilled fuel may be ignited by hot vehicle components or other ignition sources. Failure to follow these instructions may result in serious personal injury.
WARNING: Always disconnect the battery ground cable at the battery when working on an evaporative emission (EVAP) system or fuel-related component. Highly flammable mixtures are always present and may be ignited. Failure to follow these instructions may result in serious personal injury.
- Release the fuel system pressure. For additional information, refer to Section 310-00.
- Disconnect the battery ground cable. For additional information, refer to Section 414-01.
- Remove the rear seat lower cushion. For additional information, refer to Section 501-10.
Vehicles with Police Package

All Vehicles
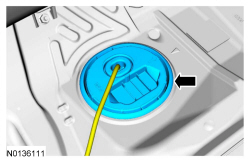
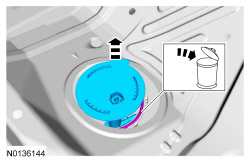
- Remove the Fuel Pump (FP) module access cover, located on the RH side floor pan.
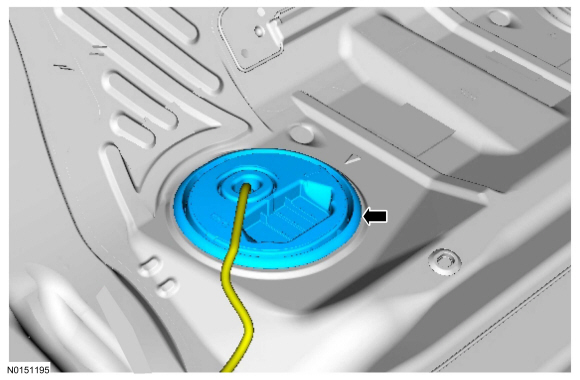
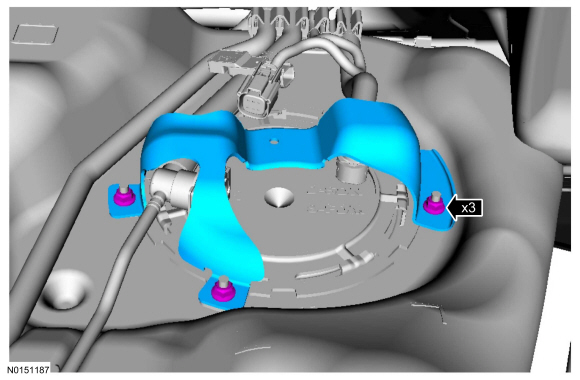
- If equipped, remove the 3 nuts and the FP module shield.
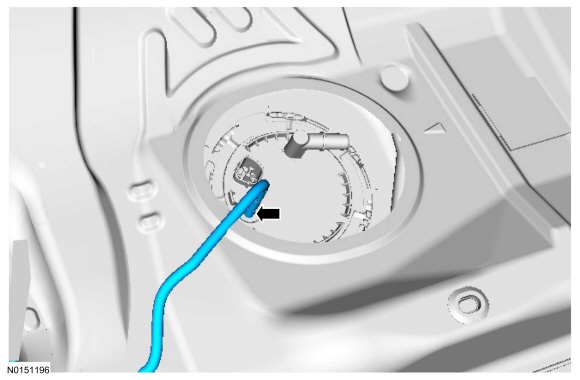
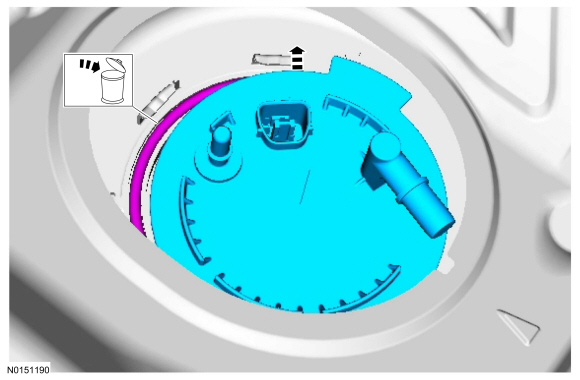
- NOTE: To avoid introducing contamination into the fuel tank use
compressed air to clean the FP module connections, couplings, flange
surfaces and the immediate surrounding area of any dirt or foreign material.
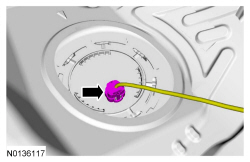
Disconnect the electrical connectors.

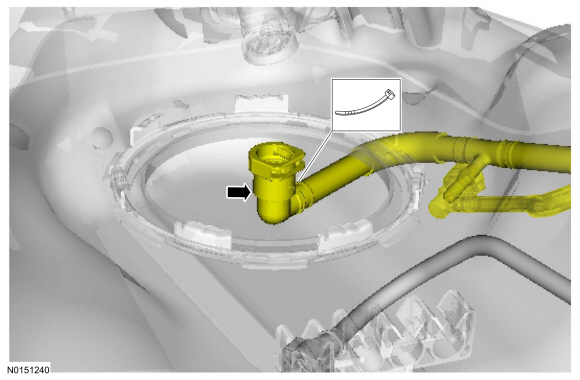
- Disconnect the Fuel Tank Pressure (FTP) sensor electrical connector.
- Disconnect the fuel tank quick connect couplings. For additional information, refer to Section 310-00.

- Attach the Fuel Storage Tanker tube to the FP module outlet fitting and remove one fourth (approximately 5 gallons) of the fuel from a completely full tank, lowering the fuel level below the FP module mounting flange.
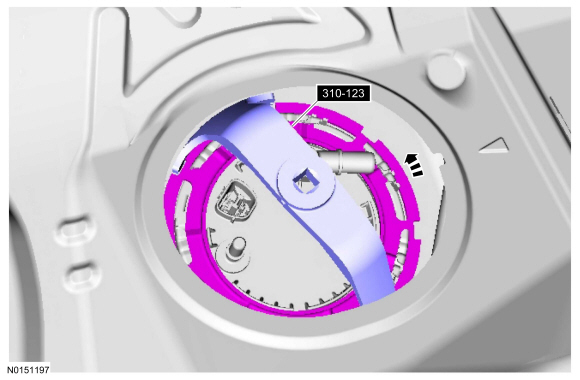
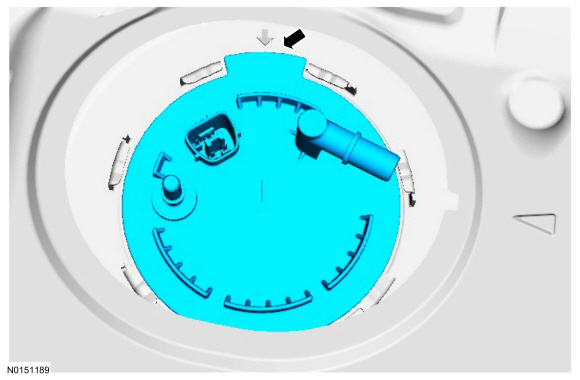
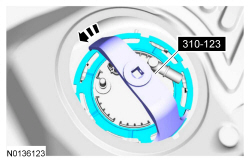
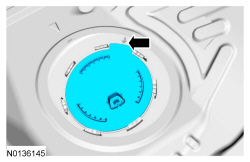
- NOTE: Carefully install the Fuel Tank Sender Unit Wrench to avoid
damaging the FP module when removing the lock ring.
Install the Fuel Tank Sender Unit Wrench, remove the FP module lock ring.
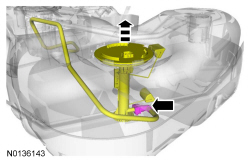
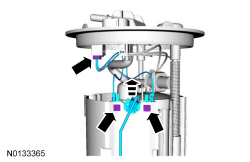
- NOTICE: The Fuel Pump (FP) module must be handled carefully to
avoid damage to the float arm.
NOTE: Place absorbent toweling in the immediate surrounding area in case of fuel spillage.
Carefully lift the FP module out of the fuel tank to access and disconnect the FP module internal fuel tube-to- FP module quick connect coupling and the transfer tube quick connect coupling, if equipped. For additional information, refer to Section 310-00.NOTE: AWD shown FWD similar.
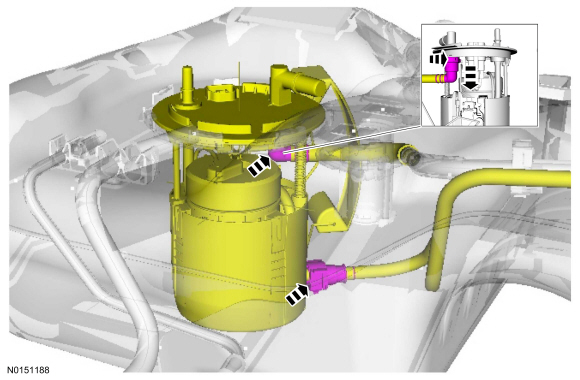
- NOTE: The FP module will have residual fuel remaining internally,
drain into a suitable container.
Completely remove the FP module from the fuel tank.
- Remove and discard the FP module O-ring seal.
Installation
All Vehicles
- NOTICE: The FP module must be handled carefully to avoid
damage to the float arm.
NOTE: Inspect the mating surfaces of the FP module flange and fuel tank O-ring seal contact surfaces. Wipe clean with a lint free towel. Install a new FP module or fuel tank if the O-ring seal contact area is bent, scratched or corroded.
NOTE: Sweep the float arm to ensure freedom of travel.
NOTE: Make sure to install a new FP module O-ring seal.
Install a new O-ring seal.
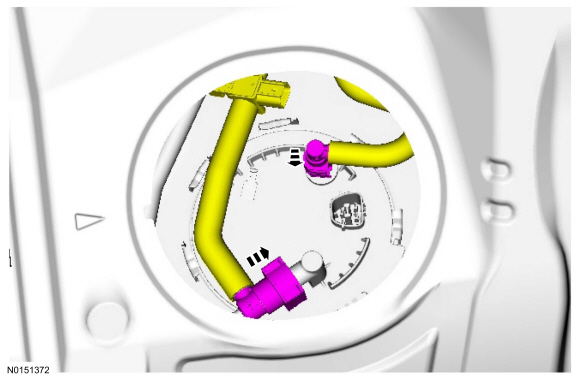
- Loosely install a 12" (minimum length) zip-tie to the internal fuel tube at the quick connect coupling. Leave the tail of the zip tie on to allow the tube to be retrieved while the FP module is being installed.
- NOTE: Make sure the alignment tab on the FP module and the fuel
tank meet before tightening the FP module lock ring.
Install the FP module by inserting the float rod through the Fuel Tank opening. Connect the transfer tube quick connect coupling at the bottom of the FP module, if equipped. Then, use the zip tie to help retrieve and connect the internal fuel tube to the FP module as it is installed into the fuel tank. Pull on the fuel tube connection to make sure it is connected securely. For additional information, refer to Section 310-00. Remove the zip tie.
- NOTE: Install a new lock ring if it is bent, damaged or corroded.
NOTE: Carefully install the Fuel Tank Sender Unit Wrench to avoid damaging the FP module when tightening the lock ring.
Install the Fuel Tank Sender Unit Wrench and tighten the fuel tank lock ring by turning clockwise.

- Connect the fuel tank quick connect couplings. For additional information, refer to Section 310-00.
- Connect the FP module electrical connector.

- If equipped, install the FP module shield.
- To install, tighten to 9 Nm (80 lb-in).

- Install the Fuel Pump (FP) module access cover.

Vehicles equipped with Police Package
- Hand tighten only.

- Tighten to 55Nm (41 lb-ft).
All Vehicles
- Install the rear seat lower cushion. For additional information, refer to Section 501-10.
- Connect the battery ground cable. For additional information, refer to Section 414-01.
Fuel Level Sensor
Special Tool(s)
Removal
All Vehicles
WARNING: Do not smoke, carry lighted tobacco or have an open flame of any type when working on or near any fuel-related component. Highly flammable mixtures are always present and may be ignited. Failure to follow these instructions may result in serious personal injury.
WARNING: Do not carry personal electronic devices such as cell phones, pagers or audio equipment of any type when working on or near any fuel-related component. Highly flammable mixtures are always present and may be ignited. Failure to follow these instructions may result in serious personal injury.
WARNING: Before working on or disconnecting any of the fuel tubes or fuel system components, relieve the fuel system pressure to prevent accidental spraying of fuel. Fuel in the fuel system remains under high pressure, even when the engine is not running. Failure to follow this instruction may result in serious personal injury.
WARNING: When handling fuel, always observe fuel handling precautions and be prepared in the event of fuel spillage. Spilled fuel may be ignited by hot vehicle components or other ignition sources. Failure to follow these instructions may result in serious personal injury.
WARNING: Always disconnect the battery ground cable at the battery when working on an evaporative emission (EVAP) system or fuel-related component. Highly flammable mixtures are always present and may be ignited. Failure to follow these instructions may result in serious personal injury.
- Release the fuel system pressure. For additional information, refer to Section 310-00.
- Disconnect the battery ground cable. For additional information, refer to Section 414-01.
- Remove the rear seat lower cushion. For additional information, refer to Section 501-10.
Vehicles with Police Package

All Vehicles
- Remove the fuel level sensor access cover.
- NOTE: To avoid introducing contamination into the fuel tank use
compressed air to clean the fuel level sensor connections, couplings, flange
surfaces and the immediate surrounding area of any dirt or foreign material.
Disconnect the fuel level sensor electrical connector.
- NOTE: Place absorbent toweling in the immediate surrounding area
in case of fuel spillage.
NOTE: Carefully install the Fuel Tank Sender Unit Wrench to avoid damaging the fuel level sensor when removing the lock ring.
Install the Fuel Tank Sender Unit Wrench, remove the fuel level sensor lock ring.
- NOTE: The fuel level sensor must be handled carefully to avoid
damage to the float arm.
Carefully lift the fuel level sensor out of the fuel tank to access and disconnect the quick release coupling. For additional information, refer to Section 310-00.
- NOTE: The fuel level sensor must be handled carefully to avoid
damage to the float arm.
Remove the fuel level sensor from the fuel tank. Remove and discard the fuel level sensor O-ring seal.
Installation
All Vehicles
- NOTE: Make sure to install a new fuel level sensor O-ring seal.
To install, reverse the removal procedure.
- Make sure the alignment arrows on the fuel level sensor and the fuel tank meet before tightening the fuel level sensor lock ring.
- Tighten the fuel level sensor lock ring until it meets the stop tabs on the fuel tank.
Vehicles equipped with Police Package
- Hand tighten only.

- Tighten to 55Nm (41 lb-ft).

All Vehicles
- Install the rear seat lower cushion. For additional information, refer to Section 501-10.
- Connect the battery ground cable. For additional information, refer to Section 414-01.
Fuel Level Sender
Removal and Installation
WARNING: Do not smoke, carry lighted tobacco or have an open flame of any type when working on or near any fuel-related component. Highly flammable mixtures are always present and may be ignited. Failure to follow these instructions may result in serious personal injury.
WARNING: Do not carry personal electronic devices such as cell phones, pagers or audio equipment of any type when working on or near any fuel-related component. Highly flammable mixtures are always present and may be ignited. Failure to follow these instructions may result in serious personal injury.
WARNING: When handling fuel, always observe fuel handling precautions and be prepared in the event of fuel spillage. Spilled fuel may be ignited by hot vehicle components or other ignition sources. Failure to follow these instructions may result in serious personal injury.
WARNING: Always disconnect the battery ground cable at the battery when working on an evaporative emission (EVAP) system or fuel-related component. Highly flammable mixtures are always present and may be ignited. Failure to follow these instructions may result in serious personal injury.
- Remove either the Fuel Pump (FP) module or fuel level sensor assembly. For additional information, refer to Fuel Pump Module or Fuel Level Sensor in this section.
- Disconnect the fuel level sender electrical connector, depress the lock tab and slide the fuel level sender upwards and remove.
- To install, reverse the removal procedure.
Fuel Lines
Removal and Installation
WARNING: Do not smoke, carry lighted tobacco or have an open flame of any type when working on or near any fuel-related component. Highly flammable mixtures are always present and may be ignited. Failure to follow these instructions may result in serious personal injury.
WARNING: Do not carry personal electronic devices such as cell phones, pagers or audio equipment of any type when working on or near any fuel-related component. Highly flammable mixtures are always present and may be ignited. Failure to follow these instructions may result in serious personal injury.
WARNING: Before working on or disconnecting any of the fuel tubes or fuel system components, relieve the fuel system pressure to prevent accidental spraying of fuel. Fuel in the fuel system remains under high pressure, even when the engine is not running. Failure to follow this instruction may result in serious personal injury.
WARNING: When handling fuel, always observe fuel handling precautions and be prepared in the event of fuel spillage. Spilled fuel may be ignited by hot vehicle components or other ignition sources. Failure to follow these instructions may result in serious personal injury.
WARNING: Always disconnect the battery ground cable at the battery when working on an evaporative emission (EVAP) system or fuel-related component. Highly flammable mixtures are always present and may be ignited. Failure to follow these instructions may result in serious personal injury.
- Remove the fuel tank. For additional information, refer to Fuel Tank - L-Shaped or Fuel Tank - Saddle Type in this section.
- Remove the rear subframe. For additional information, refer to Section 502-00.
- Remove the EVAP canister. For additional information, refer to Section 303-13.
- Remove the muffler and tail pipe assembly. For additional information, refer to Section 309-00.
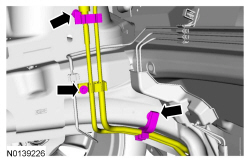
- Disconnect the EVAP canister purge valve-to-vapor tube quick connect coupling, and disconnect the fuel tube-to-fuel jumper tube quick connect coupling. For additional information, refer to Section 310-00.
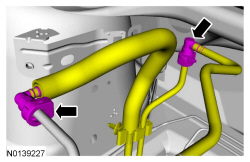
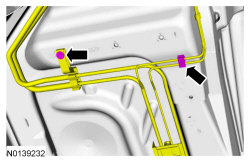
- Remove the fuel tube bundle retainer bolt and detach the fuel tube bundle retainers.
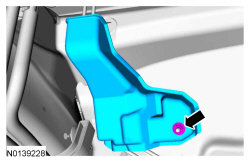
- Remove the brake line shield nut and brake line shield.
- To install, tighten to 9 Nm (80 lb-in).
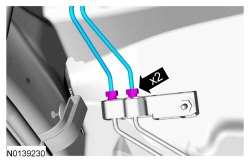
- Disconnect the 2 front-to-middle brake tube fittings.
- To install, tighten to 20 Nm (177 lb-in).
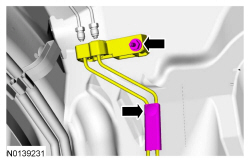
- Remove the fuel tube bundle retainer stud and detach the fuel tube
bundle retainer.
- To install, tighten to 20 Nm (177 lb-in).
- Remove the fuel tube bundle retainer bolt and detach the fuel tube
bundle retainer.
- To install, tighten to 20 Nm (177 lb-in).
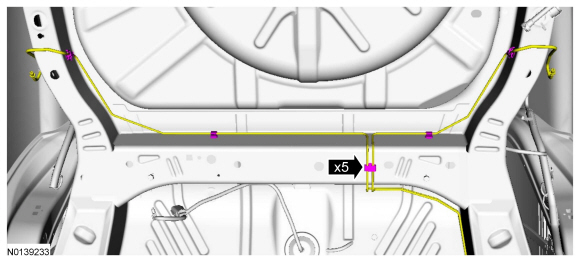
- Detach the 5 fuel tube bundle retainers.
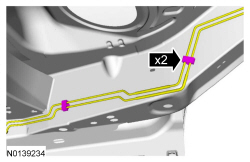
- Detach the 2 fuel tube bundle retainers.
- Remove the fuel tube bundle assembly.
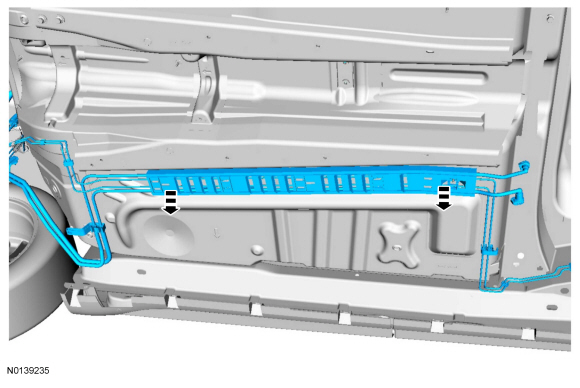
- To install, reverse the removal procedure.
 Fuel System - General Information
SPECIFICATIONS
General Specifications
Torque Specifications
DESCRIPTION AND OPERATION
Fuel System
2.0L Gasoline Turbocharged Direct Injection (GTDI)
The fuel system:
is a variable speed Cl ...
 Acceleration Control
SPECIFICATIONS
Torque Specifications
DESCRIPTION AND OPERATION
Acceleration Control
The acceleration controls consist of the accelerator pedal and sensor
assembly.
The engine management system elec ...
Other materials:
Power Brake Actuation
SPECIFICATIONS
Torque Specifications
DESCRIPTION AND OPERATION
Brake Booster
The power brake actuation system includes a vacuum sorce (engine manifold or
vacuum pump), vacuum assisted brake booster, vacuum check valve and a vacuum
supply tube. Vehicles equipped with 3.5L and 3.7L engines utilize ...
General information on radio frequencies
This device complies with part 15 of the FCC Rules and with Industry
Canada license-exempt RSS standard(s). Operation is subject to the
following two conditions: (1) This device may not cause harmful
interference, and (2) This device must accept any interference received,
including interference ...
Audio System
GENERAL INFORMATION
Radio Frequencies and Reception Factors
AM and FM frequencies are established by the Federal Communications
Commission (FCC) and the Canadian Radio and Telecommunications
Commission (CRTC). Those frequencies are:
AM: 530, 540–1700, 1710 kHz
FM: 87.9–107.7, 107.9 MHz
...
