SPECIFICATIONS
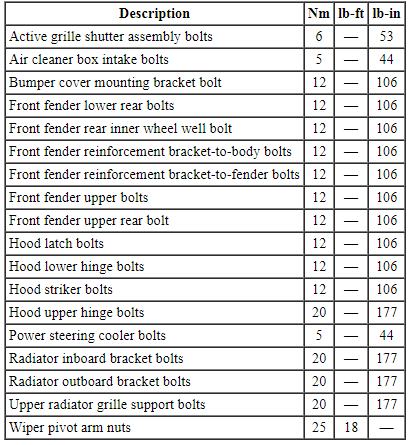
Torque Specifications
DESCRIPTION AND OPERATION
Active Grille Shutter System
Overview
The grille shutter system (when equipped) is comprised of the grille shutter assembly and the grille shutter actuator. The grille shutter system is primarily used to maximize fuel economy by reducing aerodynamic drag on the vehicle. The grille shutter system is also used to shorten engine warm-up time, increasing engine efficiency and providing heat to the vehicle occupants in a timely manner. The grille shutter actuator receives position commands from the PCM. The grille shutter system carries out a calibration sequence whenever the engine is started, fully opening and closing the shutters before being positioned in the programmed position as requested by the PCM.
PCM inputs/outputs used for controlling of grille shutters are the:
- ECT sensor
- IAT sensor
- A/C pressure transducer
- APP sensor
- ABS module (through the HS-CAN )
- Engine cooling fan motor
- Engine oil temperature
System Operation
System Diagram
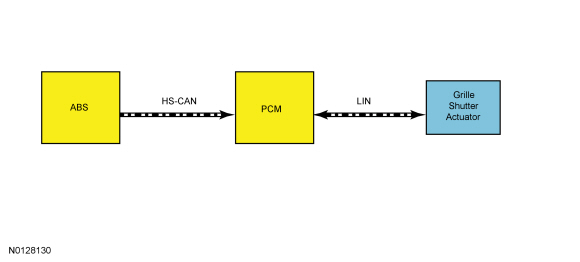
Network Message Chart
Module Network Input Messages - PCM

Grille Shutter
The grille shutter actuator positions the grille shutters based on commands from the PCM. The grille shutter moves 90 degrees from fully closed to fully open and, based on the position commanded by the PCM, is set in 1 of 16 positions (approximately 6 degrees between positions).
During normal operation, the grille shutter may be partially to fully open when the engine is off. When the engine is started and ambient temperature is above 1Âş C (34Âş F), a calibration of the grille shutter system occurs, which typically takes 15-20 seconds. The grille shutter system performs the calibration sequence by detecting the end positions, open and closed. The calibration sequence can begin in either direction, open or closed, and continues until it is successful or a fault is sensed. A long pause may occur between the 2 portions (open/close) of the calibration sequence. Calibration of the grille shutter system cannot be manually requested, it only occurs as determined by the grille shutter actuator. If certain faults are present (shutter blocked or actuator error), a recalibration is initiated in an attempt to resolve the problem. If the problem is not resolved after a calibrated number of attempts (usually 3 or 4), a timer starts and sets a DTC when the timer reaches a predetermined limit. Other faults also trigger a recalibration request, but not until a grille shutter DTC is set in the PCM.
The PCM communicates the desired position (open or closed) of the grille shutter based on various PCM inputs (vehicle speed, coolant temperature, ambient temperature, A/C system pressure, etc.). The PCM communicates to the grille shutter actuator via a LIN. The LIN supports bi-directional communication between the grille shutter actuator and PCM, allowing the grille shutter actuator to communicate position and fault information to the PCM.
The PCM sets grille shutter DTCs when the fault information is communicated by the grille shutter actuator for a predetermined amount of time. Any failures of the LIN for over 10 seconds continuously results in the grille shutter actuator positioning the grille shutter fully open. There is no indication to the driver of the vehicle when a fault with the grilled shutter system is present or a grille shutter DTC is set in the PCM.
Component Description
Grille Shutter Actuator
The grille shutter actuator is a smart motor which receives position requests from the PCM via the LIN. One of the grille shutter blinds connects to the grille shutter actuator using a retainer. The grille shutter actuator can be serviced individually or as an entire assembly, which includes the grille shutter, grille shutter actuator, retainer, housing and jumper harness.
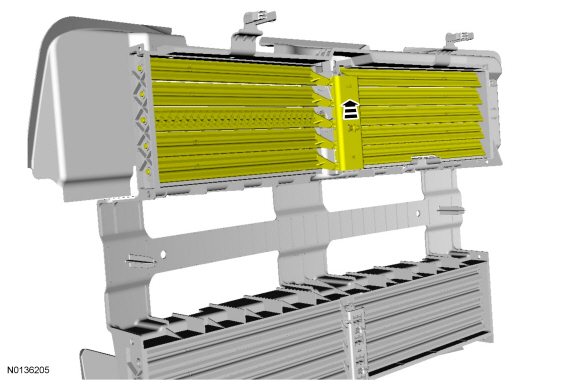
Grille Shutter
The grille shutter is comprised of shutter blinds which are linked to each other. One of the individual shutter blinds is fixed to the grille shutter actuator. When the grille shutter actuator moves, it moves the attached shutter which causes the other linked shutters to move. The grille shutter is serviced as an assembly (individual shutter blinds are not serviceable) or as an entire assembly, which includes the grille shutter, grille shutter actuator, retainer, housing and jumper harness.
DIAGNOSIS AND TESTING
Active Grille Shutter System
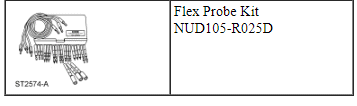
Special Tool(s)
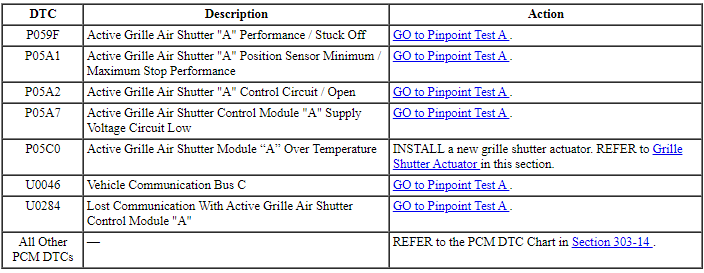
DTC Chart
Diagnostics in this manual assume a certain skill level and knowledge of Ford-specific diagnostic practices. Refer to Diagnostic Methods in Section 100-00 for information about these practices.
PCM DTC Chart
Preliminary Inspection
Before diagnosing or repairing the active grille shutter system, inspect the grille opening for any obstructions that can prohibit operation of the grille shutter.
Symptom Chart
Diagnostics in this manual assume a certain skill level and knowledge of Ford-specific diagnostic practices. Refer to Diagnostic Methods in Section 100-00 for information about these practices.
Symptom Chart

Pinpoint Tests
Pinpoint Test A: The Grille Shutter Is Inoperative Or Does Not Operate Correctly
Diagnostic Overview
Diagnostics in this manual assume a certain skill level and knowledge of Ford-specific diagnostic practices. Refer to Diagnostic Methods in Section 100-00 for information about these practices.
Refer to Wiring Diagrams Cell 33, Cooling Fan for schematic and connector information.
Normal Operation and Fault Conditions
Refer to Active Grille Shutter System for a description of the normal operation.
DTC Fault Trigger Conditions
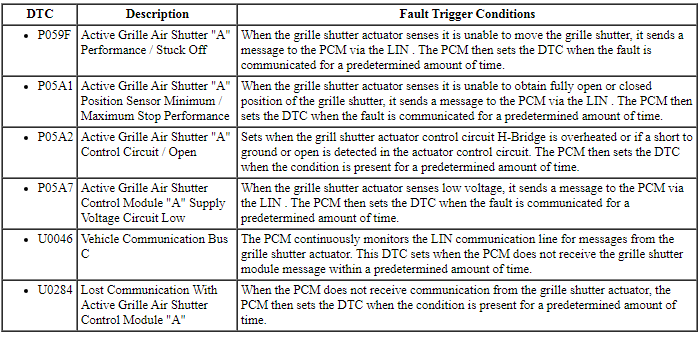
-
Possible Sources
- Wiring, terminals or connectors
- Grille shutter actuator
- Grille shutter linkage
- Grille shutters
- PCM
Visual Inspection and Diagnostic Pre-checks
Make sure the grille opening does not have any debris or other obstructions that prohibit operation of the grille shutter.
Make sure the grille shutter actuator electrical connector is not disconnected.
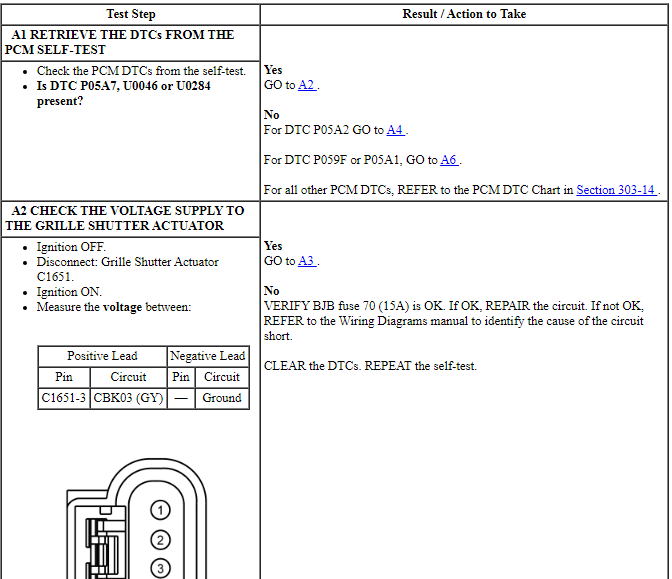
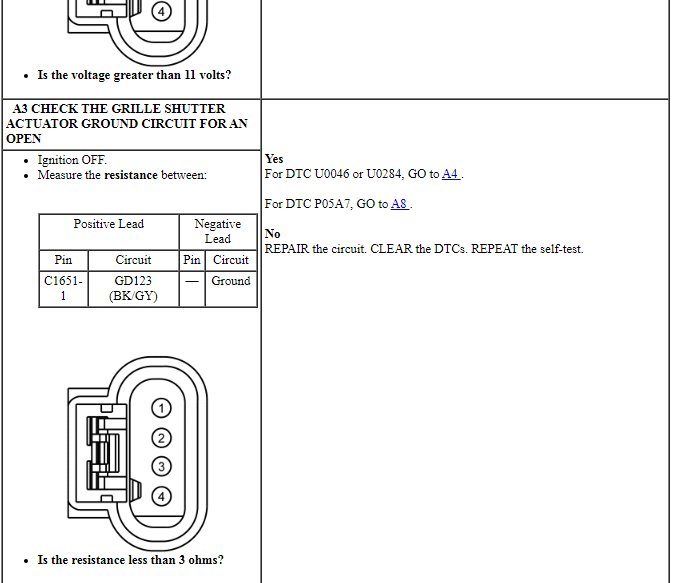
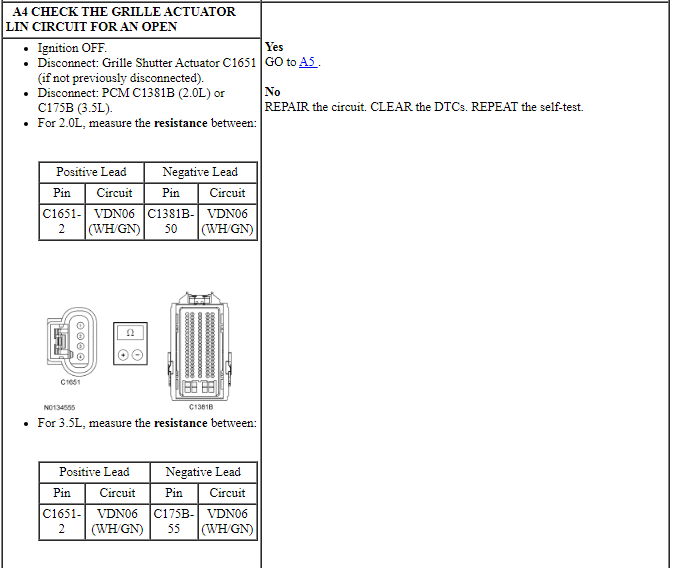
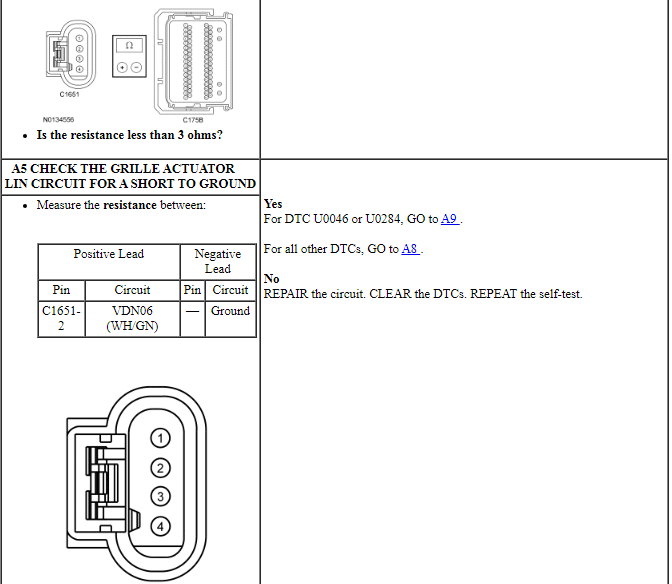
PINPOINT TEST A: THE GRILLE SHUTTER IS INOPERATIVE OR DOES NOT OPERATE CORRECTLY
NOTICE: Use the Flex Probe Kit for all test connections to prevent damage to the wiring terminals. Do not use standard multi-meter probes.
GENERAL PROCEDURES
Hood Alignment
- Open the hood.
- Loosen the 4 upper hood hinge bolts to the point where the hood slightly moves.
- Adjust the hood to align the hood-to-fender gaps. For additional information, refer to Section 501-35.
- Tighten the 4 upper hood hinge bolts.
- Tighten to 20 Nm (177 lb-in).
- NOTE: The adjustable hood bumpers are located in the hood.
Adjust the hood bumpers so that the hood fits flush to the fenders.
REMOVAL AND INSTALLATION
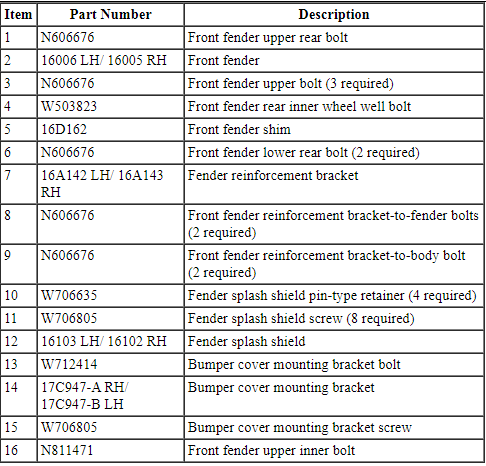
Front End Body Panels - Exploded View
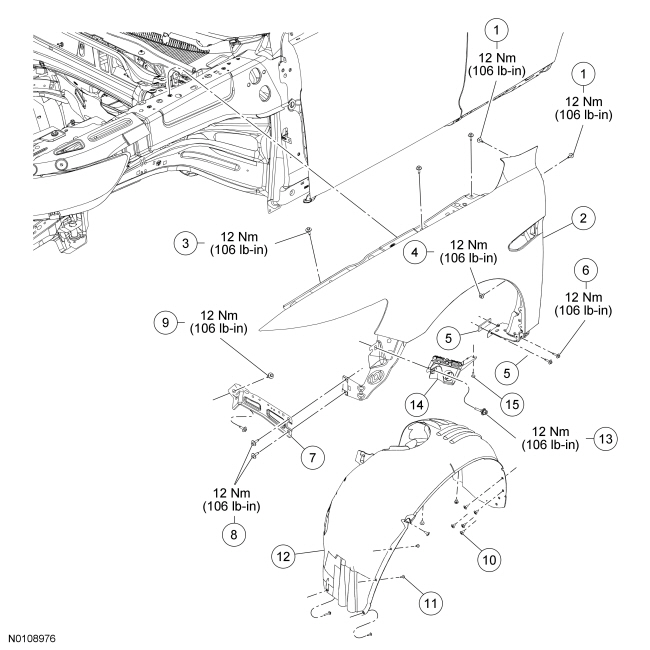
- For additional information, refer to the procedures in this section.
Fender Splash Shield
Removal and Installation
Both sides
- Remove the front wheel and tire. For additional information, refer to Section 204-04.
- Remove the 3 fender splash shield screws.
- Remove the 2 fender splash shield bolts.
- Remove the 10 fender splash shield pin-type retainers.
Right side
- Remove the 3 engine splash shield pin-type retainers.
Both sides
- Remove the fender splash shield.
- To install, reverse the removal procedure.
Fender
Removal and Installation
- Remove the front bumper cover. For additional information, refer to Section 501-19.
- Remove the front wheel and tire. For additional information, refer to Section 204-04.
- Remove the fender splash shield. For additional information, refer to Fender Splash Shield in this section.
- Remove the headlamp bolts.
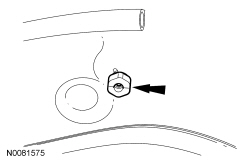
- Remove the bumper cover mounting bracket bolt.
- To install, tighten to 12 Nm (106 lb-in).
- Remove the bumper cover mounting bracket screw.
- NOTE: The rocker cover trim panel retainers are one-time use.
Release the rocker cover trim panel retainers, position rocker cover trim panel aside to gain access to the lower fender mounting bolts.
- NOTE: If shims are present during removal, be sure to reinstall
shims and check fender alignment.
Remove the 2 front fender lower rear bolts.
- To install, tighten to 12 Nm (106 lb-in).
- Remove the 2 front fender reinforcement bracket-to-fender bolts.
- To install, tighten to 12 Nm (106 lb-in).
- Remove the front fender rear inner wheel well bolt.
- To install, tighten to 12 Nm (106 lb-in).
- NOTE: The door must be open to remove the fender-to-fender
bracket bolt.
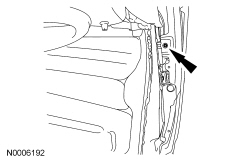
Remove the front fender upper rear bolt.
- To install, tighten to 12 Nm (106 lb-in).
- Remove the front fender upper inner bolt.
- To install, tighten to 12 Nm (106 lb-in).
- Remove the front fender upper bolts.
- To install, tighten to 12 Nm (106 lb-in).
- Remove the front fender.
- To install, reverse the removal procedure.
Cowl Panel Grille
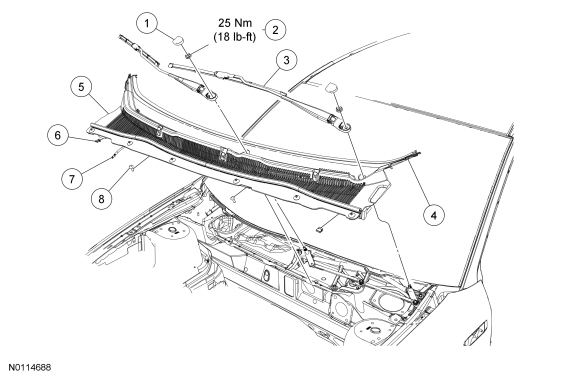
- Remove the wiper pivot arms. For additional information, refer to Section 501-16.
- Remove the cowl panel grille side pin-type retainers.
- Disconnect the windshield washer hose connector.
- Remove the 2 cowl panel grille retainer clips.
- Release the 2 cowl panel grille pin-type retainers.
- NOTICE: Failure to follow the removal instruction may result
in damaged retaining tabs and would require removal of the windshield glass.
Disconnect the cowl panel grille from the retaining strip on the cowl.
- Spread the retaining tabs.
- Start from the driver side and work the cowl trim panel off, moving across the panel from the LH to the RH side to remove.
- Remove the cowl panel grille.
- To install, reverse the removal procedure.
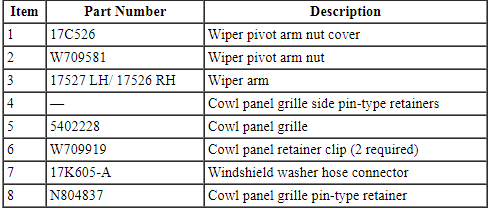
Radiator Grille Support
Removal and Installation
- With the vehicle in NEUTRAL, position it on a hoist. Refer to Section 100-02.
- Remove the 2 air cleaner box intake bolts.
- To install, tighten to 5 Nm (44 lb-in).
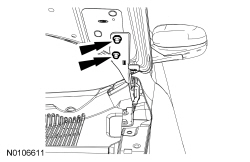
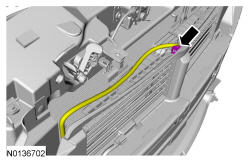
- Disconnect the hood security switch electrical connector.
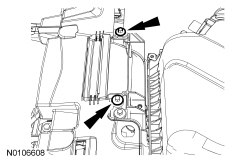
- Release the 3 engine wiring harness pushpin clips (2 shown) from the radiator support.
- Remove both headlamp assemblies. Refer to Section 417-01.
- If equipped, remove the grille shutter assembly. Refer to Grille Shutter Assembly in this section.
- Remove the front bumper. Refer to Section 501-19.
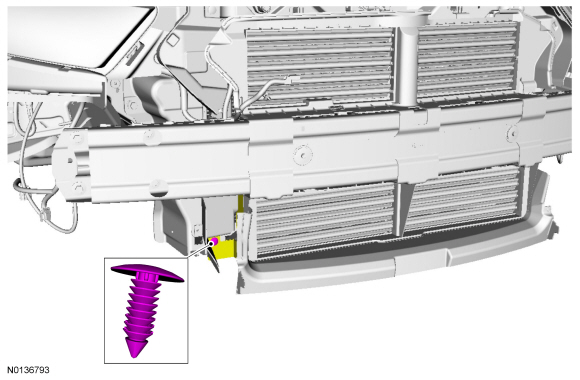
- Remove the LH and RH radiator side air deflector pushpins and remove the side air deflectors.
- Remove the front impact severity sensor and release the harness pushpin clips. Refer to Section 501-20B.
- Remove the hood latch bolts and place the latch and cable aside.
- To install, tighten to 12 Nm (106 lb-in).
- If equipped, remove the 2 power steering cooler bolts.
- To install, tighten to 5 Nm (44 lb-in).
- Release the power steering cooler hose pushpin clips from the radiator support. Position and support the power steering cooler under the radiator support.
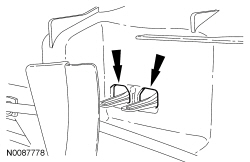
- Remove the 4 radiator bracket-to-frame outboard bolts and the 4 radiator
bracket-to-radiator support inboard bolts (4 each side).
- To install, tighten to 20 Nm (177 lb-in).
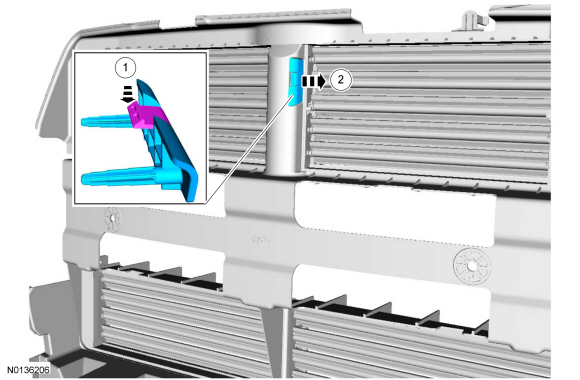
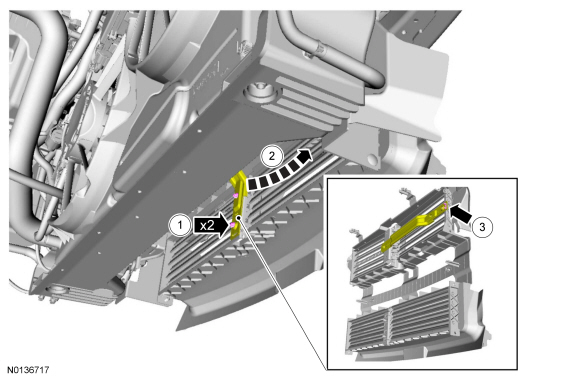
- NOTICE: When installing the cooling module retaining clips,
push the cooling module retaining clips toward the radiator grille support
until the clips are properly secured and a snap is heard. Failure to
properly secure the cooling module retaining clips may cause damage to the
radiator or the cooling module assembly.
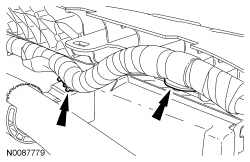
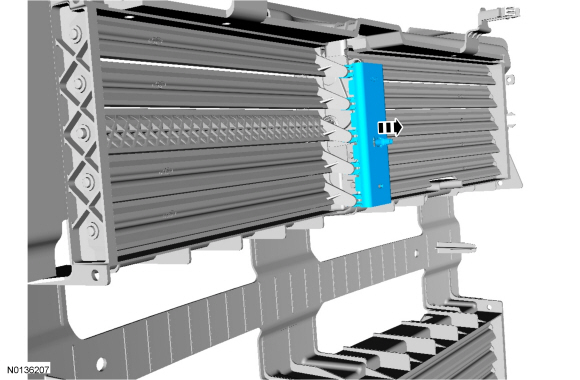
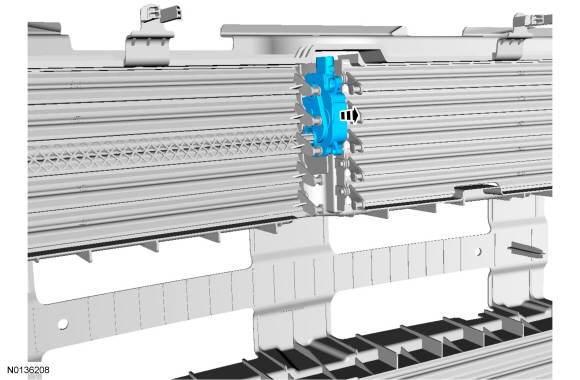
Release the cooling module retaining clips.
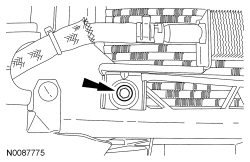
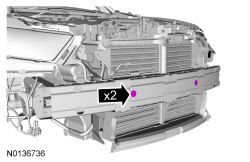
- Remove the 2 upper radiator grille support bolts.
- To install, tighten to 20 Nm (177 lb-in).
- Remove the radiator support.
- To install, reverse the removal procedure.
- Transfer all necessary components.
Grille Shutter Actuator
Removal and Installation
- Remove the grille shutter assembly. Refer to Grille Shutter Assembly.

- To install, reverse the removal procedure.
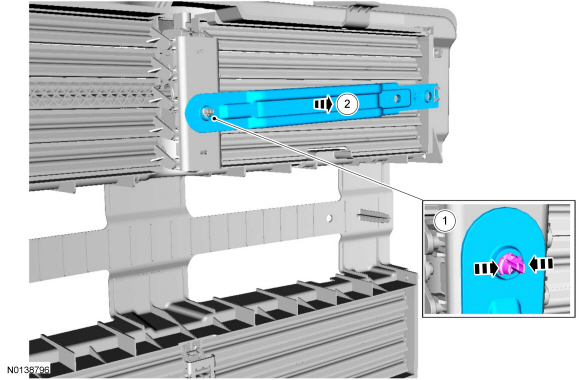
Grille Shutter Assembly
Removal and Installation
NOTE: Removal steps in this procedure may contain installation details.
- Remove the front bumper cover. Refer to Section 501-19.
-
- To install, tighten to 6 Nm (53 lb-in).
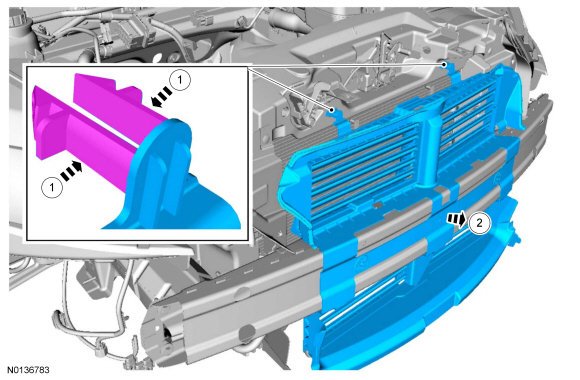
- To install, reverse the removal procedure.
Grille Shutter Linkage
Removal and Installation
- Remove the grille shutter assembly. Refer to Grille Shutter Assembly.
- To install, reverse the removal procedure.
 Body System - General Information
SPECIFICATIONS
Material
DESCRIPTION AND OPERATION
Insulation
Insulation is used as a sound-deadener to reduce exterior road and powertrain
noises from the interior of the vehicle. Mastic insulators ...
 Body Closures
SPECIFICATIONS
Torque Specifications
GENERAL PROCEDURES
Door Adjustment - Front
Loosen the front door hinge-to-front door bolts until the front door is
able to move slightly.
Align the front d ...
Other materials:
Using summer tires
Safe operation of your vehicle requires that your tires are properly
inflated. Remember that a tire can lose up to half of its air pressure
without appearing flat.
Every day before you drive, check your tires. If one looks lower than the
others, use a tire gauge to check pressure of all tires ...
Diagnosis and Testing
External Controls
Inspection and Verification
Verify the customer concern by operating the system.
Visually inspect for obvious signs of mechanical or electrical damage.
If the concern is not visually evident, verify the symptom. GO
to Symptom Chart.
Visual Inspection Chart
DTC Char ...
Sun visors
Slide-On-Rod
Rotate the visor toward the side
window and extend it rearward for
extra sunlight coverage.
Retract the visor before moving it
back toward the windshield and
storing it.
Illuminated Visor Vanity Mirror
Lift the cover to switch on the
lamp. ...
