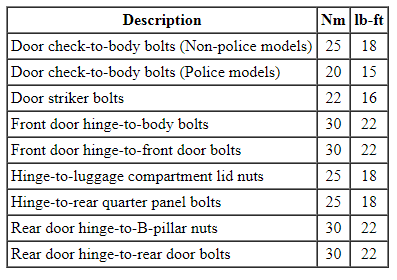
SPECIFICATIONS
Torque Specifications
GENERAL PROCEDURES
Door Adjustment - Front
- Loosen the front door hinge-to-front door bolts until the front door is able to move slightly.
- Align the front door.
- Align the front door body angles to the rear door.
- Be sure that the front door is flush to the body.
- Tighten the front door hinge-to-front door bolts.
- Tighten to 30 Nm (22 lb-ft).
- Loosen the front door striker bolts until the striker is able to move slightly.
- Align the front door striker to the front door.
- Tighten the striker bolts.
- Tighten to 22 Nm (16 lb-ft).
Door Adjustment - Rear
- Loosen the rear door hinge-to-rear door bolts until the rear door is able to move slightly.
- Align the rear door.
- Align the rear door body angles to the rear quarter panel.
- Be sure that the rear door is flush to the body.
- Tighten the rear door hinge-to-rear door bolts.
- Tighten to 30 Nm (22 lb-ft).
- Loosen the rear door striker bolts until the striker is able to move slightly.
- Align the rear door striker to the rear door.
- Tighten the striker bolts.
- Tighten to 22 Nm (16 lb-ft).
- Adjust the front door. For additional information, refer to Door Adjustment - Front in this section.
REMOVAL AND INSTALLATION
Door
NOTE: Front door shown, rear door similar.

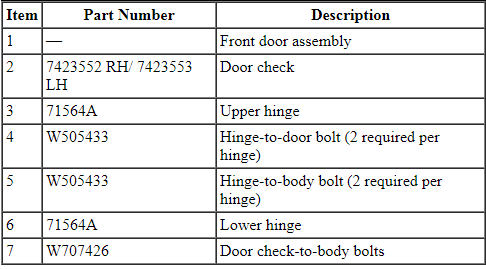
Removal and Installation
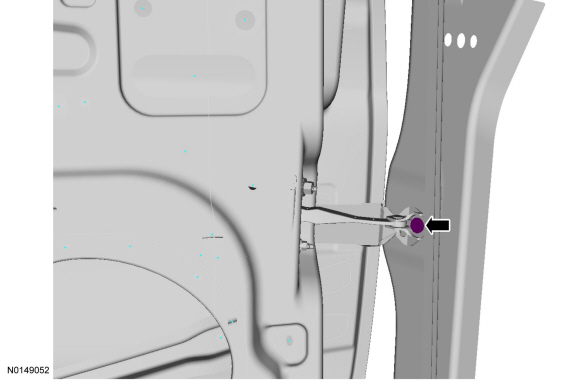
- Disconnect the front door electrical connector at the A-pillar.
- NOTE: On police vehicles an extra strap will be present.
Remove the door check bolts.
- To install, tighten to 25 Nm (18 lb-ft). (Non-police models)
- To install, tighten to 20 Nm (15 lb-ft). (Police models)
- NOTICE: To minimize the possibility of cross threading, hand
start all fasteners during installation.
NOTICE: To avoid damaging the door, this step requires an assistant.
With a wax pencil, mark the position of each hinge and remove the hinge-to-door bolts.- To install, tighten to 30 Nm (22 lb-ft).
- Remove the front door.
- NOTE: If installing a new door, transfer parts as necessary.
To install, reverse the removal procedure.
- Verify door adjustment. For additional information, refer Door Adjustment - Front or Door Adjustment - Rear in this section.
Luggage Compartment Lid
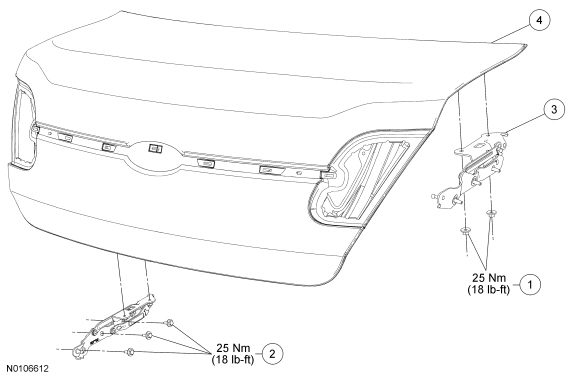
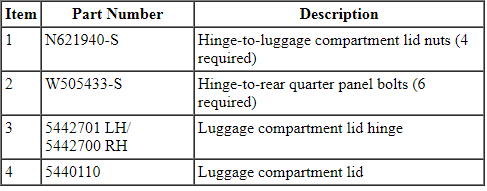
Removal and Installation
- Open the luggage compartment lid.
- Disconnect the electrical connectors.
- With the help of an assistant, remove the hinge-to-luggage compartment
lid nuts.
- To install, tighten to 25 Nm (18 lb-ft).
- With the help of an assistant, remove the luggage compartment lid.
- To install, reverse the removal procedure.
 Front End Body Panels
SPECIFICATIONS
Torque Specifications
DESCRIPTION AND OPERATION
Active Grille Shutter System
Overview
The grille shutter system (when equipped) is comprised of the grille shutter
assembly and the gri ...
 Interior Trim and Ornamentation
SPECIFICATIONS
Material
Torque Specifications
DIAGNOSIS AND TESTING
Sunshade
Special Tool(s)
Principles of Operation
Power Sunshade
The power sunshade system consists of the following:
Sunshade s ...
Other materials:
General information
See the following sections for directions on how to properly use safety
restraints for children.
WARNING: Always make sure your child is secured properly in a
device that is appropriate for their height, age and weight. Child
safety restraints must be bought separately from your vehicle. Failure ...
Climate features
Press the lower right corner on the touchscreen to access your climate
control features. Depending on your vehicle line and option package,
your climate screen may look different from the screen shown here.
A. Power: Touch to switch the system off and on. Outside air cannot
enter your vehicle ...
Anti-Theft - Passive Anti-Theft System (PATS), Without Intelligent Access (IA)
DESCRIPTION AND OPERATION
Anti-Theft
Overview
PATS deters the vehicle from theft by preventing the engine from starting
unless a programmed PATS key is in the ignition. PATS does not disable an
already running engine.
System Operation
System Diagram
Network Message Chart
...
