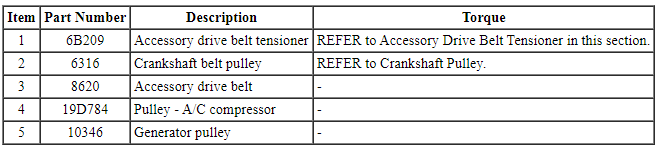
SPECIFICATIONS
Torque Specifications
DESCRIPTION AND OPERATION
Accessory Drive
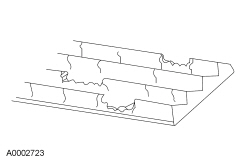
Component Location
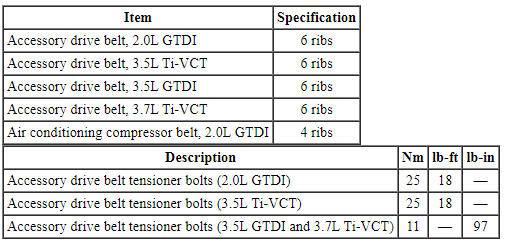
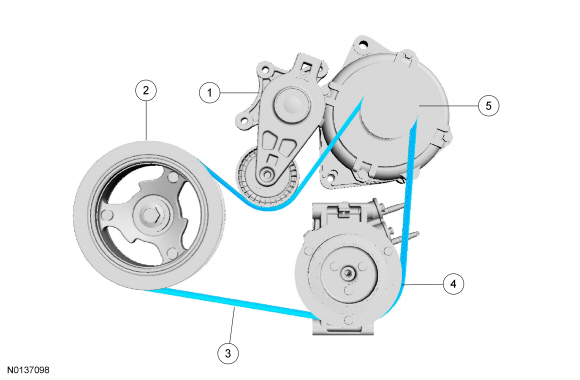
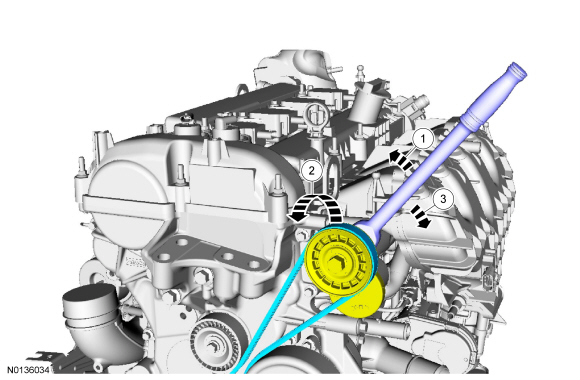
2.0L GTDI
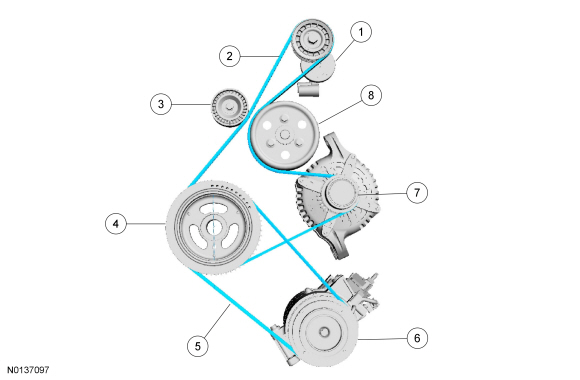
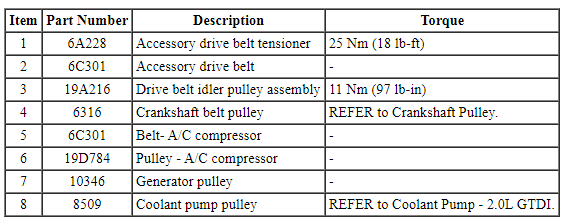
3.5L TiVCT, 3.7L TiVCT and 3.5L GTDI
Overview
The accessory drive system provides power to operate components which power other systems. These could include components such as the generator, water pump and A/C compressor. Each of these components is equipped with a pulley which is driven by the accessory drive belt. The accessory drive belt is driven by the engine crankshaft pulley.
The automatic belt tensioner maintains correct belt tension and compensates for component wear and changes in system load. System load changes can be caused by the A/C compressor clutch engaging or disengaging or demand changes on other systems powered by the accessory drive belt. Automatic belt tensioners are calibrated to provide the correct amount of tension to the belt for a given accessory drive system. Unless a spring or damping band within the tensioner assembly breaks or some other mechanical part of the tensioner fails, there is no need to check the tensioner for correct tension.
To maintain correct operation of this system, it is critical that the correct length drive belt be installed. The pulleys must also be correctly aligned and kept clean.
DIAGNOSIS AND TESTING
Accessory Drive
Inspection and Verification
NOTICE: Under no circumstances should the accessory drive belt, tensioner or pulleys have any fluids or belt dressing applied to them as damage to the belt material and tensioner damping mechanism may occur.
- Verify the customer concern by operating the system.
- Visually inspect for obvious signs of mechanical damage.
Visual Inspection Chart
Mechanical
- Drive belt cracking/chunking/wear
- Belt/pulley contamination
- Incorrect accessory drive belt
- Incorrectly routed accessory drive belt
- Pulley misalignment or excessive pulley runout
- Loose or mislocated hardware
- Incorrectly routed power steering tubes (rubbing)
- Loose accessory drive belt
- Damaged pulleys
- Tensioner arm misalignment
Belt Tensioner With Belt Length Indicator
NOTE: Modular engine (without A/C) belt tensioner shown, others similar.
NOTE: Belt tensioner is shown in the free-state position against the arm travel stops.
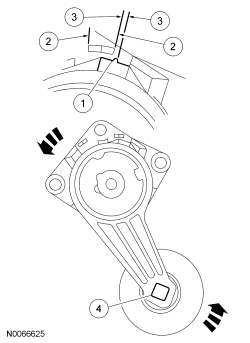
- Check that the belt length indicator, if equipped, on the belt tensioner is in the acceptable belt installation and wear range. If the indicator is in the belt replacement range, either an incorrect belt is installed or the belt is worn beyond the service limit. Install a new belt as necessary.
- Eliminate all other non-belt related noises that could cause belt misdiagnosis, such as A/C compressor engagement chirp, A/C slugging noise, power steering cavitations at low temperatures or generator whine.
- If a concern is found, correct the condition before proceeding to the next step.
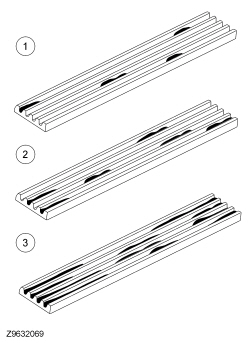
V-Ribbed Serpentine Drive Belt With Cracks Across Ribs

- Check the belt for cracks. Up to 15 cracks in a rib over a distance of 100 mm (4.0 in) can be considered acceptable. If cracks exceed this standard, install a new belt.
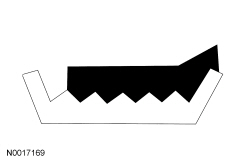
V-Ribbed Serpentine Belt With Piling
NOTE: Piling is an excessive buildup in the V-grooves of the belt.
- The condition of the V-ribbed drive belt should be compared against the
illustration and appropriate action taken.
- Small scattered deposits of rubber material. This is not a concern, therefore, installation of a new belt is not required.
- Longer deposit areas building up to 50% of the rib height. This is not considered a durability concern, but it can result in excessive noise. If noise is apparent, install a new belt.
- Heavy deposits building up along the grooves resulting in a possible noise and belt stability concern. If heavy deposits are apparent, install a new belt.
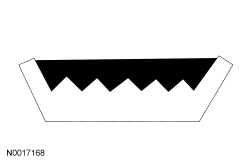
V-Ribbed Serpentine Belt With Chunks of Rib Missing
- There should be no chunks missing from the belt ribs. If the belt shows any evidence of this, install a new accessory drive belt.
- If the concern is not visually evident, verify the symptom and GO to Symptom Chart.
Symptom Chart

Component Tests
Drive Belt - Noise/Flutter
NOTICE: Under no circumstances should the accessory drive belt, tensioner or pulleys have any fluids or belt dressing applied to them as damage to the belt material and tensioner damping mechanism may occur.
Drive belt chirp occurs due to pulley misalignment or excessive pulley runout. It can be the result of a damaged or incorrectly aligned grooved pulley.
To correct, determine the area where the noise comes from. Check each of the pulleys in that area with a straightedge to the crankshaft pulley. Look for accessory pulleys out of position in the fore/aft direction or at an angle to the straightedge.
Drive belt squeal may be an intermittent or constant noise that occurs when the drive belt slips on an accessory pulley under certain conditions.
A short intermittent squeal may occur during engine start up and shut down or during very rapid engine acceleration and decelerations, such as:
- Wide Open Throttle (WOT) 1-2 and 2-3 shifts or 2-3 and 3-4 back-out shifts on automatic transmissions.
- WOT 1-2 and 2-3 shifts and any combination of rapid downshifting on manual transmissions.
These special short-term transient events are expected, and are due to the higher system inertias required to meet the electrical and cooling demands on today's vehicle systems. Constant or reoccurring drive belt squeal can occur:
- if the A/C discharge pressure goes above specifications:
- the A/C system is overcharged.
- the A/C condenser core airflow is blocked.
- the A/C anti-slugging strategy executes after a long hot heat soak.
- if the A/C off equalized pressure (the common discharged and suction pressure that occurs after several minutes) exceeds specifications.
- if any of the accessories or idler pulley(s) are damaged or have a worn or damaged bearing. All accessories should be rotatable by hand in the unloaded condition. If not, inspect the accessory.
- if there is evidence of fluid contamination on the accessory drive belt. When the drive belt has been exposed to fluid contamination during vehicle operation, such as leaks from the power steering system, A/C system or cooling system, clean all pulleys with soap and water, rinse with clean water and install a new accessory drive belt. If the drive belt has been exposed to fluids in a localized area during routine vehicle service, such as replacement of hoses or fluids, the drive belt and pulleys should be washed with soap and water immediately (prior to starting the engine), and rinsed with clean water.
- if the accessory drive belt is too long. A drive belt that is too long will allow the accessory drive belt tensioner arm to go all the way to the arm travel stop under certain load conditions, which will release tension to the drive belt. If the accessory drive belt tensioner indicator is outside the normal installation wear range window, install a new accessory drive belt.
- NOTE: The accessory drive belt tensioner arm should rotate freely
without binding.
Install a new accessory drive belt tensioner if the drive belt tensioner is worn or damaged.
Drive Belt - Incorrect Installation
NOTICE: Incorrect accessory drive belt installation will cause excessive drive belt wear and may cause the drive belt to come off the pulleys.
Non-standard accessory drive belts can track differently or incorrectly. If an accessory drive belt tracks incorrectly, install a new accessory drive belt to avoid performance failure or loss of the drive belt.
Incorrect Installation
Correct Installation
With the engine running, check accessory drive belt tracking on all pulleys. If the edge of the accessory drive belt rides beyond the edge of the pulleys, noise and premature wear will occur. Make sure the accessory drive belt rides correctly on the pulley. If an accessory drive belt tracking condition exists, proceed with the following:
- Visually check the accessory drive belt tensioner for damage and wear, especially the mounting pad surface and arm alignment. If the accessory drive belt tensioner is not installed correctly, the mounting surface pad will be out of position. If the tensioner arm is worn, the arm will be out of alignment. Either of these conditions will result in chirp and squeal noises.
- With the engine running, visually observe the grooves in the pulleys (not the pulley flanges or the pulley forward faces) for excessive wobble. Install new components as necessary.
- Check all accessories, mounting brackets and the accessory drive belt tensioner for any interference that would prevent the component from mounting correctly. Correct any interference condition and recheck the accessory drive belt tracking.
- Tighten all accessories, mounting brackets and accessory drive belt tensioner retaining hardware to specification. Recheck the accessory drive belt tracking.
Belt Tensioner - Mechanical
The only mechanical check that needs to be made is a check for tensioner stick, grab or bind.
- With the engine off, check routing of the accessory drive belt. Refer to the illustrations under Accessory Drive in the Description and Operation portion of this section.
- NOTE: The accessory drive belt tensioner spring is very strong
and requires substantial force to release.
Using a suitable, commercially available serpentine belt tensioner release tool, release the tension on the belt and detach the accessory drive belt from the tensioner. Carry out the following tests:
- Using the release tool, move the tensioner from its relaxed position, through its full stroke and back to the relaxed position to make sure there is no stick, grab or bind, and to make sure that there is tension on the tensioner spring.
- Rotate the tensioner pulley by hand and check for a binding, contaminated or seized condition.
- Inspect the area surrounding the accessory drive belt tensioner for oil leaks or contamination and repair any leaks.
- If the accessory drive belt tensioner does not meet the criteria in the previous step, install a new tensioner. If the accessory drive belt tensioner meets the criteria in the previous step, proceed to testing the tensioner dynamically.
- If the tensioner is saturated with oil and grease internally, install a new tensioner.
Belt Tensioner - Dynamics
The accessory drive belt tensioner can be checked dynamically as follows:
- With the engine running, observe the accessory drive belt tensioner movement. The accessory drive tensioner should move (respond) when the A/C clutch cycles (if equipped), or when the engine is accelerated rapidly. If the accessory drive belt tensioner movement is excessive without A/C clutch cycling or engine acceleration, check belt rideout. Excessive belt rideout (uneven depth of grooves in the belt) can cause excessive accessory drive belt tensioner movement. Check rideout condition by installing a new belt. If excessive accessory drive belt tensioner movement still exists, install a new accessory drive belt tensioner.
REMOVAL AND INSTALLATION
Accessory Drive Belt - 2.0L GTDI
NOTICE: Under no circumstances should the accessory drive belt, tensioner or pulleys be lubricated as potential damage to the belt material and tensioner damping mechanism will occur. Do not apply any fluids or belt dressing to the accessory drive belt or pulleys.
- With the vehicle in NEUTRAL, position it on a hoist. For additional information, refer to Section 100-02.
- Remove the air conditioning A/C compressor belt. For additional information, refer to Air Conditioning (A/C) Compressor Belt in this section.
- Remove the accessory drive belt.
- NOTE: After installation, make sure the accessory drive belt is
correctly seated on all pulleys.
To install, reverse the removal procedure.
Accessory Drive Belt - 3.5L GTDI
Removal
NOTICE: Under no circumstances should the accessory drive belt, tensioner or pulleys be lubricated as potential damage to the belt material and tensioner damping mechanism will occur. Do not apply any fluids or belt dressing to the accessory drive belt or pulleys.
- With the vehicle in NEUTRAL, position it on a hoist. For additional information, refer to Section 100-02.
- Remove the 4 pin-type retainers and position the splash shield aside.
- Working from under the vehicle, remove the accessory drive belt.

- Working from under the vehicle, rotate the accessory drive belt tensioner clockwise and remove the accessory drive belt.
Installation
- NOTE: After installation, make sure the accessory drive belt is
correctly seated on all pulleys.
To install, reverse the removal procedure.
Accessory Drive Belt - 3.5L Ti-VCT
Removal
NOTICE: Under no circumstances should the accessory drive belt, tensioner or pulleys be lubricated as potential damage to the belt material and tensioner damping mechanism will occur. Do not apply any fluids or belt dressing to the accessory drive belt or pulleys.
- With the vehicle in NEUTRAL, position it on a hoist. For additional information, refer to Section 100-02.
- Working from the top of the vehicle, rotate the accessory drive belt tensioner clockwise and remove the accessory drive belt from the generator pulley.

- Remove the 4 pin-type retainers and position the splash shield aside.
- Working from under the vehicle, remove the accessory drive belt.

Installation
- NOTE: After installation, make sure the accessory drive belt is
correctly seated on all pulleys.
To install, reverse the removal procedure.
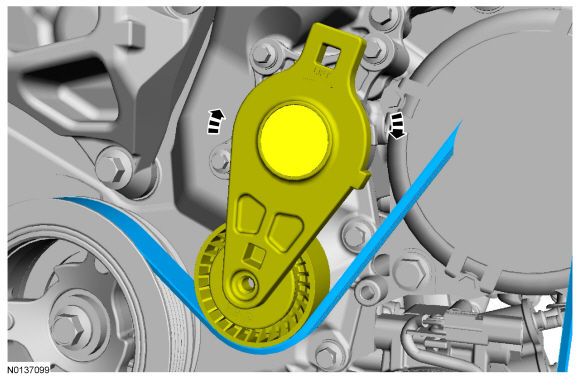
Accessory Drive Belt Tensioner - 2.0L GTDI
NOTICE: Under no circumstances should the accessory drive belt, tensioner or pulleys be lubricated as potential damage to the belt material and tensioner damping mechanism will occur. Do not apply any fluids or belt dressing to the accessory drive belt or pulleys.
NOTE: Removal steps in this procedure may contain installation details.
- Remove the accessory drive belt from the tensioner.

- Remove the 3 bolts and the tensioner.
- To install, tighten to 25Nm (18 lb-ft).
- NOTE: After installation, make sure the accessory drive belt is
correctly seated on all pulleys.
To install, reverse the removal procedure.
Accessory Drive Belt - 3.7L Ti-VCT
Removal
NOTICE: Under no circumstances should the accessory drive belt, tensioner or pulleys be lubricated as potential damage to the belt material and tensioner damping mechanism will occur. Do not apply any fluids or belt dressing to the accessory drive belt or pulleys.
- With the vehicle in NEUTRAL, position it on a hoist. For additional information, refer to Section 100-02.
- Working from the top of the vehicle, rotate the accessory drive belt tensioner clockwise and remove the accessory drive belt from the generator pulley.

- Remove the 4 pin-type retainers and position the splash shield aside.
- Working from under the vehicle, remove the accessory drive belt.

Installation
- NOTE: After installation, make sure the accessory drive belt is
correctly seated on all pulleys.
To install, reverse the removal procedure.
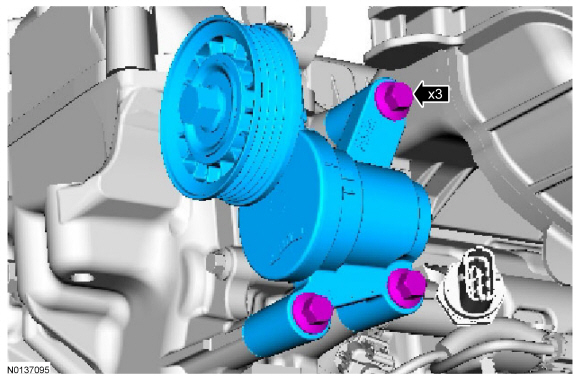
Accessory Drive Belt Tensioner - 3.5L GTDI
Removal
NOTICE: Under no circumstances should the accessory drive belt, tensioner or pulleys be lubricated as potential damage to the belt material and tensioner damping mechanism will occur. Do not apply any fluids or belt dressing to the accessory drive belt or pulleys.
- With the vehicle in NEUTRAL, position it on a hoist. For additional information, refer to Section 100-02.
- Remove the 4 pin-type retainers and position the splash shield aside.
- Working from under the vehicle, rotate the accessory drive belt tensioner clockwise and remove the accessory drive belt.

- Remove the 3 bolts and the accessory drive belt tensioner.
- To install, tighten to 11 Nm (97 lb-in).

Installation
- NOTE: After installation, make sure the accessory drive belt is
correctly seated on all pulleys.
To install, reverse the removal procedure.
Accessory Drive Belt Tensioner - 3.5L Ti-VCT
Removal
NOTICE: Under no circumstances should the accessory drive belt, tensioner or pulleys be lubricated as potential damage to the belt material and tensioner damping mechanism will occur. Do not apply any fluids or belt dressing to the accessory drive belt or pulleys.
- With the vehicle in NEUTRAL, position it on a hoist. For additional information, refer to Section 100-02.
- Working from the top of the vehicle, rotate the accessory drive belt tensioner clockwise and remove the accessory drive belt from the generator pulley.

- Remove the 4 pin-type retainers and position the splash shield aside.

- Remove the 3 bolts and the accessory drive belt tensioner.
- To install, tighten to 25 Nm (18 lb-ft).

Installation
- NOTE: After installation, make sure the accessory drive belt is
correctly seated on all pulleys.
To install, reverse the removal procedure.
Accessory Drive Belt Tensioner - 3.7L Ti-VCT
Removal
NOTICE: Under no circumstances should the accessory drive belt, tensioner or pulleys be lubricated as potential damage to the belt material and tensioner damping mechanism will occur. Do not apply any fluids or belt dressing to the accessory drive belt or pulleys.
- With the vehicle in NEUTRAL, position it on a hoist. For additional information, refer to Section 100-02.
- Working from the top of the vehicle, rotate the accessory drive belt tensioner clockwise and remove the accessory drive belt from the generator pulley.

- Remove the 4 pin-type retainers and position the splash shield aside.

- Remove the 3 bolts and the accessory drive belt tensioner.
- To install, tighten to 11 Nm (97 lb-in).

Installation
- NOTE: After installation, make sure the accessory drive belt is
correctly seated on all pulleys.
To install, reverse the removal procedure.
Air Conditioning (A/C) Compressor Belt
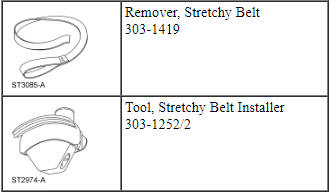
Special Tool(s)
Removal
NOTICE: Under no circumstances should the accessory drive belt, tensioner or pulleys be lubricated as potential damage to the belt material and tensioner damping mechanism will occur. Do not apply any fluids or belt dressing to the accessory drive belt or pulleys.
- With the vehicle in NEUTRAL, position it on a hoist. For additional information, refer to Section 100-02.
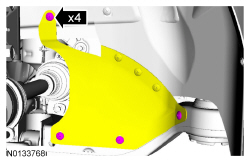
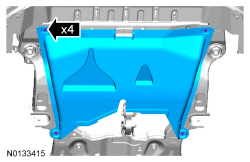
- Loosen the 4 retainers and remove the underbody shield.

- Remove the 4 pin-type retainers and position the splash shield aside.

- NOTE: Typical application shown.
Remove the A/C compressor belt.
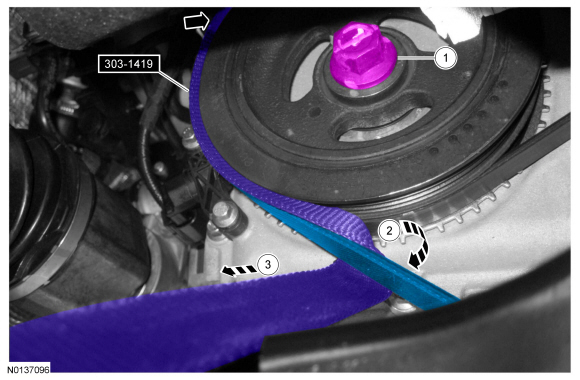
- By turning the crankshaft pulley bolt clockwise, feed the Stretchy Belt Tool on to the crankshaft pulley approximately 90 degrees.
- Fold the Stretchy Belt Tool under the inside of the A/C compressor belt as shown.
- In one quick motion, firmly pull the Stretchy Belt Remover out of the RH fender well, removing the A/C compressor belt.
Installation
NOTICE: Under no circumstances should the accessory drive belt, tensioner or pulleys be lubricated as potential damage to the belt material and tensioner damping mechanism will occur. Do not apply any fluids or belt dressing to the accessory drive belt or pulleys.
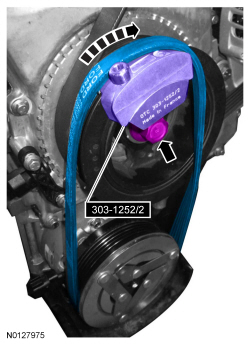
- NOTE: Typical application shown.
NOTE: After installation, make sure the A/C compressor belt is correctly seated on the crankshaft and the A/C compressor pulleys.
Position the A/C compressor belt onto the A/C compressor pulley and around the special tool on the crankshaft pulley. Make sure that the belt is engaged with the crankshaft pulley and rotate the crankshaft clockwise to install the A/C compressor belt.
- Position back the splash shield and install the 4 retainers.

- Install the underbody shield and the 4 retainers.
 Fuel Charging and Controls - 3.7L Ti-VCT
SPECIFICATIONS
Material
Torque Specifications
DESCRIPTION AND OPERATION
Fuel Charging and Controls
Component Locations
WARNING: Do
not smoke, carry lighted tobacco or have an open flame of any type ...
 Starting System
SPECIFICATIONS
General Specifications
Torque Specifications
DESCRIPTION AND OPERATION
Starting System
Starting System - without Push Button Start
Overview
The starter system controls the cranking o ...
Other materials:
Driveshaft
SPECIFICATIONS
Torque Specifications
DESCRIPTION AND OPERATION
Driveshaft
NOTE: All driveshaft assemblies are balanced. If undercoating the
vehicle, protect the driveshaft to prevent overspray of any undercoating
material.
The driveshaft assembly consists of the following:
Rubber-isolat ...
Power Brake Actuation
SPECIFICATIONS
Torque Specifications
DESCRIPTION AND OPERATION
Brake Booster
The power brake actuation system includes a vacuum sorce (engine manifold or
vacuum pump), vacuum assisted brake booster, vacuum check valve and a vacuum
supply tube. Vehicles equipped with 3.5L and 3.7L engines utilize ...
Installing child seats
Child Seats
Use a child safety seat (sometimes
called an infant carrier, convertible
seat, or toddler seat) for infants,
toddlers or children weighing
40 pounds (18 kilograms) or less
(generally age four or younger).
Using Lap and Shoulder Belts
WARNING: Airbags can kill or injure a child ...
