Remote Keyless Entry (RKE) Transmitter Programming
NOTE: The Remote Keyless Entry (RKE) transmitter of the Integrated Keyhead Transmitter (IKT) is programmed automatically during the Passive Anti-Theft System (PATS) programming. For information on programming the IKT keys, refer to the appropriate key programming procedure in Section 419-01B. This procedure is only for programming conventional keyfobs to IKT -equipped vehicles.
NOTE: All RKE transmitters must be programmed at the same time.
NOTE: Do not apply the brake pedal during this sequencing. Doing so ends the sequence and the transmitters are not programmed.
- Electronically unlock the door locks using the door lock control switch.
- Cycle the ignition switch from OFF to RUN 8 times in rapid succession (within 10 seconds), with the eighth turn ending in RUN. If the module successfully enters program mode, it locks and then unlocks all the doors.
- NOTE: If no action is taken within 20 seconds after a transmitter
has been programmed, the programming sequence ends (the doors lock and
unlock to confirm that programming is complete).
Within 20 seconds, press any button on the RKE transmitter to be programmed. The doors lock and then unlock to confirm that each RKE transmitter is programmed. Repeat this step for each RKE transmitter.
- Exiting the programming mode is accomplished if:
- the key transitions to OFF.
- twenty seconds have passed since entering programming mode or since the last RKE transmitter was programmed.
- the maximum number (4) of RKE transmitters have been programmed.
- Check the operation of the transmitter. If the door locks do not respond for the programmed RKE transmitter(s), wait several seconds and press the button again. If the door locks still fail to respond, refer to the Symptom Chart in Handles, Locks, Latches and Entry Systems. (Make sure that no more than the maximum number of RKE transmitters are attempted to be programmed.)
Keyless Entry Keypad Code Programming
Programming a Personal Entry Code
NOTE: The system allows 4 personal codes to be programmed using the keyless entry keypad.
NOTE: Multiple personal codes can be programmed in a single step. When programming multiple codes in a single step, each code must be programmed by entering each button within 5 seconds of each other. If 5 seconds elapse between any button press, programming mode is exited.
NOTE: If only a single personal code is desired or unable to program multiple codes in one step, each personal code can be programmed individually by repeating Steps 1-5 for each code desired.
- Enter the factory set 5-digit keyless entry keypad code.
- Within 5 seconds, press the 1/2 button on the keypad to activate the programming mode.
- Enter the new 5-digit keyless entry keypad code. Each number must be entered within 5 seconds of each other.
- Enter a sixth digit to indicate which slot in memory the personal entry
code is stored.
- Pressing 1/2 stores the first personal code.
- Pressing 3/4 stores the second personal code.
- Pressing other keypad buttons stores the third or fourth personal codes.
- The doors lock and unlock to confirm the new code is programmed.
Erasing a Personal Entry Code
- Carry out the procedure to program a personal keyless entry code, but enter the factory set 5-digit keyless entry keypad code into all 4 personal code slots.
- All personal codes are now erased and only the factory set 5-digit code works.
Stepped Unlock Programming
- With the ignition OFF, press and hold the lock and unlock buttons on
the RKE transmitter simultaneously for 4 seconds.
- The turn signals flash twice to indicate the mode change.
- Repeat Step 1 to enable/disable the stepped unlocking feature.
Latch Lubrication
Material

- Open the door.
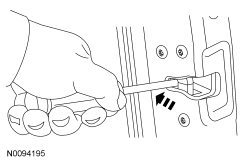
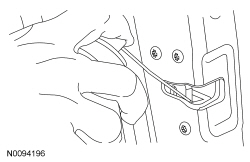
- Using a screwdriver, fully close the latch (2 clicks).

- Spray the multi-purpose grease into the opening on the door latch for approximately 5 seconds.

- Open the latch using either the interior or exterior door handle.
- Open and close the door several times to circulate the lubricant inside the latch.
- Wipe off any excess grease.
 Diagnosis and Testing
Handles, Locks, Latches and Entry Systems
Special Tool(s)
Material
DTC Chart
Diagnostics in this manual assume a certain skill level and knowledge of
Ford-specific diagnostic practices. Refer to Di ...
 Removal and Installation
Hood Latch
Removal and Installation
Remove the upper radiator sight shield.
Remove the 8 screws.
Remove the 4 bolts.
Remove the 2 pin-type retainers.
NOTE: Mark the p ...
Other materials:
Appendices
GENERAL INFORMATION
SYNC® End User License Agreement (EULA)
• You have acquired a device (“DEVICE”) that includes software
licensed by Ford Motor Company and its affiliates (“FORD MOTOR
COMPANY”) from an affiliate of Microsoft Corporation (“MS”). Those
installed software products ...
Steering
Electric Power Steering
WARNING: The electric power steering system has diagnostic
checks that continuously monitor the system to ensure proper
operation. When a system error is detected a steering message will
appear in the information display.
WARNING: The electric power steering system has d ...
Symbols Glossary
Symbols are used inside the graphics and in the text area to enhance the
information.
Movement Symbols
Movement symbols provide detailed information to a required component movement.
These component movements can be rotational or 1-3 dimensional movements.
Minor component movement clockwise/c ...
