SPECIFICATIONS
Torque Specifications

DESCRIPTION AND OPERATION
Evaporative Emissions
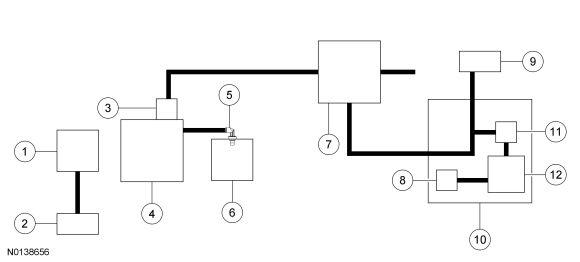
The EVAP system consists of the:
- EVAP canister purge valve.
- EVAP canister.
- dust separator and EVAP canister vent solenoid assembly.
- fuel vapor tube assembly (includes the FTP sensor).
- Dual check valve (2.0L GTDI engine) (part of the canister purge valve)
- Vapor ejector (2.0L GTDI engine) (part of the canister purge valve)
- Easy Fuel TM (capless) fuel tank filler pipe.
The EVAP system:
- utilizes an ORVR system that captures the fuel vapors from the vehicle's fuel tank during refueling.
- prevents hydrocarbon emissions from reaching the atmosphere.
- stores fuel vapors in the EVAP canister that are generated during vehicle operation or hot soak, until they can be consumed by the engine during normal engine operation.
- routes the stored fuel vapors to the engine during engine operation.
- is controlled by the PCM which, using various sensor inputs, calculates the desired amount of purge flow. The PCM regulates the purge flow, induced by the application of intake manifold vacuum, by varying the duty cycle applied to the EVAP canister purge valve.
The fuel vapors are routed:
- from the fuel tank through the fuel vapor vent valves in the fuel tank.
- to the EVAP canisters through the fuel vapor tube assembly.
- to the engine when the EVAP canister purge valve is opened by the PCM.
The FTP sensor :
- is part of the fuel vapor tube assembly.
- monitors the pressure levels in the fuel tank.
- communicates the pressure reading to the PCM during the OBD II leak test.
The fuel vapor tube assembly:
- structure varies to correspond with fuel tank design (L-shaped or saddle-type).
- is located on the top of the fuel tank.
- is used to control the flow of fuel vapors entering the EVAP system.
The EVAP canister:
- is located midship under the RH side of the vehicle.
- contains activated carbon.
- stores fuel vapors.
Easy Fuel TM (capless) fuel tank filler pipe:
- relieves system vacuum below -3.5 kPa (-16.00 in H 2 O).
The EVAP canister vent solenoid:
- is normally open.
- seals the EVAP system for the inspection and maintenance (I/M 240) test and OBD II leak and pressure tests.
- is serviced as part of the dust separator assembly.
The EVAP canister purge valve:
- is normally closed.
- regulates the purging of the EVAP canisters.
- is controlled by the PCM.
- is repaired as a separate item.
- is direct mounted to the intake manifold (3.5L Ti-VCT engine).
- is part of the vapor tube and is mounted to the intake manifold (3.5L GTDI engine).
- is part of the vapor tube and is mounted to valve cover (2.0L GTDI engine).
The dual check valve (2.0L GTDI engine):
- routes fuel vapors to the intake manifold when the intake manifold is not pressurized.
- routes fuel vapors to the vapor ejector when the intake manifold is pressurized.
The vapor ejector (2.0L GTDI engine)
- is a venturi
- uses pressurized air from the turbocharger-to- CAC tube to route fuel vapors to the ACL outlet tube.
The EVAP dust separator:
- is attached to the EVAP canister.
- prevents suspended dust and dirt particles from entering the EVAP system.
- and the EVAP canister vent solenoid are serviced together as an assembly.
The EVAP system monitor:
- is a self-test strategy within the PCM which tests the integrity of the EVAP system.
- monitors the EVAP system for leaks.
- monitors electronic EVAP components for irrationally high or low voltages.
- monitors for correct EVAP system operation.
- uses negative and positive leak test methods to test and activate the EVAP system.
For additional information on the operation of the EVAP system monitor, refer to the Powertrain Control/Emissions Diagnosis (PC/ED) manual.
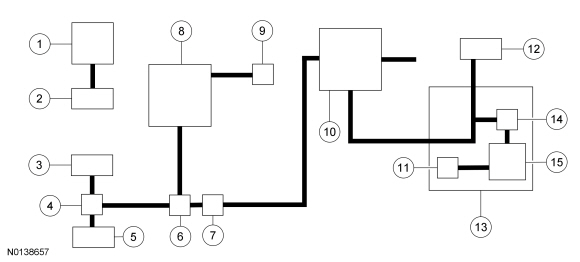
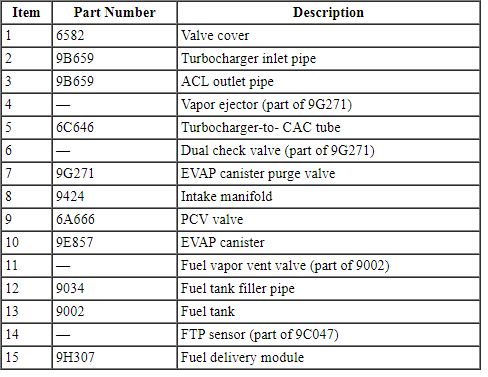
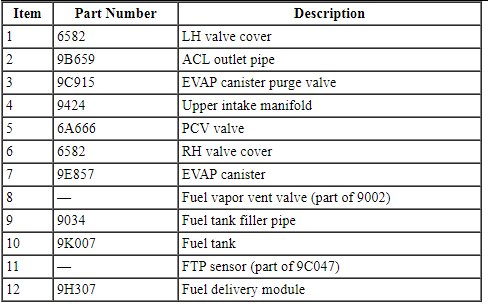
Vehicle Emission Vacuum Routing - 2.0L GTDI
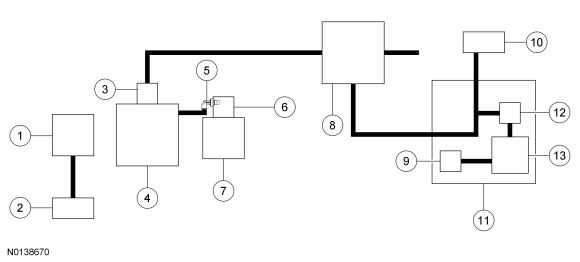
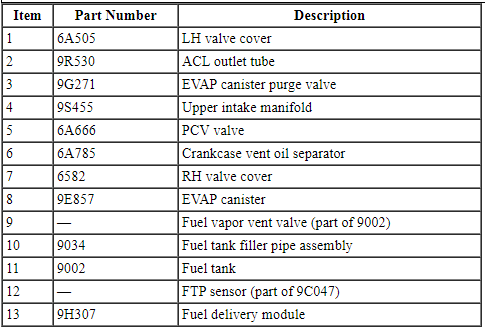
Vehicle Emission Vacuum Routing - 3.5L GTDI
Vehicle Emission Vacuum Routing - 3.5L Ti-VCT
DIAGNOSIS AND TESTING
Evaporative Emissions
Refer to the Powertrain Control/Emissions Diagnosis (PC/ED) manual.
GENERAL PROCEDURES
Evaporative Emission System Leak Test
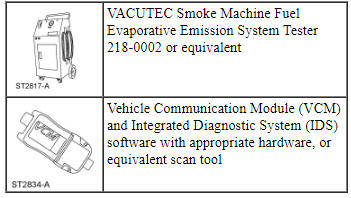
Special Tool(s)
Phase 1 - Leak Verification
- Run the EVAP Test with the scan tool.
- NOTE: Some small leaks may not be detected using the EVAP Test.
If the system has passed the test but a leak is still suspected, then
proceed to Phase 2.
If the Evaporative Emission (EVAP) system failed the EVAP Test, then proceed to Phase 2.
Phase 2 - System Leak Check
- Disconnect the fuel vapor tube-to- EVAP canister purge valve quick connect coupling. For additional information, refer to Section 310-00.
- Connect the VACUTEC Smoke Machine Fuel EVAP Emissions System Tester to the fuel vapor tube quick connect coupling. For additional information, refer to the manufacturer's instructions.
- NOTE: The battery ground cable was previously disconnected in the
fuel vapor tube quick connect coupling procedure.
Connect the battery ground cable. For additional information, refer to Section 414-01.
- Close the canister vent solenoid with the scan tool.
- NOTE: The supplemental refueling adapter is located in the jack
storage compartment.
Install the supplemental refueling adapter into the Easy Fuel TM (capless) fuel tank filler pipe assembly.
- NOTE: If smoke does not exit the fuel tank filler pipe neck area
after the system is pressurized, open the canister vent solenoid with the
scan tool to allow the air to purge. Once smoke is seen at the canister vent
solenoid, close the canister vent solenoid with the scan tool.
Introduce smoke from the VACUTEC Smoke Machine Fuel EVAP Emissions System Tester into the EVAP system and verify that smoke is exiting the fuel tank filler pipe neck area. For additional information, refer to the manufacturer's instructions.
- Remove the supplemental refueling adapter once smoke is observed exiting the fuel tank filler pipe neck area.
- Continue to enter smoke into the system for 60 seconds to obtain pressure.
- Press and release the remote start button in intervals of 15 seconds ON and 15 seconds OFF while checking for exiting smoke.
- Use the halogen light provided with the VACUTEC Smoke Machine Fuel EVAP Emissions System Tester to follow the EVAP system path and look for smoke exiting at the source of the leak(s).
- Repair any leaks as necessary.
- Repeat the EVAP Leak Test until the system passes.
REMOVAL AND INSTALLATION
Evaporative Emission (EVAP) Canister Purge Valve - 2.0L GTDI
Removal and Installation
WARNING: Do not smoke, carry lighted tobacco or have an open flame of any type when working on or near any fuel-related component. Highly flammable mixtures are always present and may be ignited. Failure to follow these instructions may result in serious personal injury.
WARNING: Do not carry personal electronic devices such as cell phones, pagers or audio equipment of any type when working on or near any fuel-related component. Highly flammable mixtures are always present and may be ignited. Failure to follow these instructions may result in serious personal injury.
WARNING: Always disconnect the battery ground cable at the battery when working on an evaporative emission (EVAP) system or fuel-related component. Highly flammable mixtures are always present and may be ignited. Failure to follow these instructions may result in serious personal injury.
NOTE: Removal steps in this procedure may contain installation details.
- Disconnect the battery ground cable. For additional information, refer to Section 414-01.
- Disconnect the quick connect couplings. For additional information, refer to Section 310-00.
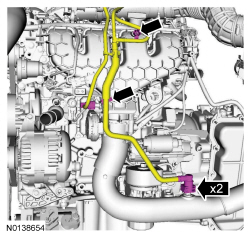
- Disconnect the quick connect couplings. For additional information,
refer to Section 310-00.
- To install, tighten to 5 Nm (44 lb-in).
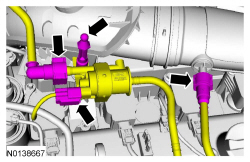
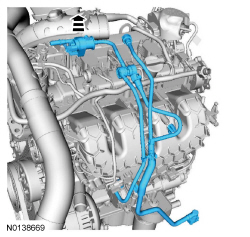
- To install, reverse the removal procedure.
Evaporative Emission Canister Purge Valve - 3.5L Ti-VCT
Removal and Installation
WARNING: Do not smoke, carry lighted tobacco or have an open flame of any type when working on or near any fuel-related component. Highly flammable mixtures are always present and may be ignited. Failure to follow these instructions may result in serious personal injury.
WARNING: Do not carry personal electronic devices such as cell phones, pagers or audio equipment of any type when working on or near any fuel-related component. Highly flammable mixtures are always present and may be ignited. Failure to follow these instructions may result in serious personal injury.
WARNING: Always disconnect the battery ground cable at the battery when working on an evaporative emission (EVAP) system or fuel-related component. Highly flammable mixtures are always present and may be ignited. Failure to follow these instructions may result in serious personal injury.
NOTE: Removal steps in this procedure may contain installation details.
- Disconnect the battery ground cable. For additional information, refer to Section 414-01.
- Disconnect the quick connect coupling. For additional information, refer to Section 310-00.
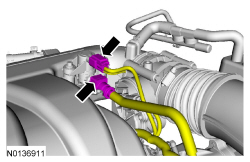
- To install, tighten to 10 Nm (89 lb-in).
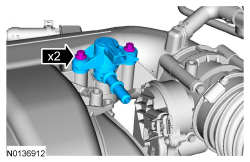
- To install, reverse the removal procedure.
Evaporative Emission Canister Purge Valve - 3.5L GTDI
Removal and Installation
WARNING: Do not smoke, carry lighted tobacco or have an open flame of any type when working on or near any fuel-related component. Highly flammable mixtures are always present and may be ignited. Failure to follow these instructions may result in serious personal injury.
WARNING: Do not carry personal electronic devices such as cell phones, pagers or audio equipment of any type when working on or near any fuel-related component. Highly flammable mixtures are always present and may be ignited. Failure to follow these instructions may result in serious personal injury.
WARNING: Always disconnect the battery ground cable at the battery when working on an evaporative emission (EVAP) system or fuel-related component. Highly flammable mixtures are always present and may be ignited. Failure to follow these instructions may result in serious personal injury.
- Disconnect the battery ground cable. For additional information, refer to Section 414-01.
- Disconnect the quick connect couplings. For additional information, refer to Section 310-00.
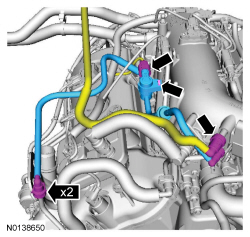
- To install, reverse the removal procedure.
Evaporative Emission Canister
Removal and Installation
WARNING: Do not smoke, carry lighted tobacco or have an open flame of any type when working on or near any fuel-related component. Highly flammable mixtures are always present and may be ignited. Failure to follow these instructions may result in serious personal injury.
WARNING: Do not carry personal electronic devices such as cell phones, pagers or audio equipment of any type when working on or near any fuel-related component. Highly flammable mixtures are always present and may be ignited. Failure to follow these instructions may result in serious personal injury.
WARNING: Always disconnect the battery ground cable at the battery when working on an evaporative emission (EVAP) system or fuel-related component. Highly flammable mixtures are always present and may be ignited. Failure to follow these instructions may result in serious personal injury.
NOTE: Removal steps in this procedure may contain installation details.
- With the vehicle in NEUTRAL, position it on a hoist. For additional information, refer to Section 100-02.
- Disconnect the battery ground cable. For additional information, refer to Section 414-01.
- NOTE: Clean the Evaporative Emission (EVAP) canister vent
solenoid electrical connector and the immediate surrounding area of any dirt
or foreign material.
Disconnect the quick connect couplings. For additional information, refer to Section 310-00.
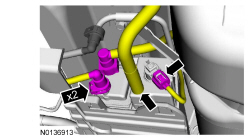
- Remove or install a pop-rivet.
- To install, tighten to 9 Nm (80 lb-in).
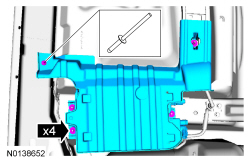
- To install, reverse the removal procedure.
- Carry out the Evaporative Emission System Leak Test. For additional information, refer to Evaporative Emission System Leak Test in this section.
Dust Separator
Removal and Installation
- Remove the Evaporative Emission (EVAP) canister. For additional information, refer to Evaporative Emission Canister.
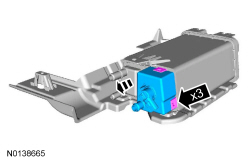
- To install, reverse the removal procedure.
Evaporative Emission Canister Vent Solenoid
Removal and Installation
- The Evaporative Emission (EVAP) canister vent solenoid is serviced with the dust separator. For additional information, refer to Dust Separator.
Fuel Vapor Tube Assembly
Removal and Installation
All vehicles
NOTE: Removal steps in this procedure may contain installation details.
- Remove the fuel tank. For additional information, refer to Section 310-01.
Vehicles with Saddle-Type Tank
- To install, tighten to 9 Nm (80 lb-in).
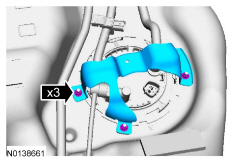
- Disconnect the quick connect coupling. For additional information, refer to Section 310-00.
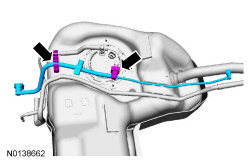
Vehicles with L-Shaped Fuel Tank
- Disconnect the quick connect coupling. For additional information, refer to Section 310-00.
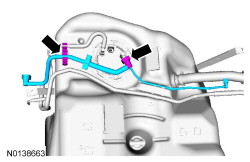
All vehicles
- To install, reverse the removal procedure.
- Carry out the Evaporative Emission System Leak Test. For additional information, refer to Evaporative Emission System Leak Test in this section.
 Intake Air Distribution and Filtering
SPECIFICATIONS
Material
Torque Specifications
DESCRIPTION AND OPERATION
Intake Air Distribution and Filtering
2.0L GTDI
The air intake system consists of the:
ACL assembly.
ACL&nbs ...
 Electronic Engine Controls
SPECIFICATIONS
Material
Torque Specifications
a Refer
to the procedure in this section.
DESCRIPTION AND OPERATION
Electronic Engine Controls
Component Location
PCM Location - 3.5 ...
Other materials:
Capacities and Specifications
Engine Drivebelt Routing
3.5L V6 engine
3.5L V6 SHO engine
2.0L EcoBoost engine
...
Fuel Charging and Controls - 3.5L Ti-VCT
SPECIFICATIONS
Material
Torque Specifications
DESCRIPTION AND OPERATION
Fuel Charging and Controls
Component Locations
WARNING: Do
not smoke, carry lighted tobacco or have an open flame of any type when working
on or near any fuel-related component. Highly flammable mixtures are always
present ...
Active Park Assist
SPECIFICATIONS
General Specifications
DESCRIPTION AND OPERATION
Active Park Assist
Component Location
Active park assist sensor
Active park assist switch
Parking aid module
Overview
The active park assist system is a supplementary parking aid that assists the
operator in detecting an availab ...
