Resetting the Trip Computer
Press and hold OK on the current screen to reset the respective trip, distance, time and fuel information.
Odometer
Registers the total accumulated distance for the lifetime of the vehicle.
This value cannot be reset.
Trip Odometer
Registers the distance of individual journeys.
Trip Timer
Registers the total time of a trip.
Fuel Used
Shows the amount of fuel used for a given trip.
Distance to E
Indicates the approximate distance the vehicle will travel on the fuel remaining in the tank. Changes in driving pattern may cause the value to vary.
Average Fuel
Indicates the average fuel consumption since the function was last reset.
Information Messages
See Information Messages later in this chapter for more information.
Information Display Controls (Type 2)
• Press the up and down arrow buttons to scroll through and highlight the options within a menu.
• Press the right arrow button to enter a sub-menu.
• Press the left arrow button to exit a menu.
• Press the OK button to choose and confirm a setting/messages.
Main menu
From the main menu bar on the left side of the information display, you can choose from the following categories:
• Display Mode
• Trip 1 & 2
• Fuel Economy
• Driver Assist
• Settings
Scroll up/down to highlight one of the categories, then press the right arrow key or OK to enter into that category. Press the left arrow key as needed to exit back to the main menu.
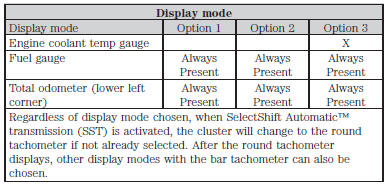
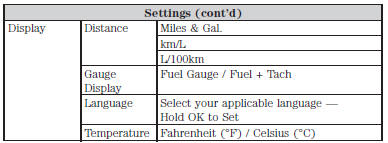
Display Mode
Use the up/down arrow buttons to choose between the following display options.
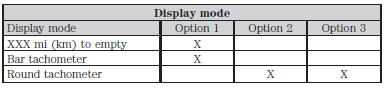
• XXX mi (km) to empty: Shows approximate fuel level before the fuel tank reaches empty. The value is dynamic and can change (raise or lower) depending on driving style.
• Fuel gauge: Indicates approximately how much fuel is left in the fuel tank. The fuel gauge may vary slightly when the vehicle is in motion or on a grade. When the fuel level becomes low, the level indicator will change to amber. When the fuel level becomes critically low, the level indicator will change to red.
Note: When a MyKey® is in use, low fuel warnings will display earlier.
The fuel icon and arrow indicates which side of the vehicle the fuel filler door is located.
• Bar/Round tachometer: Indicates the engine speed in revolutions per minute. Driving with your tachometer pointer continuously at the top of the scale may damage the engine. During SelectShift Automatic™ transmission (SST) use, the currently selected gear will appear in the display.
• Engine coolant temperature gauge: Indicates engine coolant temperature. At normal operating temperature, the level indicator will be in the normal range. If the engine coolant temperature exceeds the normal range, stop the vehicle as soon as safely possible, switch off the engine and let the engine cool.
Trip 1 & 2
Choose between the standard or enhanced trip display.
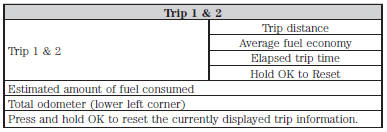
• Trip distance — shows the accumulated trip distance.
• Elapsed trip time— timer stops when the vehicle is turned off and restarts when the vehicle is restarted.
• Average fuel economy — shows the average fuel economy for a given trip.
• Estimated amount of fuel consumed — shows the amount of fuel used for a given trip.
• Elapsed trip time — timer stops when the vehicle is turned off and restarts when the vehicle is restarted.
Fuel Economy
Use the left/right arrow buttons to choose the desired fuel economy display.
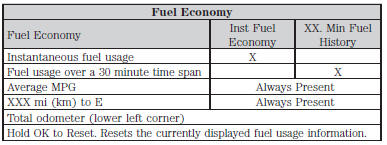
• Inst. Fuel Economy: This display shows a visual graph of your instantaneous fuel economy.
• XX. Min Fuel History: This display shows a bar chart of your fuel history.
Driver Assist
In this mode, you can configure different driver setting choices.
Note: Some items are optional and may not appear.
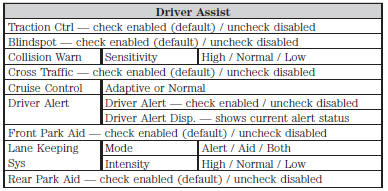
*Some MyKey items will only appear if a MyKey is set.

 Information messages
Note: Depending on the vehicle options equipped with your vehicle, not
all of the messages will display or be available. Certain messages may be
abbreviated or shortened depending upon which cluster ...
Other materials:
USB port
WARNING: Driving while distracted can result in loss of vehicle
control, crash and injury. We strongly recommend that you use
extreme caution when using any device that may take your focus off
the road. Your primary responsibility is the safe operation of your
vehicle. We recommend against the u ...
Specifications, Description and Operation
SPECIFICATIONS
Material
General Specifications
Torque Specifications
a Refer to the procedure in this section.
DESCRIPTION AND OPERATION
Wheels And Tires
Safety Precautions
WARNING:
Vehicle may have multiple drive wheels. Do not use engine to power the driveline
unless all drive wheels are ...
General Procedures
Window Grid Wire Repair
General Equipment
Material
NOTE: The grid line material is not embedded into the glass, but is
baked to the glass surface and consequently can be scraped off. An undamaged
grid line will have small ridges that project above the surface of the glass and
can easily be ...
