6F35 TRANSMISSION (if equipped)
Note:
Transmission fluid should be checked by an authorized dealer.
If required, fluid should be added by an authorized dealer.
The automatic transmission does not have a transmission fluid dipstick.
Refer to your scheduled maintenance information for scheduled intervals for fluid checks and changes. Your transmission does not consume fluid. However, the fluid level should be checked if the transmission is not working properly, (i.e., if the transmission slips or shifts slowly) or if you notice some sign of fluid leakage.
Do not use supplemental transmission fluid additives, treatments or cleaning agents. The use of these materials may affect transmission operation and result in damage to internal transmission components.
6F50/6F55 Transmission
WARNING:
The dipstick cap and surrounding components may be hot; gloves are recommended.
WARNING:
Use gloves when moving the air filter assembly; components will be hot.
Note:
Automatic transmission fluid expands when warmed. To obtain an accurate fluid check, drive the vehicle until it is warmed up (approximately 20 miles [30 km]). If your vehicle has been operated for an extended period at high speeds, in city traffic during hot weather or pulling a trailer, the vehicle should be turned off until normal operating temperatures are reached to allow the fluid to cool before checking.
Depending on vehicle use, cooling times could take up to 30 minutes or longer.
Refer to your scheduled maintenance information for scheduled intervals for fluid checks and changes. Your transmission does not consume fluid. However, the fluid level should be checked if the transmission is not working properly, i.e., if the transmission slips or shifts slowly or if you notice some sign of fluid leakage.
1. Drive the vehicle 20 miles (30 km) or until it reaches normal operating temperature.
2. Park the vehicle on a level surface and engage the parking brake.
3. With the parking brake engaged and your foot on the brake pedal, start the engine and move the gearshift lever through all of the gear ranges. Allow a minimum of 10 seconds for each gear to engage.
4. Latch the gearshift lever in P (Park) and leave the engine running.
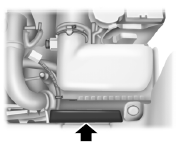
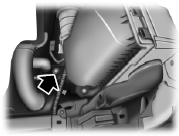
5. Remove the dipstick, wiping it clean with a clean, dry lintfree rag. If necessary, refer to Under hood overview in this chapter for the location of the dipstick. (For vehicles with the EcoBoost engine, move the air filter assembly aside to access the transmission dipstick. See Moving the Air Filter Assembly (EcoBoost engine) for more information.
6. Install the dipstick making sure it is fully seated in the filler tube by turning it to the locked position.
7. Remove the dipstick and inspect the fluid level. The fluid should be in the designated areas for normal operating temperature.
Moving the Air Filter Assembly (EcoBoost engine)
WARNING:
Do not run engine with the air filter disconnected
1. Shut the engine off.
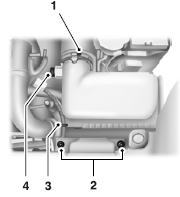
2. Clean the area around the clamp that connects the air filter assembly to the rubber hose (1).
3. Remove the bolt cover (if equipped).
4. Remove two bolts that attach the air filter assembly to the front of the vehicle (2).
5. Loosen the clamp holding the air filter assembly to the rubber hose (1).
6. Remove the harness retaining clip by pulling up (3). Do not disconnect the sensor (4).
7. Without disconnecting the sensor (4), pull the air filter assembly up to disconnect the air filter assembly from the seated grommets located underneath the air filter assembly.
8. Rotate the air filter assembly 90 degrees counterclockwise and reinstall into the rubber hose.
9. Tighten the clamp (1).
10. The transmission fluid level indicator can now be accessed.
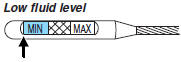
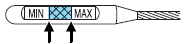
If the fluid level is below the MIN range of the dipstick, add fluid to reach the hash mark level.
Note: If the fluid level is below the MIN level, do not drive the vehicle.
An underfill condition may cause shift and/or engagement concerns and/or possible damage.
Correct fluid level
The transmission fluid should be checked at normal operating temperature 180°F-200°F (82°C-93°C) on a level surface. The normal operating temperature can be reached after approximately 20 miles (30 km) of driving.
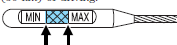
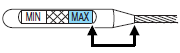
The transmission fluid level should be targeted within the cross-hatch area if at normal operating temperature 180°F-200°F (82°C-93°C).
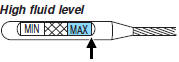
If the fluid level is above the MAX range of the dipstick, remove fluid to reach the hashmark level.
Note: Fluid level above the MAX level may cause shift and/or engagement concerns and/or possible damage.
High fluid levels can be caused by an overheating condition. If your vehicle has been operated for an extended period at high speeds, in city traffic during hot weather or pulling a trailer, the vehicle should be turned off until normal operating temperatures are reached. Depending on vehicle use, cooling times could take up to 30 minutes or longer.
Adjusting Automatic Transmission Fluid Levels
Before adding any fluid, make sure the correct type is used. The type of fluid used is normally indicated on the dipstick and also in the Technical specifications section in this chapter.
Note: Use of a non-approved automatic transmission fluid may cause internal transmission component damage.
If necessary, add fluid in 1/2 pint (250 ml) increments through the filler tube until the level is correct.
If an overfill occurs, excess fluid should be removed by an authorized dealer.
Note: An overfill condition of transmission fluid may cause shift and/or engagement concerns and/or possible damage.
Do not use supplemental transmission fluid additives, treatments or cleaning agents. The use of these materials may affect transmission operation and result in damage to internal transmission components.
For vehicles equipped with the EcoBoost engine, reinstall the air filter assembly.
After the fluid level has been checked and adjusted as necessary, do the following: 1. Shut the engine off.
2. Loosen the clamp holding the air filter assembly to the rubber hose.
3. Rotate the air filter assembly 90 degrees clockwise without disconnecting the sensor.
4. Seat the air filter assembly back into the grommets by pushing down on the air filter assembly.
5. Tighten the clamp.
6. Install and tighten two bolts that attach air filter assembly to the front of the vehicle.
7. Install the bolt cover (if equipped).
8. Reinstall the harness retaining clip into the front of the air filter assembly.
BRAKE FLUID CHECK
Fluid levels between the MIN and MAX lines are within the normal operating range; there is no need to add fluid. If the fluid levels are outside of the normal operating range, the performance of the system could be compromised; seek service from your authorized dealer immediately.
POWER STEERING FLUID CHECK
Your vehicle is equipped with an electric power steering (EPS) system.
There is no fluid reservoir to check or fill. For additional information on the electric power steering (EPS) system, Refer to Driving Aids.
FUEL FILTER
Your vehicle is equipped with a lifetime fuel filter that is integrated with the fuel tank. Regular maintenance or replacement is not needed.
WASHER FLUID CHECK
WARNING:
If you operate your vehicle in temperatures below 40°F (5°C), use washer fluid with antifreeze protection. Failure to use washer fluid with antifreeze protection in cold weather could result in impaired windshield vision and increase the risk of injury or accident.
Add fluid to fill the reservoir if the level is low. Only use a washer fluid that meets Ford specifications. See the technical specifications chart in the Capacities and Specifications chapter.
State or local regulations on volatile organic compounds may restrict the use of methanol, a common windshield washer antifreeze additive.
Washer fluids containing non-methanol antifreeze agents should be used only if they provide cold weather protection without damaging the vehicle’s paint finish, wiper blades or washer system.
 Engine coolant check
Checking the Engine Coolant
The concentration and level of engine coolant should be checked at the
intervals listed in Scheduled Maintenance Information.
Note: Make sure that the level is at the ...
 Changing the vehicle battery
WARNING: Batteries normally produce explosive gases which
can cause personal injury. Therefore, do not allow flames, sparks
or lighted substances to come near the battery. When working near the
bat ...
Other materials:
Vehicle certification label
The National Highway Traffic Safety
Administration Regulations require
that a Safety Compliance Certification
Label be affixed to a vehicle and
prescribe where the Safety
Compliance Certification Label may
be located. The Safety Compliance
Certification Label shall be affixed to
either the ...
Disassembly and Assembly
Wheel and Tire
Special Tool(s)
Disassembly
WARNING: The
tire pressure monitoring system (TPMS) sensor battery may release hazardous
chemicals if exposed to extreme mechanical damage. If these chemicals contact
the skin or eyes, flush immediately with water for a minimum of 15 minutes and
get ...
Fuel Charging and Controls - Turbocharger, 3.5L GTDI
SPECIFICATIONS
Material
Torque Specifications
a Refer to the procedure in this section.
DESCRIPTION AND OPERATION
Turbocharger
NOTICE: Whenever turbocharger air intake system components are
removed, always cover open ports to protect from debris. It is important that no
foreign materia ...
