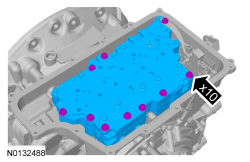
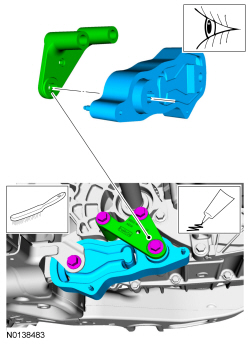
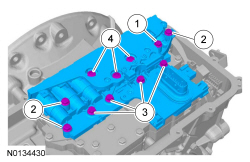
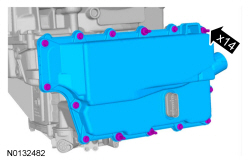
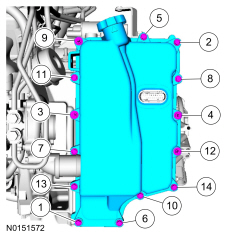
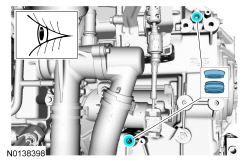
Main Control Valve Body
Material
Removal
- With the vehicle in NEUTRAL, position it on a hoist. Refer to Section 100-02.
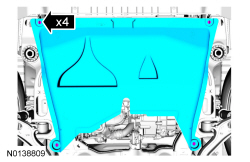
- Remove the main control cover. Refer to Main Control Cover - 3.5L GTDI or Main Control Cover - 3.5L Ti-VCT.
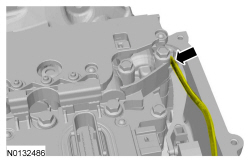
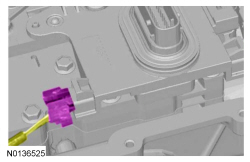
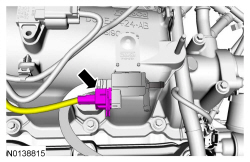
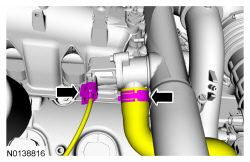
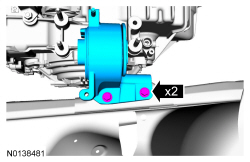
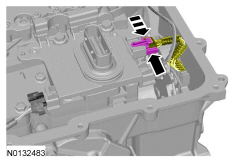
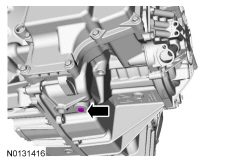
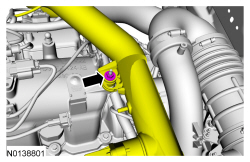
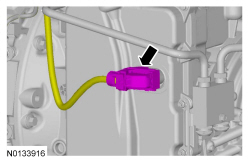
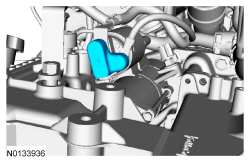
- Slide the TR sensor electrical connector lock tab over.


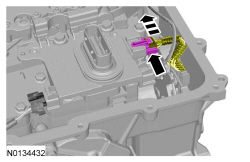
- NOTICE: Handle the solenoid body with care or damage to the solenoid body may occur.

Installation
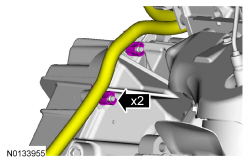
- NOTICE: Be careful not to pinch the TSS , OSS or TR sensor
wiring harnesses under the valve body, or damage to the wiring harness or
connectors may occur.
NOTE: If cleaning of the main control assembly or inspecting the valves, refer to Main Control - Overhaul. If installing a new main control assembly continue with this procedure.
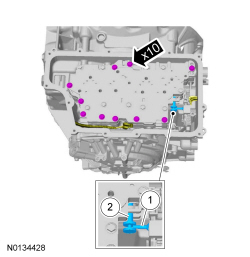
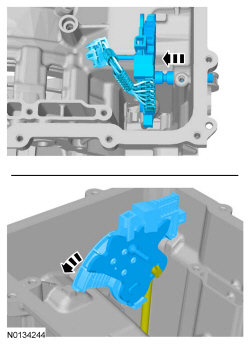
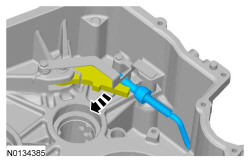
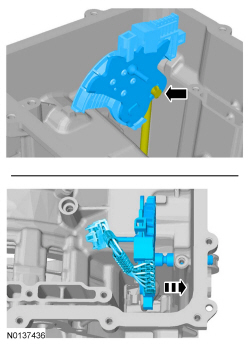
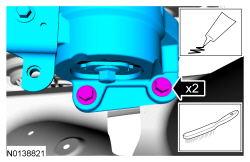
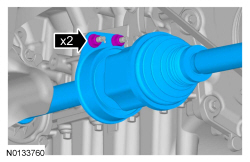
NOTE: Make sure that the manual control lever pin (part of the TR sensor) is correctly installed in the manual control valve.
- Manual pin.
- Manual valve.
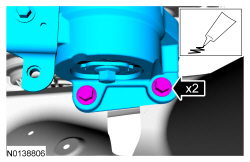
-
- Tighten to 12 Nm (106 lb-in).
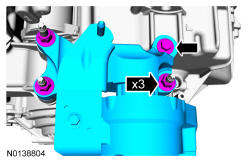
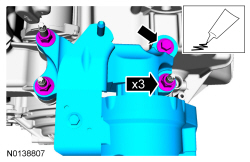
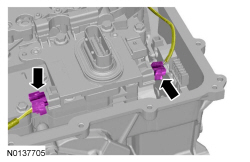
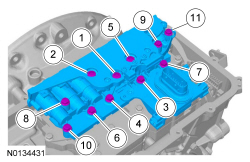
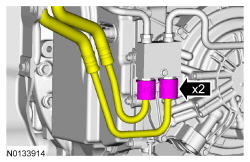
- NOTICE: Make sure not to pinch the TSS , OSS or TR sensor
wiring harnesses when positioning the solenoid body in place.
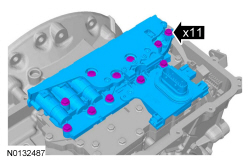
Hand-tighten only.
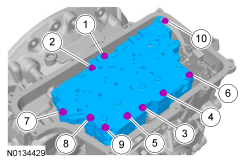
- 42 mm (1.653 in) bolt
- 63 mm (2.48 in) bolts
- 80 mm (3.149 in) bolts
- 95 mm (3.74 in) bolts

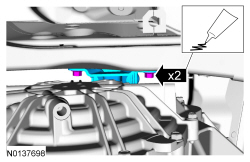
-
- Tighten to 12 Nm (106 lb-in).


- Connect the TR sensor electrical connector and slide the lock tab to the LOCK position.
- Install the main control cover. Refer to Main Control Cover - 3.5L GTDI or Main Control Cover - 3.5L Ti-VCT.
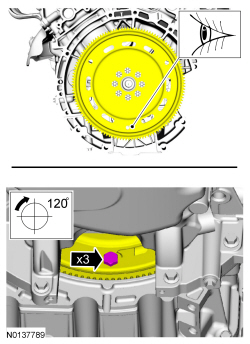
- Place the manual control lever in DRIVE.
- Rotate the manual control lever clockwise until it stops.
- Rotate the manual control lever counterclockwise one detent until it stops.


- If a replacement transmission assembly is being installed or a new solenoid body is installed, the PCM will must be reflashed with a new solenoid body strategy and identification data file. Refer to Solenoid Body Strategy Download.
- After completing the repairs, perform the Misfire Monitor Neutral Profile Correction procedure.
Turbine Shaft Speed (TSS) Sensor
Removal
- Remove the main control cover. Refer to Main Control Cover - 3.5L GTDI or Main Control Cover - 3.5L Ti-VCT.

Installation
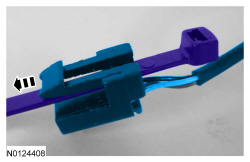
- NOTE: Use a plastic tie strap big enough so that the locking end
can not fit through the TSS sensor electrical connector and long enough so
that it can be fed through the transmission case to pull the TSS electrical
connector through the transmission case.
Route a plastic tie strap through the electrical connector of the new TSS sensor electrical connector.
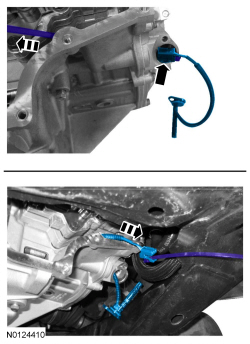
- NOTE: When routing the TSS sensor electrical connector through
the transmission case, position the TSS sensor electrical connector locking
tab toward the bottom of the TSS sensor hole.
Route the plastic tie strap through the TSS sensor hole and route the tie strap to the main control valve body area. Use the tie strap to pull the TSS sensor electrical connector through the transmission case to the main control valve body area. Remove the tie strap from the TSS sensor.
-
- Tighten to 12 Nm (106 lb-in).

- Install the main control cover. Refer to Main Control Cover - 3.5L GTDI or Main Control Cover - 3.5L Ti-VCT.
Output Shaft Speed (OSS) Sensor
Removal
- Remove the main control valve body. Refer to Main Control Valve Body.
Installation

- Install the main control valve body. Refer to Main Control Valve Body.
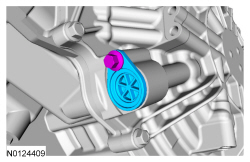
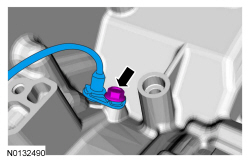
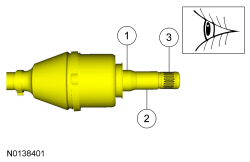
Halfshaft Seal - RH, Front Wheel Drive (FWD)
Special Tool(s)
Material
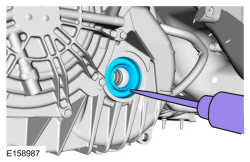
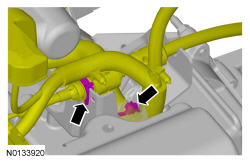
Removal
- With the vehicle in NEUTRAL, position it on a hoist. REFER to Section 100-02.
- Remove the RH front wheel and tire. REFER to Section 204-04.
- Remove the RH halfshaft. REFER to Section 205-04.
- General equipment: Awl.
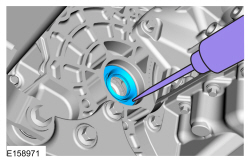
- General equipment: Dent puller.
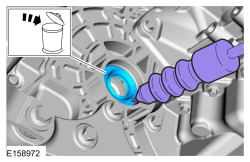
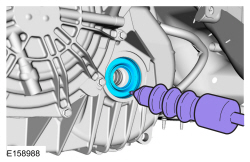
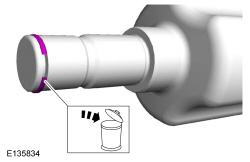
Installation
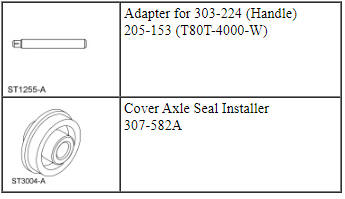
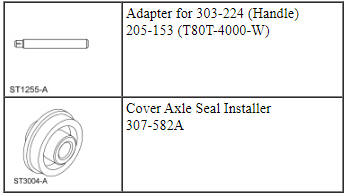
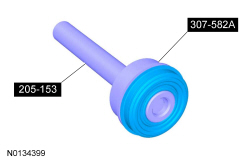
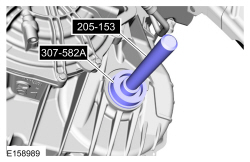
- Special Tool(s): Cover Axle Seal Installer 307-582A and Adapter for
303-224 (Handle) 205-153 (T80T-4000-W).
New halfshaft seal.
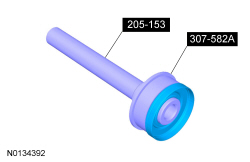
- Special Tool(s): Cover Axle Seal Installer 307-582A and Adapter for 303-224 (Handle) 205-153 (T80T-4000-W).
- Install the RH halfshaft. REFER to Section 205-04.
- Install the RH wheel and tire. REFER to Section 204-04.
- Fill with clean transmission fluid to the correct level.
Halfshaft Seal - RH, All Wheel Drive (AWD)
- NOTE: The RH halfshaft seal for AWD vehicles is part of
the PTU.
To install a new RH halfshaft seal for AWD vehicles, refer to Intermediate Shaft Seal in REFER to Section 308-07B.
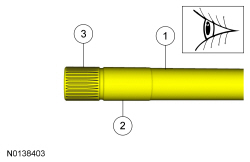
Halfshaft Seal - LH
Special Tool(s)
Material
Removal
- With the vehicle in NEUTRAL, position it on a hoist. REFER to Section 100-02.
- Remove the front LH halfshaft. REFER to Section 205-04.
- General equipment: Awl.
- General equipment: Dent puller.
Discard the specified component. Follow local disposal regulations.
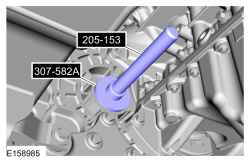
Installation
- Special Tool(s): Cover Axle Seal Installer 307-582A and Adapter for
303-224 (Handle) 205-153 (T80T-4000-W).
New half shaft seal.
- Special Tool(s): Cover Axle Seal Installer 307-582A and Adapter for 303-224 (Handle) 205-153 (T80T-4000-W).
- Install the front LH halfshaft. REFER to Section 205-04.
- Fill with clean transmission fluid to the correct level.
Digital Transmission Range (TR) Sensor
Special Tool(s)
Removal
- With the vehicle in NEUTRAL, position it on a hoist. REFER to Section 100-02.
- Remove the main control valve body. Refer to Main Control Valve Body.


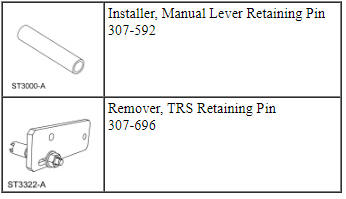
- Special tool(s): Remover, TRS Retaining Pin 307-696.
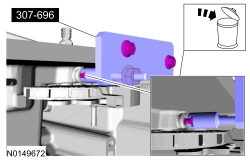
- NOTICE: Do not allow the park pawl actuator rod to slide out of the transmission case too far or it can become disengaged from the park pawl. Transmission removal and disassembly is required to install the park pawl actuator rod on the park pawl.
Installation
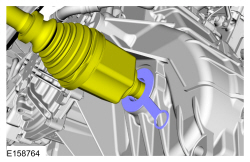
- Special tool(s): Installer, Manual Lever Retaining Pin 307-592.
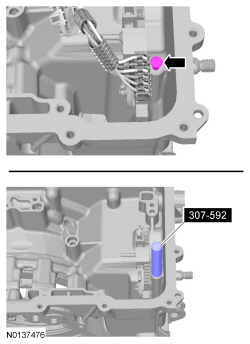
-
- Tighten to 18 Nm (159 lb-in).

- Install the main control valve body. Refer to Main Control Valve Body.
- Adjust the selector lever cable. Refer to Section 307-05.
Transaxle Support Insulator - 3.5L Ti-VCT
Special Tool(s)
Material

Removal
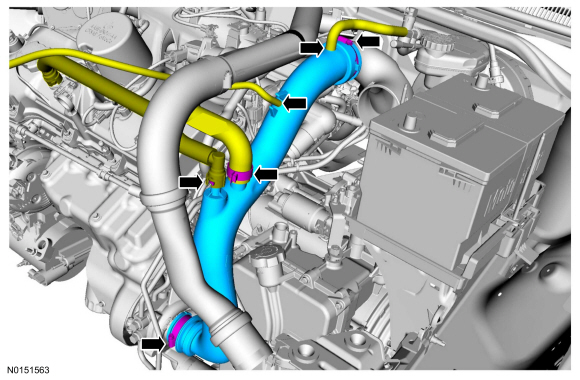
- Remove the ACL assembly and outlet pipe. Refer to Section 303-12.
- Remove the battery tray. Refer to Section 414-01.
- Remove the Y-pipe assembly. Refer to Section 309-00.
- Remove the transmission support insulator-anti roll. Refer to Transaxle Support Insulator - Anti-Roll, 3.5L Ti-VCT.
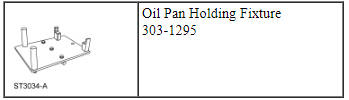
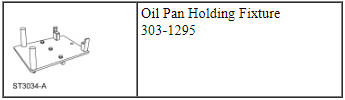
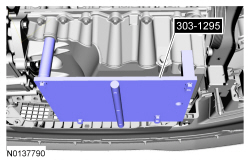
- NOTICE: The Oil Pan Holding Fixture must be carefully aligned
to the mounting bosses on the oil pan. Failure to follow these instructions
may result in damage to the oil pan.
NOTE: The Oil Pan Holding Fixture 303-1295 and a floor jack are used to raise and lower the engine to access the transmission support insulator.
Special Tool(s): Oil Pan Holding Fixture 303-1295.
General Equipment: Floor Jack.

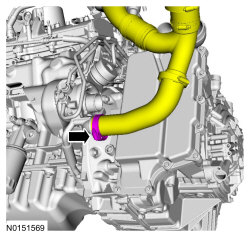
- Lower the transaxle from the mount about 50.8 mm (2 in).


Installation
- Wire brush. Apply the substance from the specified tube.
Material: Threadlock and Sealer TA-25.- Tighten to 55 Nm (41 lb-ft).
- Wire brush. Apply the substance from the specified tube.
Material: Threadlock and Sealer TA-25.- Tighten to 70 Nm (52 lb-ft).
- Apply the substance from the specified tube.
Material: Threadlock and Sealer TA-25.- Tighten the bolt to 80 Nm (59 lb-ft).
- Tighten the nuts to 63 Nm (46 lb-ft).
- Material: Threadlock and Sealer TA-25.
- Tighten to 175 Nm (129 lb-ft).

- Install the battery tray and battery. Refer to Section 414-01.
- Install the ACL assembly and outlet pipe. Refer to Section 303-12.
- Install the transmission support insulator-anti roll. Refer to Transaxle Support Insulator - Anti-Roll, 3.5L Ti-VCT.
- Install the exhaust Y-pipe assembly. Refer to Section 309-00.
Transaxle Support Insulator - 3.5L GTDI
Special Tool(s)

Material

Removal
- With the vehicle in NEUTRAL, position it on a hoist. Refer to Section 100-02.
- Remove the battery tray. Refer to Section 414-01.
- Remove the cowl panel grille. Refer to Section 501-02.


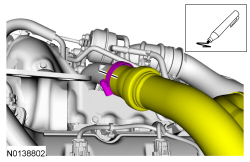
- Remove the crankcase vent tube. Refer to Section 310-00.


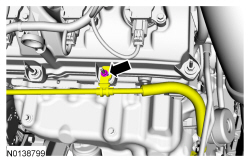


- NOTE: Index-mark the RH CAC tube position for reference during installation.


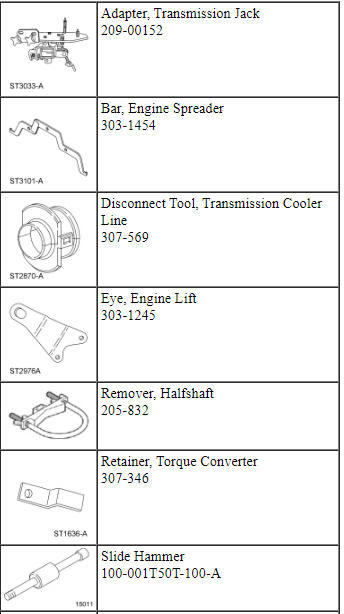
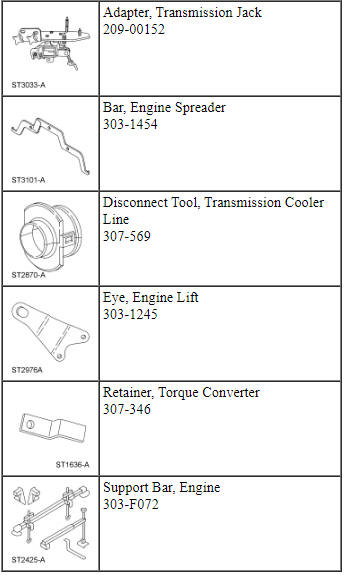
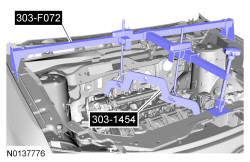
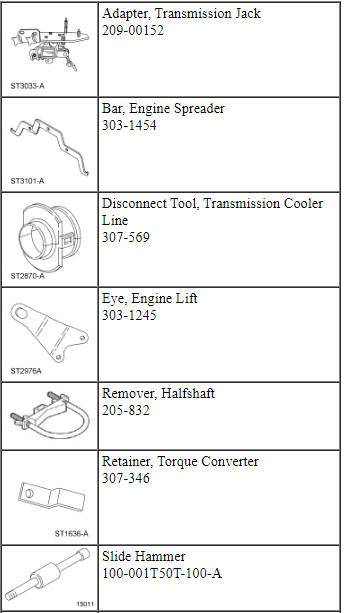
- Special Tool(s): Eye, Engine Lift 303-1245.
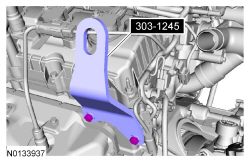
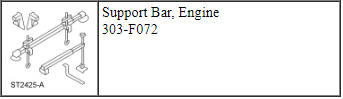
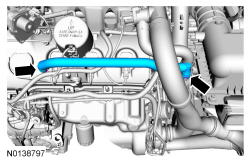
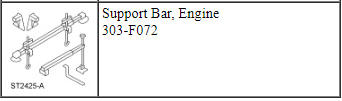
- Special Tool(s): Support Bar, Engine 303-F072, Bar, Engine Spreader 303-1454.

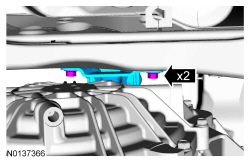
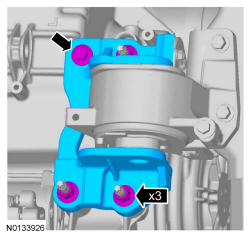
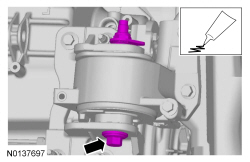
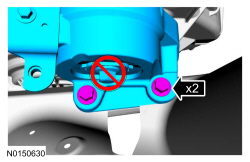
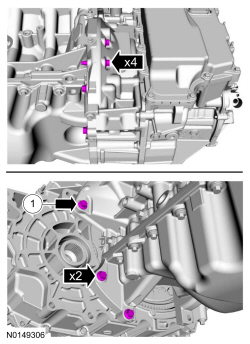
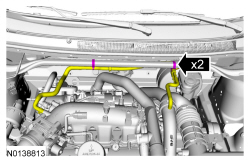
- NOTICE: Do not loosen the center bolt or damage to the mount
will occur.
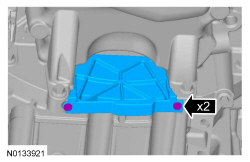
Remove the 2 upper transmission support insulator bolts.

Installation
- Material: Threadlock and Sealer TA-25.
- Tighten to 70 Nm (52 lb-ft).
- Material: Threadlock and Sealer TA-25.
- Tighten to 55 Nm (41 lb-ft).

- Material: Threadlock and Sealer TA-25.
- Tighten the bolt to 80 Nm (59 lb-ft).
- Tighten the nuts to 63 Nm (46 lb-ft).
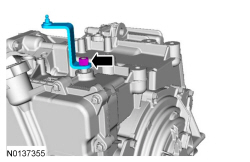
- Connect the turbocharger wastegate regulating valve electrical connector.
- Align the index marks.
- Tighten to 5 Nm (44 lb-in).

-
- Tighten to 10 Nm (89 lb-in).

-
- Tighten to 15 Nm (133 lb-in).
-
- Tighten to 8 Nm (71 lb-in).

-
- Tighten to 6 Nm (53 lb-in).


-
- Tighten to 30 Nm (22 lb-ft).


- Install the cowl panel grille. Refer to Section 501-02.
- Install the battery tray. Refer to Section 414-01.
Transaxle Support Insulator - 3.7L Ti-VCT
Special Tool(s)
Material

Removal
- Remove the ACL assembly and outlet pipe. Refer to Section 303-12.
- Remove the battery tray. Refer to Section 414-01.
- Remove the Y-pipe assembly. Refer to Section 309-00.
- Remove the transmission support insulator-anti roll. Refer to Transaxle Support Insulator - Anti-Roll, 3.7L Ti-VCT.
- NOTICE: The Oil Pan Holding Fixture must be carefully aligned
to the mounting bosses on the oil pan. Failure to follow these instructions
may result in damage to the oil pan.
NOTE: The Oil Pan Holding Fixture 303-1295 and a floor jack are used to raise and lower the engine to access the transmission support insulator.
Special Tool(s): Oil Pan Holding Fixture 303-1295.
General Equipment: Floor Jack.
- Lower the transaxle from the mount about 50.8 mm (2 in).


Installation
- Wire brush. Apply the substance from the specified tube.
Material: Threadlock and Sealer TA-25.- Tighten to 55 Nm (41 lb-ft).

- Wire brush. Apply the substance from the specified tube.
Material: Threadlock and Sealer TA-25.- Tighten to 70 Nm (52 lb-ft).

- Apply the substance from the specified tube.
Material: Threadlock and Sealer TA-25.- Tighten the bolt to 80 Nm (59 lb-ft).
- Tighten the nuts to 63 Nm (46 lb-ft).

- Material: Threadlock and Sealer TA-25.
- Tighten to 175 Nm (129 lb-ft).

- Install the battery tray and battery. Refer to Section 414-01.
- Install the ACL assembly and outlet pipe. Refer to Section 303-12.
- Install the transmission support insulator-anti roll. Refer to Transaxle Support Insulator - Anti-Roll, 3.7L Ti-VCT.
- Install the exhaust Y-pipe assembly. Refer to Section 309-00.
Transaxle Support Insulator - Anti-Roll, 3.5L Ti-VCT
Material

Removal
- With the vehicle in NEUTRAL, position it on a hoist. Refer to Section 100-02.
- Remove the exhaust Y-pipe. Refer to Section 309-00.

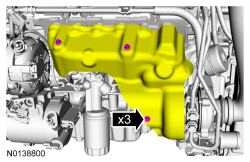
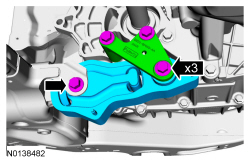
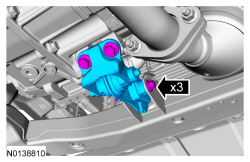
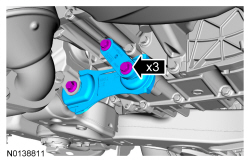
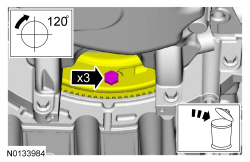
- NOTE: FWD shown, AWD similar. The FWD roll restrictor bracket will have 3 bolts and the AWD roll restrictor bracket will have 2 bolts.
Installation
- NOTE: The bracket has keyed tabs to orientate the roll
restrictor.
Align the keyed tabs. Visual check. Wire brush. Apply the substance from the specified tube.
Materials: Threadlock and Sealer TA-25.- Tighten to 103 Nm (76 lb-ft).

-
- Tighten to 9 Nm (80 lb-in).
- Install the exhaust Y-pipe. Refer to Section 309-00.
Transaxle Support Insulator - Anti-Roll, 3.5L GTDI
Material
Removal
Front and rear roll restrictors
- With the vehicle in NEUTRAL, position it on a hoist. Refer to Section 100-02.
Front roll restrictor
- If equipped.

Rear roll restrictor
Installation
Rear roll restrictor
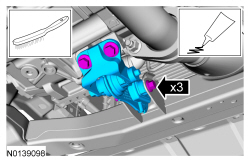
- NOTE: The bracket has keyed tabs to orient the roll restrictor.
Wire brush. Apply the substance from the specified tube.
Material: Threadlock and Sealer TA-25.- Tighten to 103 Nm (76 lb-ft).

Front roll restrictor
- Wire brush. Apply the substance from the specified tube.
Material: Threadlock and Sealer TA-25.- Tighten the 2 bracket-to-transmission bolts to 90 Nm (66 lb-ft).
- Tighten the through bolt to 103 Nm (76 lb-ft).
- If equipped.
- Tighten to 70 Nm (52 lb-in).

Front and rear roll restrictors

Transaxle Support Insulator - Anti-Roll, 3.7L Ti-VCT
Material

Removal
- With the vehicle in NEUTRAL, position it on a hoist. Refer to Section 100-02.
- Remove the exhaust Y-pipe. Refer to Section 309-00.

- NOTE: FWD shown, AWD similar. The FWD roll restrictor bracket will have 3 bolts and the AWD roll restrictor bracket will have 2 bolts.

Installation
- NOTE: The bracket has keyed tabs to orientate the roll
restrictor.
Align the keyed tabs. Visual check. Wire brush. Apply the substance from the specified tube.
Materials: Threadlock and Sealer TA-25.- Tighten to 103 Nm (76 lb-ft).
-
- Tighten to 9 Nm (80 lb-in).

- Install the exhaust Y-pipe. Refer to Section 309-00.
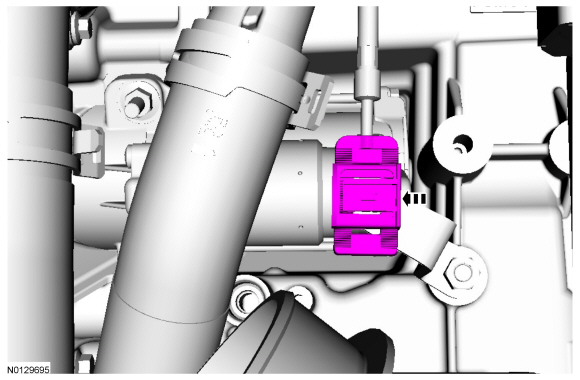
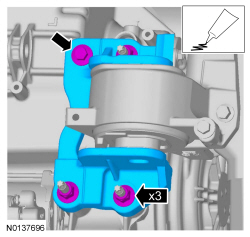
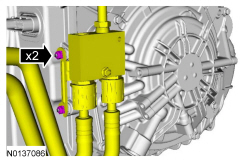
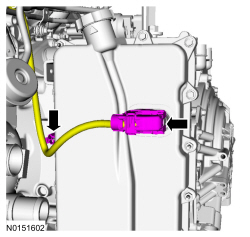
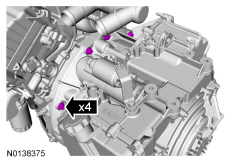
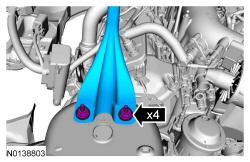
Solenoid Body Assembly
Removal
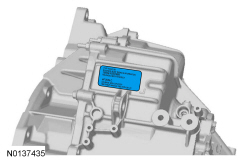
NOTE: The PCM must be updated with a new solenoid body strategy data file and solenoid body identification anytime a new solenoid body is installed. A new solenoid body service tag must be installed over the current solenoid body service tag on top of the transmission case.
- With the vehicle in NEUTRAL, position it on a hoist. Refer to Section 100-02.
- Remove the main control cover. Refer to Main Control Cover - 3.5L GTDI or Main Control Cover - 3.5L Ti-VCT.
- Slide the TR sensor electrical connector lock tab over.

- NOTICE: Handle the solenoid body with care or damage to the solenoid body may occur.
Installation
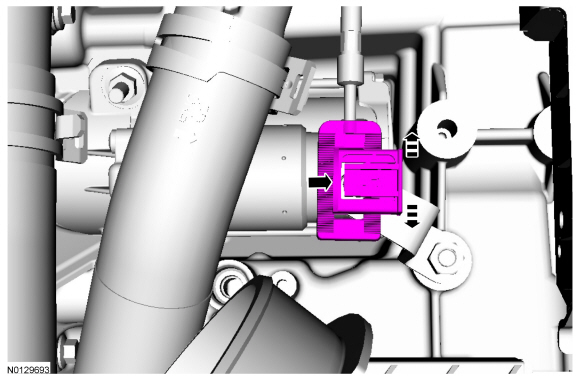
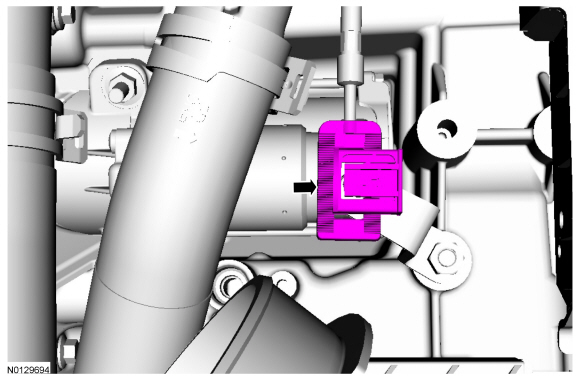
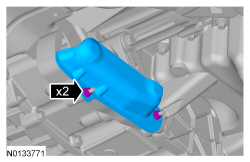
- NOTICE: Make sure not to pinch the TSS , OSS or TR sensor
wiring harnesses behind the solenoid body when positioning the solenoid body
in place.
Hand-tighten only.
- 42 mm (1.653 in) bolt
- 63 mm (2.48 in) bolts
- 80 mm (3.149 in) bolts
- 95 mm (3.74 in) bolts
-
- Tighten to 12 Nm (106 lb-in).


- Connect the TR sensor electrical connector and slide the lock tab to the LOCK position.

- Install the main control cover. Refer to Main Control Cover - 3.5L GTDI or Main Control Cover - 3.5L Ti-VCT.
- Wipe the surface of the existing solenoid body strategy tag on top of the transmission case clean and install the new solenoid body strategy tag (supplied with the solenoid body service kit) over it.
- Download a new solenoid body strategy to the PCM. Refer to Solenoid Body Strategy Download.
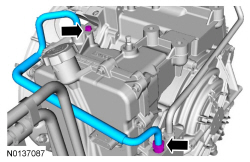
Main Control Cover - 3.5L Ti-VCT
Material
Removal
- With the vehicle in NEUTRAL, position it on a hoist. Refer to Section 100-02.
- Remove the ACL assembly and outlet pipe. Refer to Section 303-12.
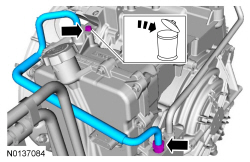
- Drain the transmission fluid.
- Tighten to 9 Nm (80 lb-in).

- Discard the specified component. Follow local disposal regulations.

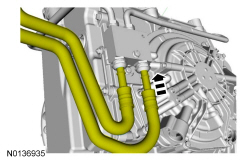
- NOTE: If the transmission fluid cooler tube seals or backing rings are stuck in the transmission case, remove the seals and backing rings.


- NOTE: Note the location of the of the studbolts for assembly.
Installation
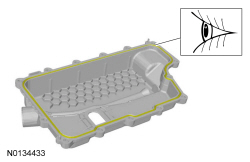
- Check for damage. Visual check.

- NOTE: Install the studbolts in the correct locations as noted
during disassembly.
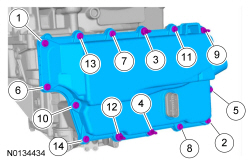
Loosely install the bolts.

- Tighten the main control cover bolts in the sequence shown.
- Tighten to 12 Nm (106 lb-in).

-
- Tighten to 9 Nm (80 lb-in).
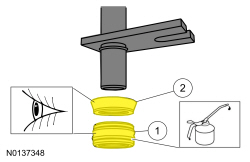
- Visual check. Apply the specified lubricant to the specified component.
Material: Motorcraft MERCON LV Automatic Transmission Fluid XT-10-QLVC.- Seal
- Backing ring

- Install a new transmission fluid cooler tube bolt.
- Tighten the bolt to 9 Nm (80 lb-in).
- Tighten the nut to 30 Nm (22 lb-ft).


- Install the ACL assembly and outlet pipe. Refer to Section 303-12.
- Fill the transaxle with clean transmission fluid. Refer to Transmission Fluid Drain and Refill.
Main Control Cover - 3.5L GTDI
Material
Removal
- With the vehicle in NEUTRAL, position it on a hoist.
- Remove the ACL and outlet pipe.
- If equipped.

- Drain the transmission fluid.
- Tighten to 9 Nm (80 lb-in).


- NOTE: Note the location of the of the studbolts for assembly.

Installation
- Check for damage. Visual check.
- NOTE: Install the studbolts in the correct locations as noted
during disassembly.
Loosely install the bolts.
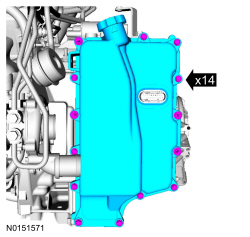
- Tighten the main control cover bolts in the sequence shown.
- Tighten to 12 Nm (106 lb-in).
-
- Tighten to 9 Nm (80 lb-in).


- If equipped.
- Tighten to 70 Nm (52 lb-in).

- Fill the transaxle with clean transmission fluid. Refer to Transmission Fluid Drain and Refill.
- Install the ACL and outlet pipe. REFER to Section 303-12.
Main Control Cover - 3.7L Ti-VCT
Material
Removal
- With the vehicle in NEUTRAL, position it on a hoist. REFER to Section 100-02.
- Remove the ACL assembly and outlet pipe. REFER to Section 303-12.
- Drain the transmission fluid.
- Tighten to 9 Nm (80 lb-in).
- Discard the specified component. Follow local disposal regulations.
- NOTE: If the transmission fluid cooler tube seals or backing rings are stuck in the transmission case, remove the seals and backing rings.


- NOTE: Note the location of the of the studbolts for assembly.

Installation
- Check for damage. Visual check.

- NOTE: Install the studbolts in the correct locations as noted
during disassembly.
Loosely install the bolts.

- Tighten the main control cover bolts in the sequence shown.
- Tighten to 12 Nm (106 lb-in).
-
- Tighten to 9 Nm (80 lb-in).

- Visual check. Apply the specified lubricant to the specified component.
Material: Motorcraft MERCON LV Automatic Transmission Fluid XT-10-QLVC.- Seal
- Backing ring

- Install a new transmission fluid cooler tube bolt.
- Tighten the bolt to 9 Nm (80 lb-in).
- Tighten the nut to 30 Nm (22 lb-ft).


- Install the ACL assembly and outlet pipe. REFER to Section 303-12.
- Fill the transmission with clean transmission fluid. Refer to Transmission Fluid Drain and Refill.
Manual Control Lever Shaft Seal
Special Tool(s)
Removal
- Remove the TR sensor. Refer to Digital Transmission Range (TR) Sensor.
- Discard the specified component. Follow local disposal regulations.
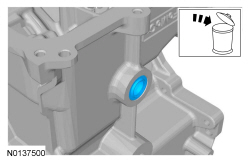
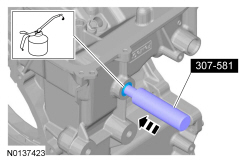
Installation
- Apply the specified lubricant to the specified component.
Shop Supplies: Petroleum Jelly.
Special Tool(s): Manual Lever Seal Installer 307-581.
- Install the TR sensor. Refer to Digital Transmission Range (TR) Sensor.
Transaxle - 3.5L Ti-VCT
Special Tool(s)
Material
Removal
All vehicles
NOTE: Refer to the Transmission Cooler Flushing Job Aid on the FMCDealer website.
- With the vehicle in NEUTRAL, position it on a hoist. Refer to Section 100-02.
- Remove the ACL and ACL outlet pipe. Refer to Section 303-12.
- Remove the battery and battery tray. Refer to Section 414-01.
- Remove the upper intake manifold. Refer to Section 303-01A.


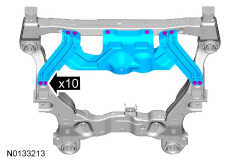
- Remove the subframe. Refer to Section 502-00.

- Remove the roll restrictor. Refer to Transaxle Support Insulator - Anti-Roll, 3.5L Ti-VCT.
- NOTE: If transmission disassembly or installation of a new
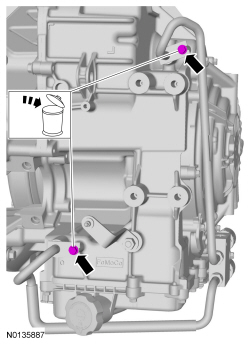
transmission is necessary, drain the transmission fluid.
- Tighten to 9 Nm (80 lb-in).

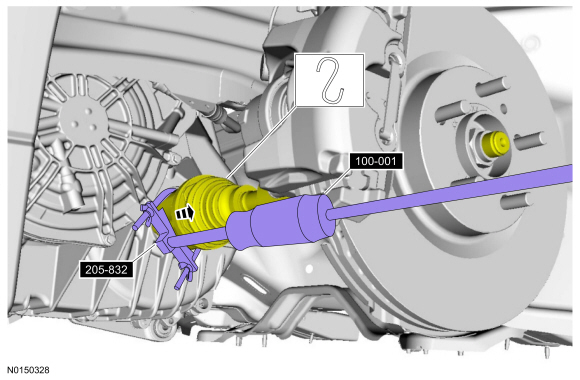
- NOTICE: Do not allow the the halfshaft to over angle or hang
from the outer CV joint. Always support the free end of the halfshaft or
damage can occur.
Special Tool(s): Slide Hammer 100-001 T50T-100-A, Remover, Halfshaft 205-832.
-
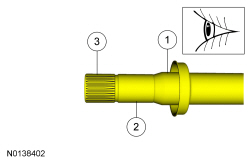
- Inspect the differential seal surface.
- Inspect the halfshaft bushing surface. If this surface is damaged, inspect the halfshaft bushing for damage.
- Inspect the differential side gear splines.

FWD vehicles
- NOTICE: Do not allow the the halfshaft to over angle or hang from the outer CV joint. Always support the free end of the halfshaft or damage can occur.

-
- Inspect the differential seal surface.
- Inspect the halfshaft bushing surface. If this surface is damaged, inspect the halfshaft bushing for damage.
- Inspect the differential side gear splines.

AWD vehicles
- Remove the PTU. Refer to Section 308-07B.
All vehicles


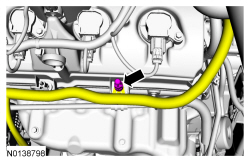
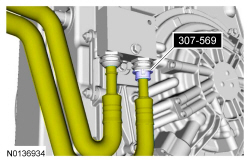
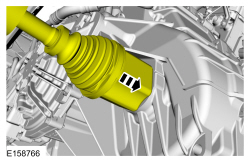
- Special Tool(s): Disconnect Tool, Transmission Cooler Line 307-569.

- Special Tool(s): Eye, Engine Lift 303-1245.

- Special Tool(s): Support Bar, Engine 303-F072, Bar, Engine Spreader 303-1454.

- Lower the transmission from the mount about 50.8 mm (2 in).

- Special Tool(s): Adapter, Transmission Jack 209-00152.
General equipment: Transmission jack.

-
- If equipped.

- Special Tool(s): Retainer, Torque Converter 307-346


- NOTE: If the transmission fluid cooler tube seals or backing rings are stuck in the transmission case, remove the seals and backing rings.
- If the transmission is to be overhauled or if installing a new or re-manufactured transmission, carry out transmission fluid cooler backflushing and cleaning. Refer to Section 307-02A.
Installation
All vehicles
NOTICE: Prior to installation of a new, re-manufactured or overhauled transmission, the transmission fluid cooler tubes must be cleaned, otherwise transmission failure may occur.
NOTE: Prior to installation of a new, re-manufactured or overhauled transmission, flush out the cooler and cooler tubes. Refer to Section 307-02A.
-
- Seal (7D258)
- Backing ring (7J324)
-
- Tighten to 9 Nm (80 lb-in).

-
- Tighten to 9 Nm (80 lb-in).

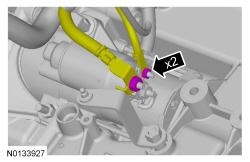
- NOTICE: Make sure that when installing the manual control
lever, it is fully seated onto the manual control lever shaft. Damage to the
manual control lever shaft will occur and the manual lever will come loose.
NOTICE: Make sure to hold the manual control lever while tightening the manual control lever nut or damage to the manual control lever and park components will occur.
- Tighten to 18 Nm (159 lb-in).

- Material: Multi-Purpose Grease XG-4 and/or XL-5
- NOTICE: If the transmission is not positioned on the dowel
pins, damage to the transmission may occur.
NOTE: If the dowel pins were pulled out of the engine block during removal, install new dowel pins in the engine block.

- Special Tool(s): Retainer, Torque Converter 307-346

- Install the transmission on the engine dowels.
Special Tool(s): Adapter, Transmission Jack 209-00152.
General equipment: Transmission jack.

- Tighten to 48 Nm (35 lb-ft).
- If equipped.

- Material: Threadlock and Sealer TA-25.
- Tighten the bolt to 80 Nm (59 lb-ft).
- Tighten the nuts to 63 Nm (46 lb-ft).

- Material: Threadlock and Sealer TA-25.
- Tighten to 175 Nm (129 lb-ft).

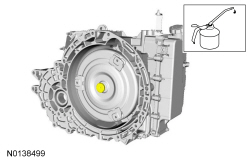
- NOTICE: Use only the specified bolts for the torque converter.
Standard length fasteners may bottom out and damage the torque converter
clutch apply surface.
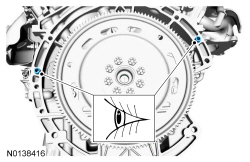
Install 3 new torque converter bolts (W714722).
- Install the first torque converter bolt in the slotted hole on the flexplate.
- Tighten to 55 Nm (41 lb-ft).


AWD vehicles
- Install the PTU. Refer to Section 308-07B.
FWD vehicles
-
- Tighten to 25 Nm (18 lb-ft).
All vehicles

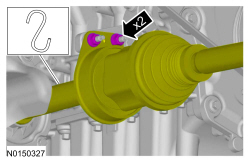
- NOTE: Remove the seal protector before the halfshaft is installed
completely.
NOTE: After insertion, pull the halfshaft inner end to make sure the circlip is locked.
Using part: AA5P-4N206-A.
- NOTE: Insert shaft until circlip is fully seated. When checking if circlip is seated do not pull on CV joint or damage can result.

- Install the subframe. Refer to Section 502-00.
- Install the roll restrictor. Refer to Transaxle Support Insulator - Anti-Roll, 3.5L Ti-VCT.
-
- Tighten to 48 Nm (35 lb-ft).


-
- Tighten to 26 Nm (19 lb-ft).


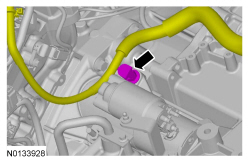
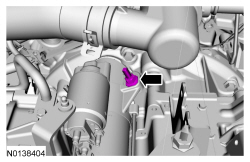
-
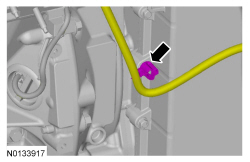
- Tighten the starter battery terminal nut to 12 Nm (106 lb-in).
- Tighten the starter solenoid terminal nut to 6 Nm (53 lb-in).


- Adjust the selector lever cable. Refer to Section 307-05.
- Install the upper intake manifold. Refer to Section 303-01A.
- Install the battery and battery tray. Refer to Section 414-01.
- Install the ACL and ACL outlet pipe. Refer to Section 303-12.
- Fill with clean transmission fluid to the correct level. Refer to Transmission Fluid Drain and Refill.
- If a new solenoid body is installed, the solenoid body strategy will need to be updated. Refer to Solenoid Body Strategy Download.
Transaxle - 3.5L GTDI
Special Tool(s)
Material
Removal
NOTE: Refer to the Transmission Cooler Flushing Job Aid on the FMCDealer website.
- With the vehicle in NEUTRAL, position it on a hoist. Refer to Section 100-02.
- Remove the battery and battery tray. Refer to Section 414-01.
- Remove the ACL outlet pipe. Refer to Section 303-12.
- Remove the cowl panel grille. Refer to Section 501-02.


- Remove the crankcase vent tube. Refer to Section 310-00.


- Special Tool(s): Eye, Engine Lift 303-1245.

- NOTE: Index-mark the CAC tube position for reference during installation.
- Special Tool(s): Support Bar, Engine 303-F072, Bar, Engine Spreader 303-1454.


- NOTICE: Do not loosen the center bolt or damage to the
transmission support insulator will occur.
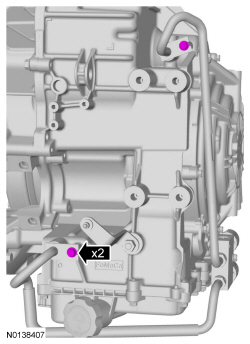
Remove the 2 upper transmission support insulator bolts.
- Remove the front subframe. Refer to Section 502-00.
- Remove the roll restrictors. Refer to Transaxle Support Insulator - Anti-Roll, 3.5L GTDI.
- Drain the transmission fluid.
- Tighten to 9 Nm (80 lb-in).

- Remove the LH front halfshaft. Refer to Section 205-04.
-
- Inspect the differential seal surface.
- Inspect the halfshaft bushing surface. If this surface is damaged, inspect the halfshaft bushing for damage.
- Inspect the differential side gear splines.
- Remove the PTU. Refer to Section 308-07B.
-
- Inspect the differential seal surface.
- Inspect the halfshaft bushing surface. If this surface is damaged, inspect the halfshaft bushing for damage.
- Inspect the differential side gear splines.


- Special Tool(s): Disconnect Tool, Transmission Cooler Line 307-569.

- Special Tool(s): Adapter, Transmission Jack 209-00152.
General equipment: Transmission jack.

-
- If equipped.

- Special Tool(s): Retainer, Torque Converter 307-346


- NOTE: If the transmission fluid cooler tube seals or backing rings are stuck in the transmission case, remove the seals and backing rings.

- If the transmission is to be overhauled or if installing a new or re-manufactured transmission, carry out transmission fluid cooler backflushing and cleaning. Refer to Section 307-02A.
Installation
NOTICE: Prior to installation of a new, re-manufactured or overhauled transmission, the transmission fluid cooler tubes must be cleaned, otherwise transmission failure may occur.
NOTE: Prior to installation of a new, re-manufactured or overhauled transmission, flush out the cooler and cooler tubes. Refer to Section 307-02A.
-
- Seal (7D258)
- Backing ring (7J324)

-
- Tighten to 9 Nm (80 lb-in).

-
- Tighten to 9 Nm (80 lb-in).

- NOTICE: Make sure that when installing the manual control
lever, it is fully seated onto the manual control lever shaft. Damage to the
manual control lever shaft will occur and the manual lever will come loose.
NOTICE: Make sure to hold the manual control lever while tightening the manual control lever nut or damage to the manual control lever and park components will occur.
- Tighten to 18 Nm (159 lb-in).

- Material: Multi-Purpose Grease XG-4 and/or XL-5

- NOTICE: If the transmission is not positioned on the dowel
pins, damage to the transmission may occur.
NOTE: If the dowel pins were pulled out of the engine block during removal, install new dowel pins in the engine block.

- Special Tool(s): Retainer, Torque Converter 307-346

- Install the transmission on the engine dowels.
Special Tool(s): Adapter, Transmission Jack 209-00152.
General equipment: Transmission jack.

- Tighten to 48 Nm (35 lb-ft).
- If equipped.


- NOTICE: Use only the specified bolts for the torque converter.
Standard length fasteners may bottom out and damage the torque converter
clutch apply surface.
Install 3 new torque converter bolts (W714722).
- Install the first torque converter bolt in the slotted hole on the flexplate.
- Tighten to 55 Nm (41 lb-ft).

- Install the PTU. Refer to Section 308-07B.
- Install the LH halfshaft. Refer to Section 205-00.
- Install the front subframe. Refer to Section 502-00.
- Install the roll restrictors. Refer to Transaxle Support Insulator - Anti-Roll, 3.5L GTDI.
- Material: Threadlock and Sealer TA-25.
- Tighten to 70 Nm (52 lb-ft).
- Material: Threadlock and Sealer TA-25.
- Tighten to 55 Nm (41 lb-ft).
- Material: Threadlock and Sealer TA-25.
- Tighten the bolt to 80 Nm (59 lb-ft).
- Tighten the nuts to 63 Nm (46 lb-ft).

- Align the index marks.
- Tighten to 5 Nm (44 lb-in).
-
- Tighten to 10 Nm (89 lb-in).

-
- Tighten to 15 Nm (133 lb-in).

-
- Tighten to 8 Nm (71 lb-in).

-
- Tighten to 6 Nm (53 lb-in).


-
- Tighten to 48 Nm (35 lb-ft).


-
- Tighten to 26 Nm (19 lb-ft).


-
- Tighten the starter battery terminal nut to 12 Nm (106 lb-in).
- Tighten the starter solenoid terminal nut to 6 Nm (53 lb-in).

- Install the starter motor positive terminal cover.


-
- Tighten to 30 Nm (22 lb-ft).
- Install the cowl panel grille. Refer to Section 501-02.
- Adjust the selector lever cable. Refer to Section 307-05.
- Install the battery tray. Refer to Section 414-01.
- Install the ACL outlet pipe. Refer to Section 303-12.
- Fill the transmission with clean transmission fluid. Refer to Transmission Fluid Drain and Refill.
- If a new solenoid body is installed, the solenoid body strategy will need to be updated. Refer to Solenoid Body Strategy Download.
- After completing the repairs, perform the Misfire Monitor Neutral Profile Correction procedure.
Transaxle - 3.7L Ti-VCT
Special Tool(s)
Material
Removal
All vehicles
NOTE: Refer to the Transmission Cooler Flushing Job Aid on the FMCDealer website.
- With the vehicle in NEUTRAL, position it on a hoist. Refer to Section 100-02.
- Remove the ACL and ACL outlet pipe. Refer to Section 303-12.
- Remove the battery and battery tray. Refer to Section 414-01.
- Remove the upper intake manifold. Refer to Section 303-01D.


- Remove the subframe. Refer to Section 502-00.

- Remove the roll restrictor. Refer to Transaxle Support Insulator - 3.7L Ti-VCT.
- NOTE: If transmission disassembly or installation of a new
transmission is necessary, drain the transmission fluid.
- Tighten to 9 Nm (80 lb-in).

- NOTICE: Do not allow the the halfshaft to over angle or hang
from the outer CV joint. Always support the free end of the halfshaft or
damage can occur.
Special Tool(s): Slide Hammer 100-001 T50T-100-A, Remover, Halfshaft 205-832.


-
- Inspect the differential seal surface.
- Inspect the halfshaft bushing surface. If this surface is damaged, inspect the halfshaft bushing for damage.
- Inspect the differential side gear splines.

FWD vehicles
- NOTICE: Do not allow the the halfshaft to over angle or hang from the outer CV joint. Always support the free end of the halfshaft or damage can occur.
-
- Inspect the differential seal surface.
- Inspect the halfshaft bushing surface. If this surface is damaged, inspect the halfshaft bushing for damage.
- Inspect the differential side gear splines.
AWD vehicles
- Remove the PTU. Refer to Section 308-07B.
All vehicles


- Special Tool(s): Disconnect Tool, Transmission Cooler Line 307-569.
- Special Tool(s): Eye, Engine Lift 303-1245.

- Special Tool(s): Support Bar, Engine 303-F072, Bar, Engine Spreader 303-1454.

- Lower the transmission from the mount about 50.8 mm (2 in).


- Special Tool(s): Adapter, Transmission Jack 209-00152.
General equipment: Transmission jack.

-
- If equipped.

- Special Tool(s): Retainer, Torque Converter 307-346


- NOTE: If the transmission fluid cooler tube seals or backing rings are stuck in the transmission case, remove the seals and backing rings.

- If the transmission is to be overhauled or if installing a new or re-manufactured transmission, carry out transmission fluid cooler backflushing and cleaning. Refer to Section 307-02A.
Installation
All vehicles
NOTICE: Prior to installation of a new, re-manufactured or overhauled transmission, the transmission fluid cooler tubes must be cleaned, otherwise transmission failure may occur.
NOTE: Prior to installation of a new, re-manufactured or overhauled transmission, flush out the cooler and cooler tubes. Refer to Section 307-02A.
-
- Seal (7D258)
- Backing ring (7J324)

-
- Tighten to 9 Nm (80 lb-in).

-
- Tighten to 9 Nm (80 lb-in).
- NOTICE: Make sure that when installing the manual control
lever, it is fully seated onto the manual control lever shaft. Damage to the
manual control lever shaft will occur and the manual lever will come loose.
NOTICE: Make sure to hold the manual control lever while tightening the manual control lever nut or damage to the manual control lever and park components will occur.
- Tighten to 18 Nm (159 lb-in).

- Material: Multi-Purpose Grease XG-4 and/or XL-5

- NOTICE: If the transmission is not positioned on the dowel
pins, damage to the transmission may occur.
NOTE: If the dowel pins were pulled out of the engine block during removal, install new dowel pins in the engine block.
- Special Tool(s): Retainer, Torque Converter 307-346

- Install the transmission on the engine dowels.
Special Tool(s): Adapter, Transmission Jack 209-00152.
General equipment: Transmission jack.

- Tighten to 48 Nm (35 lb-ft).
- If equipped.

- Material: Threadlock and Sealer TA-25.
- Tighten the bolt to 80 Nm (59 lb-ft).
- Tighten the nuts to 63 Nm (46 lb-ft).

- Material: Threadlock and Sealer TA-25.
- Tighten to 175 Nm (129 lb-ft).


- NOTICE: Use only the specified bolts for the torque converter.
Standard length fasteners may bottom out and damage the torque converter
clutch apply surface.
Install 3 new torque converter bolts (W714722).
- Install the first torque converter bolt in the slotted hole on the flexplate.
- Tighten to 55 Nm (41 lb-ft).

AWD vehicles
- Install the PTU. Refer to Section 308-07B.
FWD vehicles
-
- Tighten to 25 Nm (18 lb-ft).

All vehicles

- NOTE: Remove the seal protector before the halfshaft is installed
completely.
NOTE: After insertion, pull the halfshaft inner end to make sure the circlip is locked.
Using part: AA5P-4N206-A.

- NOTE: Insert shaft until circlip is fully seated. When checking if circlip is seated do not pull on CV joint or damage can result.

- Install the subframe. Refer to Section 502-00.
- Install the roll restrictor. Refer to Transaxle Support Insulator - Anti-Roll, 3.7L Ti-VCT.
-
- Tighten to 48 Nm (35 lb-ft).


-
- Tighten to 26 Nm (19 lb-ft).


-
- Tighten the starter battery terminal nut to 12 Nm (106 lb-in).
- Tighten the starter solenoid terminal nut to 6 Nm (53 lb-in).

- Adjust the selector lever cable. Refer to Section 307-05.
- Install the upper intake manifold. Refer to Section 303-01D.
- Install the battery and battery tray. Refer to Section 414-01.
- Install the ACL and ACL outlet pipe. Refer to Section 303-12.
- Fill with clean transmission fluid to the correct level. Refer to Transmission Fluid Drain and Refill.
- If a new solenoid body is installed, the solenoid body strategy will need to be updated. Refer to Solenoid Body Strategy Download.
 General Procedures
Solenoid Body Identification Procedure
Original Solenoid Body Service Tag
Using the scan tool, select Powertrain, Transmission and Transmission
Solenoid Body Identification from the toolbox icon a ...
 Disassembly and Assembly
Transaxle - Overhaul
Special Tool(s)
Material
Disassembled Views
All vehicles
Special Tool(s): Holding Fixture 307-580
Special Tool(s): Retainer, Torque Converter 307-346
...
Other materials:
Changing a bulb
Lamp Assembly Condensation
Exterior lamps are vented to accommodate normal changes in pressure.
Condensation can be a natural by-product of this design. When moist air
enters the lamp assembly through the vents, there is a possibility that
condensation can occur when the temperature is cold. W ...
Specifications, Description and Operation
SPECIFICATIONS
Material
General Specifications
Torque Specifications
DESCRIPTION AND OPERATION
Wipers and Washers
Overview
The windshield wiper/washer system is activated by the wiper/washer controls
on the multifunction switch. The following functions/features of the windshield
wiper/washer sy ...
Fastening the safety belts
The front outboard and rear safety restraints in your vehicle are
combination lap and shoulder belts.
1. Insert the belt tongue into the
proper buckle (the buckle closest to
the direction the tongue is coming
from) until you hear a snap and feel
it latch. Make sure the tongue is
securely fa ...
