GENERAL PROCEDURES
Wiper Blade and Pivot Arm Adjustment
- Cycle and park the windshield wipers.
- Verify that the RH and LH wiper blade tips are aligned to the "I" marks on the lower windshield glass.
- NOTE: Make sure there is no mechanical binding in the linkage
preventing the wiper arms from returning to the full PARK position.
If not within specification, remove the wiper pivot arms and reposition to the correct location. For additional information, refer to Wiper Pivot Arm in this section.
REMOVAL AND INSTALLATION
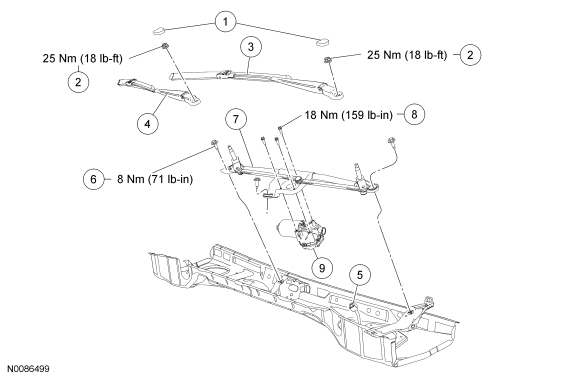
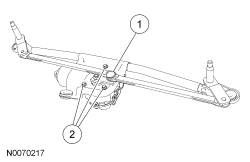
Wiper and Washer System - Exploded View
Wipers
Washer Pump and Reservoir
- For additional information, refer to the procedures in this section.
Wiper Pivot Arm
Removal and Installation
- Remove the wiper pivot arm nut cover.
- Remove the nut and the wiper pivot arm.
- Using a suitable 2-leg puller, remove the wiper pivot arm.
- To install, tighten to 25 Nm (18 lb-ft).
- To install, reverse the removal procedure.
- Adjust the wiper pivot arms. For additional information, refer to Wiper Blade and Pivot Arm Adjustment in this section.
Wiper Mounting Arm and Pivot Shaft
Removal
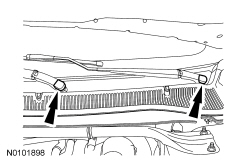
- Remove the cowl panel grille. For additional information, refer to Section 501-02.
- NOTICE: Do not remove the wiper motor linkage arm from the
wiper motor assembly. If the arm is removed, the wiper arms may not park in
the correct location and damage may occur.
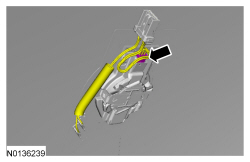
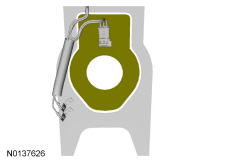
Turn and position the wiper mounting arm and wiper pivot shaft assembly as shown.
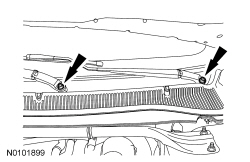
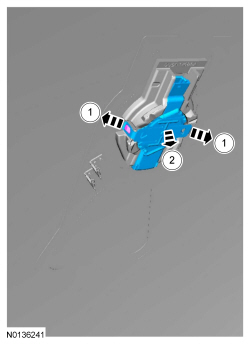
- Remove the 3 wiper mounting arm and wiper pivot shaft assembly bolts.

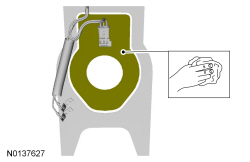
- Disconnect the electrical connector.
- Detach the wire harness pin-type retainer.
- Remove the wiper mounting arm and wiper pivot shaft assembly from the vehicle.
Installation
- NOTICE: Do not remove the wiper motor linkage arm from the
wiper motor assembly. If the arm is removed, the wiper arms may not park in
the correct location and damage may occur.
If installing a new wiper mounting arm and wiper pivot shaft assembly or a new wiper motor, position the wiper motor linkage arm and wiper pivot shaft assembly to match the position of the old wiper motor linkage arm and wiper pivot shaft assembly.
- Position the wiper mounting arm and wiper pivot shaft assembly onto the vehicle.
- Connect the electrical connector.
- Attach the wire harness pin-type retainer.
- Install the 3 wiper mounting arm and wiper pivot shaft assembly bolts.
- Tighten to 8 Nm (71 lb-in).
- Cycle the wiper motor to the PARK position.
- Install the cowl panel grille. For additional information, refer to Section 501-02.
Wiper Motor
Removal and Installation
NOTE: A new wiper motor assembly comes with the linkage arm installed.
- Remove the wiper mounting arm and pivot shaft assembly. For additional information, refer to Wiper Mounting Arm and Pivot Shaft in this section.
- NOTICE: Do not remove the wiper motor linkage arm from the
wiper motor assembly. If the arm is removed, the wiper arms may not park in
the correct location and damage may occur.
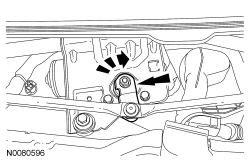
Remove the wiper motor.
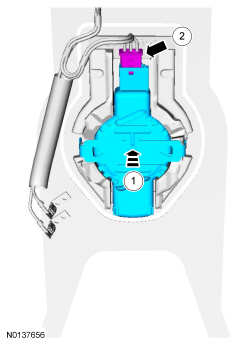
- Using a flat-blade screwdriver or a suitable tool at the location shown, separate the wiper pivot arm linkage from the wiper motor linkage arm.
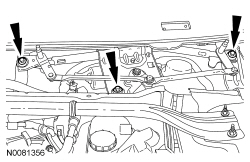
- Remove the 3 wiper motor bolts.
- To install, tighten to 18 Nm (159 lb-in).
- To install, reverse the removal procedure.
Rain Sensor
Removal
- Remove the interior rear view mirror. Refer to Section 501-09.
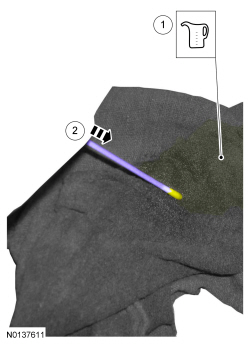
Installation
- NOTE: Glass must be clean and dry.
If installing a new rain sensor, clean the specified component with the specified material.

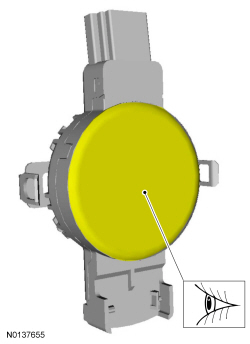
- NOTICE: If rain sensor gel is contaminated, a new sensor must
be installed.
If installing the original rain sensor, visual check.
Rain Sensor Bracket
General Equipment
Removal and Installation
NOTE: The rain sensor bracket primer and adhesive are not included in service kit (part number 19G382) and will have to be ordered separately. The rain sensor bracket primer and adhesive part numbers and ordering instructions are available in the parts ordering system.
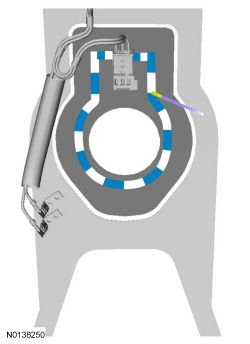
- NOTICE: Use only a plastic scraper or damage to the ceramic
paint on the windshield can occur.
NOTICE: Use care when cleaning off residual glue from windshield or damage to the windshield camera defrost heater can occur.
General Equipment: Plastic Scraper.
- Clean the specified component with the specified material.
General Equipment: Isopropyl Alcohol.
-
- Apply the fluid.
General Equipment: Betaseal 43517 Primer.
- General Equipment: Cotton Swab.
- Apply the fluid.
- NOTE: Glass must be clean and dry.
NOTE: Take care not to apply primer to the clear sensor window.
General Equipment: Cotton Swab.
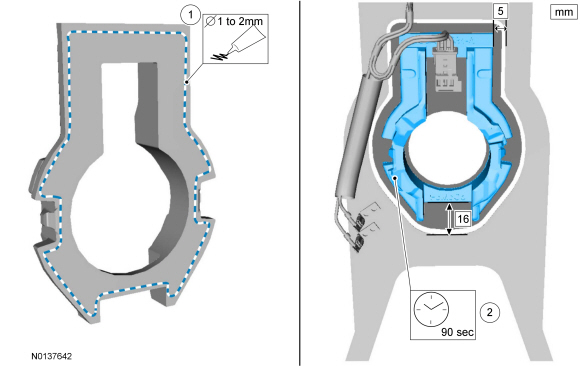
- NOTICE: Misalignment of the rain sensor bracket may cause the
lane departure feature to work incorrectly.
NOTE: Apply the adhesive to the outer edge of the backside of the new rain sensor bracket to prevent adhesive squeeze out toward the sensor viewing window.
NOTE: New bracket needs to be applied to windshield within 90 seconds of adhesive being applied.
- Apply a continuous bead of the specified diameter from the specified
tube.
General Equipment: DP604NS Urethane Adhesive.
General Equipment: 3M EPX Plus II Applicator or equivalent.
- Working time: 90 s.
- Apply a continuous bead of the specified diameter from the specified
tube.
- NOTE: Do not apply masking tape onto the rain sensor view window
area.
Apply tape to specified component or area.
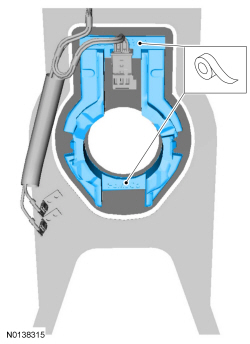
- Wait time: 6 h.
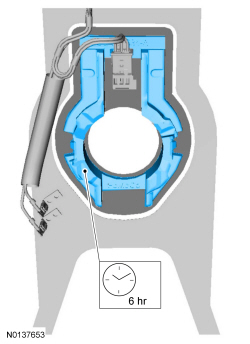
- Install the rain sensor. Refer to Rain Sensor.
Washer Pump
Material
Removal and Installation
- With the vehicle in NEUTRAL, position it on a hoist. For additional information, refer to Section 100-02.
- Remove the front lower air deflector. For additional information, refer to the Front Bumper Exploded View in Section 501-19.
- Remove the RH front fender splash shield. For additional information, refer to Section 501-02.
- WARNING:
Carefully read cautionary information on product label. For emergency
medical information seek medical advice. In the USA or Canada on Ford/Motorcraft
products call: 1-800-959-3673. For additional information, consult the
product Material Safety Data Sheet (MSDS) if available. Failure to follow
these instructions may result in serious personal injury.
NOTICE: When installing a new washer pump, be careful not to damage the rubber grommet.
NOTE: To prevent spilling windshield washer fluid, drain the washer reservoir before washer pump removal.
Remove the washer pump in the following sequence.- Disconnect the electrical connector.
- Disconnect the washer hose.
- Remove the washer pump.
- NOTICE: Do not operate the washer pump prior to filling the
washer reservoir. Failure to follow this instruction may result in premature
washer pump failure.
To install, reverse the removal procedure.
- Fill the washer reservoir with windshield washer fluid.
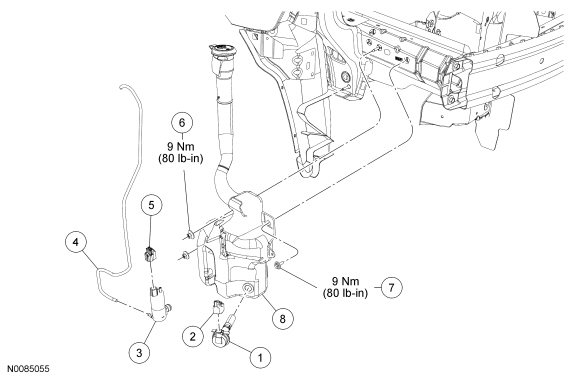
Washer Pump and Reservoir
Material

Removal and Installation
- With the vehicle in NEUTRAL, position it on a hoist. For additional information, refer to Section 100-02.
- Remove the front lower air deflector. For additional information, refer to the Front Bumper Exploded View in Section 501-19.
- Remove the RH front fender splash shield. For additional information, refer to Section 501-02.
- Disconnect the washer fluid level sensor electrical connector.
- Disconnect the washer pump electrical connector.
- WARNING:
Carefully read cautionary information on product label. For emergency
medical information seek medical advice. In the USA or Canada on Ford/Motorcraft
products call: 1-800-959-3673. For additional information, consult the
product Material Safety Data Sheet (MSDS) if available. Failure to follow
these instructions may result in serious personal injury.
NOTE: To prevent spilling washer fluid, drain the washer reservoir before removal.
Disconnect the washer pump hose.
- Remove the washer reservoir bolt.
- To install, tighten to 9 Nm (80 lb-in).
- Remove the 2 washer reservoir nuts and the washer reservoir.
- To install, tighten to 9 Nm (80 lb-in).
- Remove the washer reservoir.
- NOTICE: Do not operate the washer pump prior to filling the
washer reservoir. Failure to follow this instruction may result in premature
washer pump failure.
To install, reverse the removal procedure.
- Fill the washer reservoir with windshield washer fluid.
 Diagnosis and Testing
Wipers and Washers
Special Tool(s)
DTC Chart
Diagnostics in this manual assume a certain skill level and knowledge of
Ford-specific diagnostic practices. REFER to Diagnostic Methods in Section ...

Other materials:
Specifications, Description and Operation, Diagnosis and Testing
SPECIFICATIONS
Material
General Specifications
Torque Specifications
a Refer to the procedure in this section.
b 15 Nm plus an additional 60 degrees
c 8 Nm plus an additional 180 degrees
DESCRIPTION AND OPERATION
Engine
Overview
The 2.0L GTDI 4-cylinder engine has ...
Starting System
SPECIFICATIONS
General Specifications
Torque Specifications
DESCRIPTION AND OPERATION
Starting System
Starting System - without Push Button Start
Overview
The starter system controls the cranking of the engine. The starter motor is
enabled by the starter relay when the relay is activated by the& ...
Driving through water
WARNING: Drive through water in an emergency only, and not
as part of normal driving.
WARNING: Engine damage can occur if water enters the air
filter.
Note: Driving through deep water may allow water into the transmission
or air intake and can cause internal vehicle damage or cause it to stall. ...
