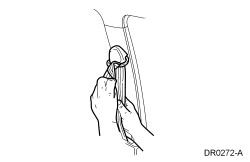
Safety Belt Cleaning
- WARNING:
Do not bleach or re-dye the safety belt webbing, as the webbing may weaken.
Failure to follow this instruction may increase the risk of serious personal
injury or death in a crash.
Clean the safety belt webbing only with a mild soap solution recommended for cleaning upholstery or carpets. Follow the instructions provided with the soap.
Safety Belt Maintenance
WARNING: All safety belt components must be inspected and corrected as part of any collision repair. Inspect all safety belt components as prescribed by Safety Belt Inspection and Repair After a Collision found in Section 501-20A General Procedures of this manual. Failure to follow this instruction may result in incorrect operation of the safety belt system and increase the risk of serious personal injury or death in a crash.
- The safety belt assemblies should be periodically inspected to make sure that they have not become damaged and that they remain in correct operating condition, particularly if they have been subjected to severe stress.
- Before installing the new safety belt assembly, the safety belt retaining areas must be inspected for damage and distortion. If the retaining points are damaged and distorted, the sheet metal must be reworked back to its original shape and structural integrity.
- Install the new safety belt(s) using the appropriate instructions. Carry out the appropriate Functional Test Procedure. For additional information, refer to the appropriate Functional Test procedure in Safety Belt System in this section.
Safety Belt Inspection and Repair After a Collision
- After a crash, the following safety belt components and attaching
hardware must be inspected and tested to verify correct function at all
seating positions. Components that do not operate correctly or pass all
Functional Tests located in Component Tests of Safety Belt System must be
replaced with new components.
- Retractors
- Buckles
- Safety belt shoulder belt height adjusters (if equipped)
- Front safety belt buckle support assemblies (slide bar) (if equipped)
- Automatic Locking Retractor (ALR) feature for child safety seats (passenger seating positions only)
- Child safety seat tether bracket assemblies
- Lower anchors and tethers for children
- Belt Tension Sensor (BTS) (if equipped)
- Inflatable safety belt systems (if equipped)
- Before installing a new safety belt assembly, inspect all safety belt attaching points for damage and distortion. If the attaching points are damaged or distorted, the sheet metal must be restored to its original shape and structural integrity.
- Install new safety belt(s) at any seating position(s) where safety belt deployment has occurred and the safety belt(s) were used.
Safety Belt Tongue Rotated on Belt
- Fold the safety belt as indicated.
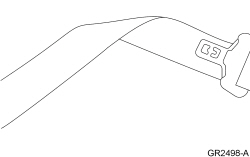
- Pull the safety belt tongue over the fold in the safety belt.
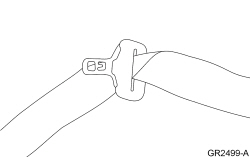
Safety Belt Twisted at the Safety Belt Guide
NOTE: These procedures apply to both wire-formed and stamped D-ring designs.
- If necessary, for access, remove the appropriate interior trim panel. Refer to Section 501-05.
- Grasp the belt webbing at the shoulder belt guide (D-ring).
- Rotate and fold the belt webbing over itself to remove the twist.
- Feed the folded portion of the belt through the safety belt guide (D-ring).
- When completed, the safety belt should look like the illustration.
 Diagnosis and Testing
Safety Belt System
Principles of Operation
WARNING: All
safety belt components must be inspected and corrected as part of any collision
repair. Inspect all safety belt components as prescribed ...
 Removal and Installation
Safety Belt Anchor and Pretensioner
Special Tool(s)
Removal and Installation
WARNING: All
safety belt components must be inspected and corrected as part of any collision
repair. Inspect all s ...
Other materials:
Cleaning the interior
WARNING: Do not use cleaning solvents, bleach or dye on the
vehicle’s safety belts, as these actions may weaken the belt webbing.
WARNING: On vehicles equipped with seat-mounted airbags, do
not use chemical solvents or strong detergents. Such products
could contaminate the side airbag system a ...
Appendices
GENERAL INFORMATION
SYNC® End User License Agreement (EULA)
• You have acquired a device (“DEVICE”) that includes software
licensed by Ford Motor Company and its affiliates (“FORD MOTOR
COMPANY”) from an affiliate of Microsoft Corporation (“MS”). Those
installed software products ...
Diagnosis and Testing
Instrumentation, Message Center and Warning Chimes
Special Tool(s)
DTC Chart(s)
Diagnostics in this manual assume a certain skill level and knowledge of
Ford-specific diagnostic practices. REFER to Section 100-00 for information
regarding these diagnostic practices.
DTC Chart - IPC ...
