Safety Belt System
Principles of Operation
WARNING: All safety belt components must be inspected and corrected as part of any collision repair. Inspect all safety belt components as prescribed by Safety Belt Inspection and Repair After a Collision found in Section 501-20A General Procedures of this manual. Failure to follow this instruction may result in incorrect operation of the safety belt system and increase the risk of serious personal injury or death in a crash.
Safety Belt Warning System
The safety belt warning indicator illuminates and a chime sounds to remind the occupants to fasten their safety belts.
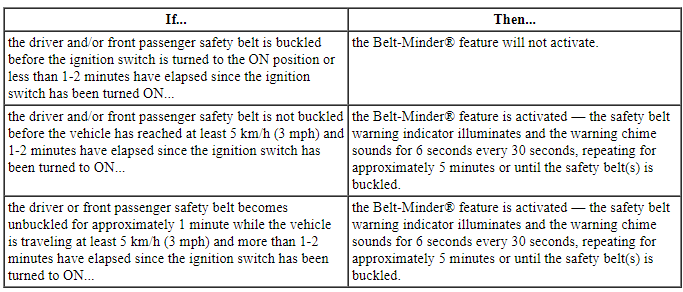
The conditions of operation for the safety belt warning indicator and chime are as follows:
- If the driver and/or front passenger safety belt is not buckled before the ignition switch is turned to ON, the safety belt warning indicator illuminates for 1 to 2 minutes and the warning chime sounds for 4 to 8 seconds.
- If the driver and/or front passenger safety belt is buckled while the warning indicator is illuminated and the warning chime is sounding, the safety belt warning indicator and warning chime turn off.
- If the driver and/or front passenger safety belt is buckled before the ignition switch is turned to ON, the safety belt warning indicator and warning chime remain off.
Belt-Minder
The Belt-Minder feature is a supplemental warning to the safety belt warning function. This feature provides additional reminders to the driver that the driver and/or front passenger safety belt is unbuckled by intermittently sounding a chime and illuminating the safety belt warning indicator in the Instrument Cluster (IC).
Either the driver or front passenger safety belt systems may activate the Belt-Minder. If the Belt-Minder warnings have expired (warnings for approximately 5 minutes) for one occupant (driver or front passenger), the other occupant can still activate the Belt-Minder feature.
When a MyKey is in the ignition, deactivation of Belt-Minder will be ignored. The Belt-Minder feature can be activated or deactivated by the administrator key. Using the non-administrator key will override the deactivation of the Belt-Minder feature. Refer to Section 413-01 or the Owner's Literature for further information on MyKey functionality.
The passenger Belt-Minder feature is activated only when the Occupant Classification System (OCS) system detects a passenger in the RH front seat and the passenger weight exceeds a programmed limit. For information on the OCS system, refer to Section 501-20B.
To activate or deactivate the Belt-Minder feature, refer to Section 413-01.
Inspection and Verification
- Verify the customer's concern by operating the active restraint system to duplicate the condition.
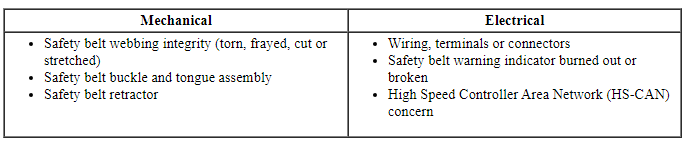
- Inspect to determine if any of the following mechanical or electrical concerns apply:
Visual Inspection Chart
- If the inspection reveals an obvious concern(s) that can be readily identified, service as required. With the exception of removing a twist from the safety belt webbing, do not attempt to repair a component of the safety belt system; new components must be installed.
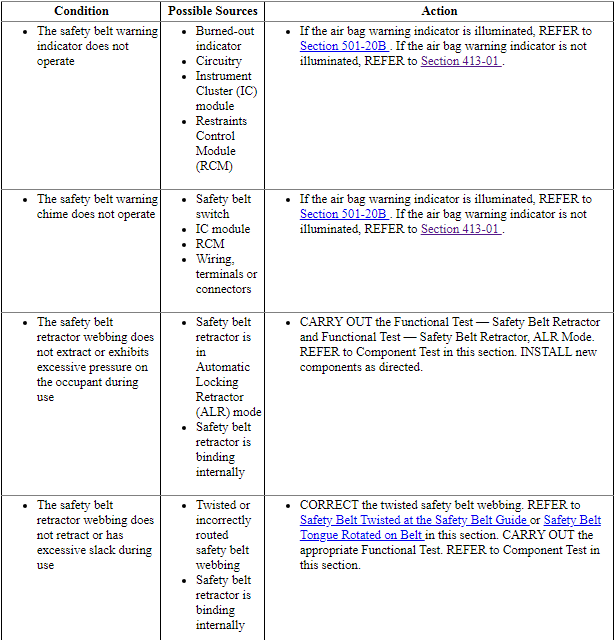
- If the concern remains after the inspection, determine the symptom. GO to Symptom Chart.
- To check the active restraint system for correct operation, carry out the appropriate Functional Test(s).
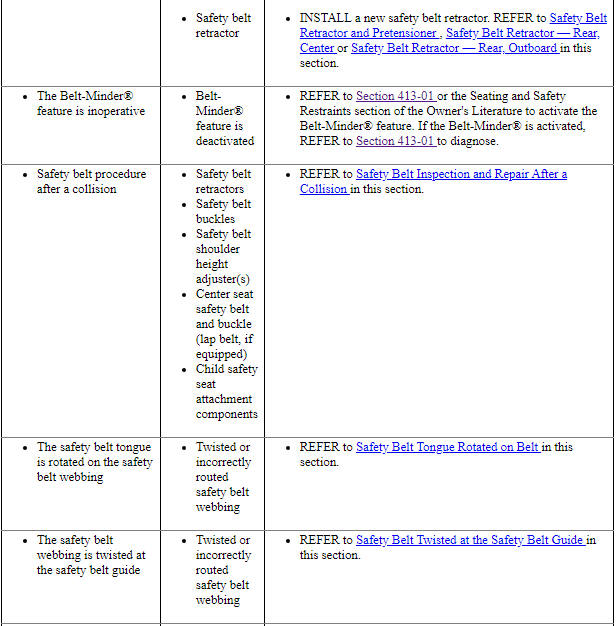
Symptom Chart

Component Test
WARNING: All safety belt components must be inspected and corrected as part of any collision repair. Inspect all safety belt components as prescribed by Safety Belt Inspection and Repair After a Collision found in Section 501-20A General Procedures of this manual. Failure to follow this instruction may result in incorrect operation of the safety belt system and increase the risk of serious personal injury or death in a crash.
Carry out the appropriate Functional Test(s) as determined in Inspection and Verification.
Functional Test - Buckle and Tongue
The safety belt buckle and tongue assembly must operate freely during the latching and unlatching function. Fasten the safety belt by inserting the tongue (male portion) into the buckle (female portion).
- Verify the following during the latching sequence:
- Tongue insertion is not hindered by excessive effort.
- A click is heard when the safety belt buckle latches the tongue.
- Verify the system integrity by forcefully pulling on the safety belt webbing.
- Unlatch the safety belt by fully depressing the safety belt buckle release button and allowing the safety belt to release and retract.
- Verify the following during the unlatching process:
- Push-button depression does not require excessive effort.
- The tongue can be removed easily from the buckle.
- Repeat the above steps 3 times.
- If the functional test reveals a concern(s), install a new safety belt buckle or safety belt retractor as required.
Functional Test - Safety Belt Retractor
The safety belt retractor must be freely operational for extraction and retraction of the safety belt webbing between full extension and in-vehicle stowed positions.
- Extract and retract the safety belt between the full extension and stowed positions.
- Verify the safety belt retractor operates without excessive effort or binding.
- Install a new safety belt retractor if any concern is found or the complaint has been verified.
Functional Test - Safety Belt Retractor, Automatic Locking Retractor (ALR) Mode
- Position the seat backrest fully upright (if adjustable).
- Position the safety belt shoulder height adjuster (if equipped) in the full down or up position.
- Fasten the safety belt.
- Pull out the safety belt webbing until the Automatic Locking Retractor (ALR) feature is activated.
- Allow the safety belt webbing to retract until it stops.
- Pull on the safety belt webbing to check that the safety belt retractor has remained in the ALR mode. If the safety belt retractor is not locked, install a new safety belt retractor.
- Unfasten the safety belt and allow the safety belt webbing to retract to its stowed position.
- Pull out and retract the safety belt webbing to verify the safety belt retractor has converted automatically out of ALR mode. If the safety belt retractor remains locked in the ALR mode, install a new safety belt retractor.
Functional Test - Safety Belt Retractor, Road Test Inspection
WARNING: The driver and passenger must be prepared to brace themselves in the event the safety belt retractor does not lock. Failure to follow this instruction may result in serious personal injury.
NOTE: Make sure there is no excessive slack in the safety belt webbing across the torso during testing.
NOTE: Do not jerk on the safety belt webbing when carrying out this test.
- Test the safety belts in the following sequence:
- Fasten the safety belts and proceed to a safe area.
- Attain a speed of 24 km/h (15 mph).
- WARNING:
Apply maximum brake force only on dry concrete or equivalent hard
surface, never on wet pavement or gravel. Failure to follow this
instruction may result in serious personal injury.
Grasp the shoulder harness, lean forward and apply the brakes, making a maximum braking application without a skid.
- The safety belts should lock up with minimum webbing extension.
- If there is a lockup of all safety belt retractors being tested, the safety belt retractors are functioning correctly. If any safety belt retractor fails to lock up, install a new safety belt retractor(s).
 Specifications, Description and Operation
SPECIFICATIONS
Torque Specifications
DESCRIPTION AND OPERATION
Safety Belt System
WARNING: All
safety belt components must be inspected and corrected as part of any collision
repair. Inspect ...
 General Procedures
Safety Belt Cleaning
WARNING:
Do not bleach or re-dye the safety belt webbing, as the webbing may weaken.
Failure to follow this instruction may increase the risk of serious personal
inj ...
Other materials:
Transaxle/Transmission Cooling - 6F35
SPECIFICATIONS
Material
Torque Specifications
DESCRIPTION AND OPERATION
Transaxle Cooling
The transmission fluid cooling system consists of the following:
OTA transmission fluid cooler
Front transmission fluid cooler tube assembly
Rear transmission fluid cooler tube assembly
Transmission ...
Disassembly and Assembly of Subassemblies
Cylinder Head
Special Tool(s)
Material
Disassembly
NOTICE: During engine repair procedures, cleanliness is extremely
important. Any foreign material, including any material created while cleaning
gasket surfaces, that enters the oil passages, coolant passages or the oil pan
can cause en ...
General Procedures, Removal and Installation
GENERAL PROCEDURES
Belt-Minder Deactivating/Activating
NOTE: If you are using MyKey, the Belt-Minder cannot be disabled. If
the Belt-Minder has been previously disabled, it is re-enabled during the use
of MyKey.
Apply the parking brake before deactivating/activating the Belt-Minder.
Plac ...
