Timing Adjustment
NOTE: Any time a roof opening panel motor is removed, the cables/mechanisms can experience free-play movement. It is important that the cables do not move. They are timed to be parallel with each other. If one or both are moved in either direction, they must be re-timed.
NOTE: The roof opening panel motor must be initialized when repairs are carried out on any part of the roof opening panel system, including: whenever the roof opening panel motor has been removed from the roof opening panel system, the roof opening panel glass has been removed from the roof opening panel system, the roof opening panel assembly has been removed from the vehicle, a new roof opening panel motor has been installed, a new roof opening panel glass has been installed or a new roof opening panel assembly has been installed. For additional information, refer to Roof Opening Panel Motor Initialization in this section.
- Remove the roof opening panel glass. For additional information, refer to Roof Opening Panel Glass in this section.
- Remove the roof opening panel motor. For additional information, refer to Roof Opening Panel Motor in this section.
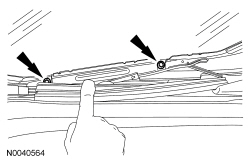
- Using a flat-blade screwdriver, push on the back of the drive slide until it contacts the crimp on the guide.

- Reinstall the roof opening panel motor, but do not carry out the roof opening panel motor initialization. For additional information, refer to Roof Opening Panel Motor in this section.
- Reinstall the roof opening panel glass. For additional information, refer to Roof Opening Panel Glass in this section.
- Initialize the roof opening panel motor. For additional information, refer to Roof Opening Panel Motor Initialization in this section.
Roof Opening Panel Alignment
NOTE: The roof opening panel motor must be initialized when repairs are carried out on any part of the roof opening panel system, including: whenever the roof opening panel motor has been removed from the roof opening panel system, the roof opening panel glass has been removed from the roof opening panel system, the roof opening panel assembly has been removed from the vehicle, a new roof opening panel motor has been installed, a new roof opening panel glass has been installed or a new roof opening panel assembly has been installed. For additional information, refer to Roof Opening Panel Motor Initialization in this section.
- Open the roof opening panel to the VENT position.
- NOTE: To access the glass screws, unclip the top portion of the
concertina blind and position aside as shown.
Loosen the 4 roof opening panel glass screws.
- Close the roof opening panel glass.
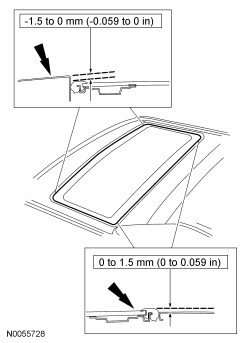
- NOTE: The correct position of the roof opening panel glass to the
roof panel should be -1.5 mm to 0 mm (-0.059 to 0 in) at the front edge and
0 mm to 1.5 mm (0 to 0.059 in) at the rear edge of the roof panel.
Make sure the roof opening panel is centered in the roof opening. Adjust the roof opening panel glass.
- NOTE: Clip the top portion of the concertina blind once the
screws are tightened.
Tighten the roof opening panel glass screws to 5 Nm (44 lb-in).

- Initialize the roof opening panel motor. For additional information, refer to Roof Opening Panel Motor Initialization in this section.
Roof Opening Panel Motor Initialization
NOTE: A new roof opening panel motor will only vent and must be initialized.
NOTE: The roof opening panel motor must be initialized when repairs are carried out on any part of the roof opening panel system, including: whenever the roof opening panel motor has been removed from the roof opening panel system, the roof opening panel glass has been removed from the roof opening panel system, the roof opening panel assembly has been removed from the vehicle, a new roof opening panel motor has been installed, a new roof opening panel glass has been installed or a new roof opening panel assembly has been installed.
- Turn the ignition to the RUN position. For an existing roof opening panel motor, skip to Step 3.
- For a new roof opening panel motor, push and hold the tilt switch for 2 seconds after the roof opening panel glass moves to the full VENT position and the motor stalls.
- For an existing roof opening panel motor, push and hold the tilt
switch until the roof opening panel glass moves to full VENT. Then push and
hold the tilt switch until the following actions occur:
- The roof opening panel glass motor stalls into a hard stop after approximately 3 seconds.
- Then, after motor stalls, continue holding for an additional 5 seconds.
- Release the tilt switch and verify successful initialization by carrying out one-touch open, one-touch close and one-touch vent operations.
 Diagnosis and Testing
Roof Opening Panel
Special Tool(s)
Principles of Operation
Roof Opening Panel
The roof opening panel assembly uses an integrated motor and module to
operate the roof opening panel. The roof opening ...
 Removal and Installation
Roof Opening Panel - Exploded View
NOTE: The roof opening panel motor must be initialized when repairs
are carried out on any part of the roof opening panel system, including:
whenever the roof ...
Other materials:
Electronic Engine Controls
SPECIFICATIONS
Material
Torque Specifications
a Refer
to the procedure in this section.
DESCRIPTION AND OPERATION
Electronic Engine Controls
Component Location
PCM Location - 3.5L Ti-VCT,
3.7L Ti-VCT
PCM Location - 2.0L GTDI,
3.5L GTDI
Front Engine S ...
Installing child seats
Child Seats
Use a child safety seat (sometimes
called an infant carrier, convertible
seat, or toddler seat) for infants,
toddlers or children weighing
40 pounds (18 kilograms) or less
(generally age four or younger).
Using Lap and Shoulder Belts
WARNING: Airbags can kill or injure a child ...
Automatic high beam control
The system will automatically turn on your high beams if it is dark
enough and no other traffic is present. When it detects an approaching
vehicleŌĆÖs headlights, a preceding vehicleŌĆÖs tail lamps or street lighting, the
system will turn off the high beams (low beams remain on) before they
dist ...
