Audio Control Module (ACM) Self-Diagnostic Mode
NOTE: If the ACM is completely inoperative (does not power up), the part number decal on the ACM chassis can be used to attain the ACM part number.
- Turn the ACM on.
- Operate the audio system in radio tuner (AM/FM) mode.
- Press and hold the eject button, and within 1 second, press the seek up
button until the speaker walk-around test begins.
- The display indicates each speaker as it is tested.
- NOTE: If the speaker walk-around test is the only test required,
this procedure can be stopped after Step 3 by turning the ACM off or by
selecting exit using the touchscreen.
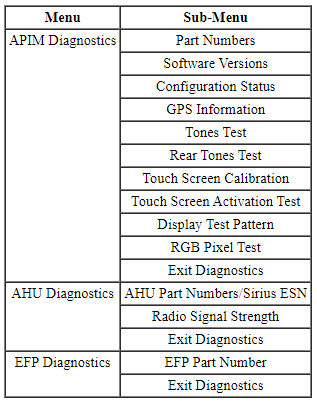
Once the speaker walk-around test is complete, the following information is available through the "BEZEL DIAGNOSTICS" menu using the audio system control buttons:
NOTE: The AHU Diagnostics refers to the ACM and EFP Diagnostics refers to the FCIM.
- To exit the self-diagnostic mode, turn the ACM off.
Accessory Protocol Interface Module (APIM) Reset
NOTE: Carrying out an APIM Reset consists of a battery disconnect and a SYNC system Master Reset.
NOTE: NOTE: This procedure will clear all CMDTCs. The DTCs must be recorded now if other (non SYNC) diagnoses are to be performed after this procedure.
- Remove any devices connected to the USB port(s), audio input jack (if equipped), or media hub (if equipped).
- NOTE: After the APIM reset procedure has been completed the
customer should be advised to reset their device following the
manufacturer's instructions. Refer to the device's owner's manual and/or
website for information on how to perform a Manual / Master Reset or Clear.
Devices can be powered off and back on for a simple re-boot. In some cases
the device's battery may also need to be removed and re-installed to
complete a re-boot. In addition, cell phones may need to have SYNC deleted
from the Bluetooth menu prior to re-pairing the phone to the SYNC system.
Customer devices may affect the operation of SYNC and this should be
understood to prevent unnecessary diagnosis or repairs to the system.
Disconnect the negative battery cable for 1 minute, then reconnect it. Refer to Section 414-01.
- NOTE: Performing a Master Reset returns all preference settings
to the factory defaults, erases all the phone book and call histories, and
deletes any devices paired with the SYNC system. On vehicles equipped
MyFord Touch or MyLincoln Touch with navigation, the customer's saved
destination points (home address and points of interest) and preferences
will also be lost with a Master Reset.
Carry out a SYNC system Master Reset. Refer to the owner's literature
- Verify system function using the Multi-Media Interface Tester 105-00120, to test the audio output for the audio input jack/socket (if equipped), USB port(s), and Bluetooth. If equipped, use the RCA Adapter 105-00121 to test the audio output for the RCA jacks.
- If a concern is still present return to the Symptom Charts.
Accessory Protocol Interface Module (APIM) Programming - Standard
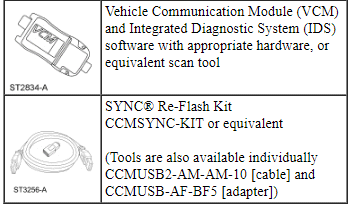
Special Tool(s)
NOTE: Use this procedure to update the Accessory Protocol Interface Module (APIM) and any installed Applications to the latest level. For additional information on choosing the correct programming procedure, refer to Information and Entertainment System, APIM Programming.
NOTE: A Universal Serial Bus (USB) flash drive with a minimum storage size of 1 gigabyte (GB) may be required for this procedure (obtain locally).
NOTE: Some programming files are large (greater than 2 gigabytes). It is important that the scan tool have enough available hard drive free space to accommodate the programming file download. If a "Disk Space Error" is received, additional free space must be created on the hard drive.
NOTE:
- To prevent timeout errors and to minimize programming time, a hardwired internet connection is strongly recommended when programming.
- During programming, the vehicle display may go blank momentarily.
- Make sure the scan tool is plugged into a power supply due to the length of programming time.
- The Integrated Diagnostic System (IDS) program must be closed before attempting to perform this procedure.
- Connect a battery charger to the vehicle.
- When connecting the charger, the negative battery charger lead must be connected to a clean chassis ground, not the negative battery post.
- Place the ignition in the RUN position. For additional information on Intelligent Access (IA) vehicles, refer to Push Button Start System Ignition Modes in Section 211-05.
- Connect the scan tool and Vehicle Communication Module (VCM) to the vehicle.
- Open Internet Explorer on the scan tool and go to the technician service publication web site. On the OASIS tab, select "Read VIN & DTCs", and select "Go".
- NOTE: This procedure will clear all Continuous Memory Diagnostic
Trouble Codes (CMDTCs). The DTCs must be recorded now if other diagnoses are
to be performed after this procedure.
Select Toolbox from technician service publication web site to retrieve and record all CMDTCs.
- NOTE: If unable to complete programming because the operation
stops or errors are received, the web browser settings may need to be
configured. Refer to "Software Programming v1.1" on the technician service
publication web site "Service Tips" tab.
From the OASIS tab, select the "SYNC" button. The Last Recorded State - Software is displayed.
- Scroll to the bottom of the screen, select "Standard", and click the
"Read SYNC" button to compare the current APIM Vehicle Interface Processor
(VIP), Consumer Interface Processor (CIP), and Application software levels
to the last reported state in the Ford online database.
- After the compare is performed, the scan tool automatically selects software for programming. Applications with check marks next to them indicate the APIM already has the latest level installed (no re-installation required).
- Depending on the software level required, the scan tool automatically selects either the Service Pack or Full Flash programming method.
- Although there may be an option available to override the Service Pack installation and perform a Full Flash, choosing this option (Force CIP ) requires additional programming time and is not recommended unless directed by a Technical Service Bulletin (TSB).
- NOTE: Only applications on a flash drive may be loaded to
the APIM through the media hub.
NOTE: If not performing a Full Flash/Force CIP, proceed to Step 10.
Remove the media hub. For additional information, refer to Media Hub.
- NOTE: Do not disconnect the scan tool or cable from
the APIM during programming unless directed by the scan tool on-screen
prompts.
Connect the SYNC Re-Flash Kit cable and adapter between the scan tool USB port and the vehicle USB cable.
- NOTE: Scan tools that have never been used to program SYNC may
encounter a Hardware Wizard pop-up requesting a "WMA SBOOT" driver
installation. If this request is encountered, install the driver and click
the scan tool retry button to continue programming.
Select the "Program SYNC" button to begin the APIM programming process.
- When prompted by the scan tool, disconnect the battery charger, start the engine, and select OK. Once OK is selected, do not interrupt this step (which may take up to 20 minutes or longer).
- The updates are downloaded to the scan tool or to the USB flash drive.
- NOTE: If the scan tool does not have an available USB port, the
Re-Flash Kit cable can be unplugged at this time to make room for
the USB flash drive. Do not disconnect the VCM from the scan tool.
Connect the USB flash drive to the scan tool and follow the on-screen instructions for downloading service packs and applications onto the USB flash drive.
- This step may take up to 20 minutes or longer.
- NOTE: If the media hub was removed, install it before
connecting the USB flash drive to the vehicle. For additional information,
refer to Media Hub.
When prompted by the scan tool, remove the USB flash drive and connect it to the media hub in order to install the applications into the APIM.
- The update should start automatically, and may take up to 20 minutes or longer once begun.
- It is normal for the APIM to reset during this step.
- NOTE: Re-installing the USB flash drive in the scan tool
initiates the remaining automated configuration steps. Failure to do so
results in the loss of feature functionality such as navigation and SYNC
traffic, direction and information services.
Once scan tool programming and USB flash drive programming are complete, re-install the flash drive into the scan tool and select "OK" to report software installation to the Ford online database.
- Recalibrate the touchscreen.
- While in AM/FM mode, press and hold the EJECT button, and within 1 second, press the SEEK UP button.
- Select "APIM Diagnostics".
- Select "Touch Screen Calibration".
- Touch the touch points (a stylus is not required) as instructed by the touchscreen.
- To accept the new settings, touch anywhere on the screen once "Press the Enter key to accept the new settings" is displayed.
- Clear all CMDTCs.
Accessory Protocol Interface Module (APIM) Programming - Module Replacement
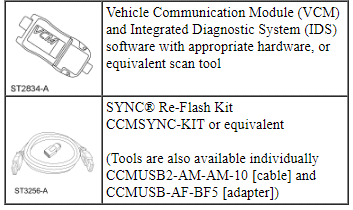
Special Tool(s)
NOTE: Use this procedure to program and provision the module when a new Accessory Protocol Interface Module (APIM) is being installed. For additional information on choosing the correct programming procedure, refer to Information and Entertainment System, APIM Programming.
NOTE: A Universal Serial Bus (USB) flash drive with a minimum storage size of 1 gigabyte (GB) may be required for this procedure (obtain locally).
NOTE: Some programming files are large (greater than 2 gigabytes). It is important that the scan tool have enough available hard drive free space to accommodate the programming file download. If a "Disk Space Error" is received, additional free space must be created on the hard drive.
NOTE:
- Install the new APIM before performing this procedure.
- To prevent timeout errors and to minimize programming time, a hardwired internet connection is strongly recommended when programming.
- During programming, the vehicle display may go blank momentarily.
- Make sure the scan tool is plugged into a power supply due to the length of programming time.
- The Integrated Diagnostic System (IDS) program must be closed before attempting to perform this procedure.
- Connect a battery charger to the vehicle.
- When connecting the charger, the negative battery charger lead must be connected to a clean chassis ground, not the negative battery post.
- Place the ignition in the RUN position. For additional information on Intelligent Access (IA) vehicles, refer to Push Button Start System Ignition Modes in Section 211-05.
- Connect the scan tool and Vehicle Communication Module (VCM) to the vehicle.
- Open Internet Explorer on the scan tool and go to the technician service publication web site. On the OASIS tab, select "Read VIN & DTCs", and select "Go".
- NOTE: This procedure will clear all Continuous Memory Diagnostic
Trouble Codes (CMDTCs). The DTCs must be recorded now if other diagnoses are
to be performed after this procedure.
Select Toolbox from technician service publication web site to retrieve and record all CMDTCs.
- NOTE: If unable to complete programming because the operation
stops or errors are received, the web browser settings may need to be
configured. Refer to "Software Programming v1.1" on the technician service
publication web site "Service Tips" tab.
From the OASIS tab, select the "SYNC" button. The Last Recorded State - Software is displayed.
- Scroll to the bottom of the screen, select "Module Replacement", and
click the "Read SYNC" button to compare the current APIM Vehicle Interface
Processor (VIP), Consumer Interface Processor (CIP), and Application
software levels to the last reported state in the Ford online database.
- After the compare is performed, the scan tool automatically selects software for programming. Applications with check marks next to them indicate the APIM already has the latest level installed (no re-installation required).
- Depending on the software level required, the scan tool automatically selects either the Service Pack or Full Flash programming method.
- Although there may be an option available to override the Service Pack installation and perform a Full Flash, choosing this option (Force CIP ) requires additional programming time and is not recommended unless directed by a Technical Service Bulletin (TSB).
- NOTE: Only applications on a flash drive may be loaded to
the APIM through the media hub.
NOTE: If not performing a Full Flash/Force CIP, proceed to Step 10.
Remove the media hub. For additional information, refer to Media Hub.
- NOTE: Do not disconnect the scan tool or cable from
the APIM during programming unless directed by the scan tool on-screen
prompts.
Connect the SYNC Re-Flash Kit cable and adapter between the scan tool USB port and the vehicle USB cable.
- NOTE: Scan tools that have never been used to program SYNC may
encounter a Hardware Wizard pop-up requesting a "WMA SBOOT" driver
installation. If this request is encountered, install the driver and click
the scan tool retry button to continue programming.
Select the "Program SYNC" button to begin the APIM programming process.
- When prompted by the scan tool, disconnect the battery charger, start the engine, and select OK. Once OK is selected, do not interrupt this step (which may take up to 20 minutes or longer).
- The updates are downloaded to the scan tool or to the USB flash drive.
- NOTE: If the scan tool does not have an available USB port, the
Re-Flash Kit cable can be unplugged at this time to make room for
the USB flash drive. Do not disconnect the VCM from the scan tool.
Connect the USB flash drive to the scan tool and follow the on-screen instructions for downloading service packs and applications onto the USB flash drive.
- This step may take up to 20 minutes or longer.
- NOTE: If the media hub was removed, install it before
connecting the USB flash drive to the vehicle. For additional information,
refer to Media Hub.
When prompted by the scan tool, remove the USB flash drive and connect it to the media hub in order to install the applications into the APIM.
- The update should start automatically, and may take up to 20 minutes or longer once begun.
- It is normal for the APIM to reset during this step.
- NOTE: Re-installing the USB flash drive in the scan tool
initiates the remaining automated configuration steps. Failure to do so
results in the loss of feature functionality such as navigation and SYNC
traffic, direction and information services.
Once scan tool programming and USB flash drive programming are complete, re-install the flash drive into the scan tool and select "OK" to report software installation to the Ford online database.
- Recalibrate the touchscreen.
- While in AM/FM mode, press and hold the EJECT button, and within 1 second, press the SEEK UP button.
- Select "APIM Diagnostics".
- Select "Touch Screen Calibration".
- Touch the touch points (a stylus is not required) as instructed by the touchscreen.
- To accept the new settings, touch anywhere on the screen once "Press the Enter key to accept the new settings" is displayed.
- Clear all CMDTCs.
Accessory Protocol Interface Module (APIM) Programming - Custom
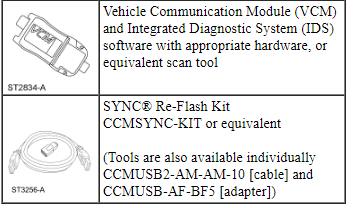
Special Tool(s)
NOTE: Use this procedure to show all available software options, including Applications, that can be programmed into the Accessory Protocol Interface Module (APIM) when upgrades become available or as directed by a Technical Service Bulletin (TSB). For additional information on choosing the correct programming procedure, refer to Information and Entertainment System, APIM Programming.
NOTE: A Universal Serial Bus (USB) flash drive with a minimum storage size of 1 gigabyte (GB) may be required for this procedure (obtain locally).
NOTE: Some programming files are large (greater than 2 gigabytes). It is important that the scan tool have enough available hard drive free space to accommodate the programming file download. If a "Disk Space Error" is received, additional free space must be created on the hard drive.
NOTE:
- To prevent timeout errors and to minimize programming time, a hardwired internet connection is strongly recommended when programming.
- During programming, the vehicle display may go blank momentarily.
- Make sure the scan tool is plugged into a power supply due to the length of programming time.
- The Integrated Diagnostic System (IDS) program must be closed before attempting to perform this procedure.
- Connect a battery charger to the vehicle.
- When connecting the charger, the negative battery charger lead must be connected to a clean chassis ground, not the negative battery post.
- Place the ignition in the RUN position. For additional information on Intelligent Access (IA) vehicles, refer to Push Button Start System Ignition Modes in Section 211-05.
- Connect the scan tool and Vehicle Communication Module (VCM) to the vehicle.
- Open Internet Explorer on the scan tool and go to the technician service publication web site. On the OASIS tab, select "Read VIN & DTCs", and select "Go".
- NOTE: This procedure will clear all Continuous Memory Diagnostic
Trouble Codes (CMDTCs). The DTCs must be recorded now if other diagnoses are
to be performed after this procedure.
Select Toolbox from technician service publication web site to retrieve and record all CMDTCs.
- NOTE: If unable to complete programming because the operation
stops or errors are received, the web browser settings may need to be
configured. Refer to "Software Programming v1.1" on the technician service
publication web site "Service Tips" tab.
From the OASIS tab, select the "SYNC" button. The Last Recorded State - Software is displayed.
- Scroll to the bottom of the screen, select "Custom" and click the "Read
SYNC" button to compare the current APIM Vehicle Interface Processor (VIP),
Consumer Interface Processor (CIP), and Application software levels to the
last reported state in the Ford online database.
- After the compare is performed, the scan tool displays a list of available software. Select the software level needed as indicated by the TSB. If the software level is not known, stop this procedure and perform standard programming, which automatically selects the latest software levels. Refer to Accessory Protocol Interface Module (APIM) Programming - Standard.
- Depending on the software level required, the scan tool automatically selects either the Service Pack or Full Flash programming method.
- Although there may be an option available to override the Service Pack installation and perform a Full Flash, choosing this option (Force CIP ) requires additional programming time and is not recommended unless directed by a TSB.
- Applications may require selection for installation. Applications with a green check mark next to them indicate that the APIM already has the latest level installed (no re-installation required). All applications can be selected for installation.
- Select the customer-requested upgrade or the Application directed by the TSB.
- NOTE: Only applications on a flash drive may be loaded to
the APIM through the media hub.
NOTE: If not performing a Full Flash/Force CIP, proceed to Step 11.
Remove the media hub. For additional information, refer to Media Hub.
- NOTE: Do not disconnect the scan tool or cable from
the APIM during programming unless directed by the scan tool on-screen
prompts.
Connect the SYNC Re-Flash Kit cable and adapter between the scan tool USB port and the vehicle USB cable.
- NOTE: Scan tools that have never been used to program SYNC may
encounter a Hardware Wizard pop-up requesting a "WMA SBOOT" driver
installation. If this request is encountered, install the driver and click
the scan tool retry button to continue programming.
Select the "Program SYNC" button to being the APIM programming process.
- When prompted by the scan tool, disconnect the battery charger, start the engine, and select OK. Once OK is selected, do not interrupt this step (which may take up to 20 minutes or longer).
- The updates are downloaded to the scan tool or to the USB flash drive.
- NOTE: If the scan tool does not have an available USB port, the
Re-Flash Kit cable can be unplugged at this time to make room for
the USB flash drive. Do not disconnect the VCM from the scan tool.
Connect the USB flash drive to the scan tool and follow the on-screen instructions for downloading service packs and applications onto the USB flash drive.
- This step may take up to 20 minutes or longer.
- NOTE: If the media hub was removed, install it before
connecting the USB flash drive to the vehicle. For additional information,
refer to Media Hub.
When prompted by the scan tool, remove the USB flash drive and connect it to the media hub in order to install the applications into the APIM.
- The update should start automatically, and may take up to 20 minutes or longer once begun.
- It is normal for the APIM to reset during this step.
- NOTE: Re-installing the USB flash drive in the scan tool
initiates the remaining automated configuration steps. Failure to do so
results in the loss of feature functionality such as navigation and SYNC
traffic, direction and information services.
Once scan tool programming and USB flash drive programming are complete, re-install the flash drive into the scan tool and select "OK" to report software installation to the Ford online database.
- Recalibrate the touchscreen.
- While in AM/FM mode, press and hold the EJECT button, and within 1 second, press the SEEK UP button.
- Select "APIM Diagnostics".
- Select "Touch Screen Calibration".
- Touch the touch points (a stylus is not required) as instructed by the touchscreen.
- To accept the new settings, touch anywhere on the screen once "Press the Enter key to accept the new settings" is displayed.
- Clear all CMDTCs.
Satellite Radio Receiver Electronic Serial Number (ESN) Retrieval
- NOTE: If the ACM is completely inoperative (does not power
up), the part number decal on the ACM chassis can be used to attain the ESN.
Turn the ACM on.
- Using the touchscreen menus access the SIRIUS main menu.
- Using the touchscreen menu select the options menu. The ESN is displayed on the options screen.
Touchscreen Calibration
NOTE: Recalibrate the touchscreen by following the scan tool prompts or the steps below.
- Make sure the vehicle battery is fully charged in order to avoid an inoperative touchscreen.
- Turn the ACM on.
- While in AM/FM mode, press and hold the EJECT button, and within 1 second, press the SEEK UP button.
- Press and hold the seek down button to enter the touchscreen calibration.
- Touch and hold the touch points as they appear on the touchscreen (a stylus is not required).
- When "New calibration settings have been measured. Press the Enter key to accept the new settings." is displayed, touch anywhere on the screen to accept the new settings.
- Clear all CMDTCs.
 Diagnosis and Testing
Information and Entertainment System
Special Tool(s)
DTC Chart(s)
NOTE: For SYNC related concerns, REFER to the SYNC Symptom Chart
before connecting the scan tool and beginning DTC-based diagno ...
 Removal and Installation
Antenna - Satellite Radio
Removal and Installation
NOTE: This procedure applies to both the stand-alone satellite radio
antenna and the combination satellite radio/Global Positioning System (G ...
Other materials:
Under hood overview
3.5L V6 engine
A. Engine coolant reservoir
B. Windshield washer fluid reservoir
C. Brake fluid reservoir
D. Battery
E. Power distribution box
F. Air filter assembly
G. Automatic transmission fluid dipstick
H. Engine oil dipstick
I. Engine oil filler cap
3.5L V6 SHO engine
A. Engine co ...
Information
If your vehicle is equipped with
Navigation, touch the
i (Information) button to access these features. If your vehicle
is not equipped with Navigation, touch the corner of the
touchscreen with the green tab.
Under the Information menu, you can access features, such as:
A. SYNC Services
B ...
Engine Ignition - 3.5L GTDI
SPECIFICATIONS
Material
General Specifications
Torque Specifications
a Refer
to the procedure in this section.
DESCRIPTION AND OPERATION
Engine Ignition
3.5L GTDI
System Operation
Refer to the PC/ED manual
section 1 Description and Operation.
Component Description
Refe ...
