SPECIFICATIONS
Material
General Specifications
Torque Specifications
DESCRIPTION AND OPERATION
Engine Ignition
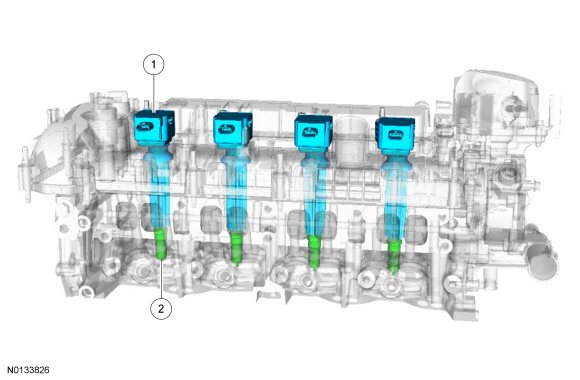
Component Location
System Operation
REFER to the PC/ED manual section 1 Description and Operation.
Component Description
REFER to the PC/ED manual section 1 Description and Operation.
DIAGNOSIS AND TESTING
Engine Ignition
For PCM DTCs, REFER to Section 303-14 PCM DTC Chart. For driveability symptoms without DTCs, refer to the PC/ED manual, section 3 Symptom Charts.
REMOVAL AND INSTALLATION
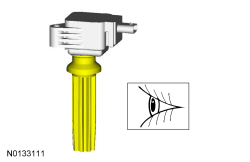
Ignition Coil-On-Plug
Material
Removal and Installation
NOTE: Removal steps in this procedure may contain installation details.
- Remove the Air Cleaner (ACL) outlet pipe. For additional information, refer to Section 303-12.
-
- Tighten to 5 Nm (44 lb-in).
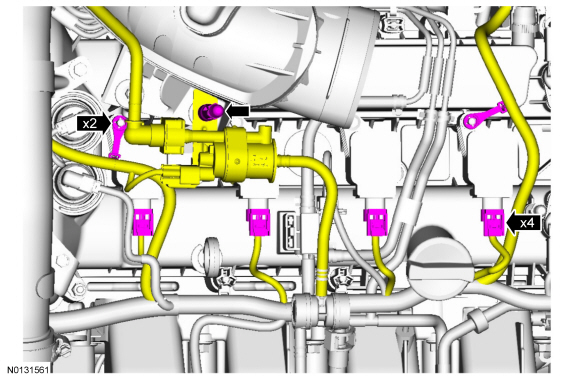
NOTE: Use compressed air to remove any foreign material from the ignition coil-on-plugs and surrounding area before removing the ignition coil-on-plugs.
NOTE: When removing the ignition coil-on-plugs, a slight twisting motion will break the seal and ease removal.
NOTE: When installing apply a small amount of silicone brake caliper grease and dielectric compound to the inside of the ignition coil-on-plug boots before installation.
-
- Tighten to 8 Nm (71 lb-in).
- Inspect the ignition coil-on-plug rubber boot assembly for cracks, rips, or tears. Replace any damaged coil-on-plug rubber boots. Visual check.
- To install, reverse the removal procedure.
Spark Plugs
Removal and Installation
NOTE: Removal steps in this procedure may contain installation details.
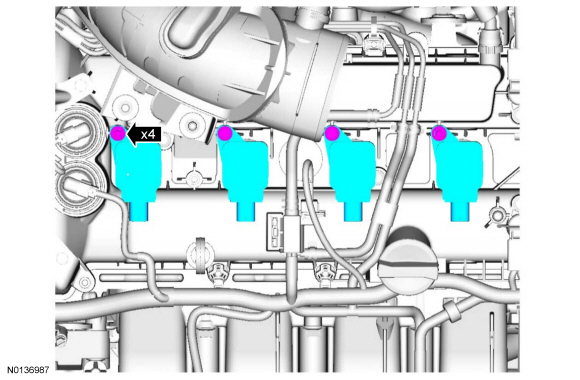
- Remove the 4 ignition coil-on-plugs. For additional information, refer to Ignition Coil-On-Plug in this section.
- NOTICE: Only use hand tools when removing or installing the
spark plugs, or damage can occur to the cylinder head or spark plug.
NOTICE: The spark plug procedure must be followed exactly or damage to the cylinder head and spark plug will result.
NOTICE: Do not remove the spark plugs when the engine is hot or cold soaked. Spark plug thread or cylinder head damage can occur. Make sure the engine is warm (hand touch after cooling down) prior to spark plug removal.
NOTE: Used compressed air to remove any foreign material in the spark plug well before removing the spark plugs.
Remove the 4 spark plugs.- Tighten to 12 Nm (106 lb-in).
- Inspect the 4 spark plugs. For additional information, refer to Section 303-00.
- To install, reverse the removal procedure.
 Engine Ignition - 3.5L GTDI
SPECIFICATIONS
Material
General Specifications
Torque Specifications
a Refer
to the procedure in this section.
DESCRIPTION AND OPERATION
Engine Ignition
3.5L GTDI
System Operation
R ...
 Engine Ignition - 3.7L Ti-VCT
SPECIFICATIONS
Material
General Specifications
Torque Specifications
DESCRIPTION AND OPERATION
Engine Ignition
Component Location
3.7L Ti-VCT
System Operation
REFER to the PC/ED m ...
Other materials:
Child seat positioning
WARNING: Airbags can kill or injure a child in a child seat.
Never place a rear-facing child seat in front of an active airbag.
If you must use a forward-facing child seat in the front seat, move the
vehicle seat upon which the child seat is installed all the way back.
When possible, all c ...
Rear Drive Axle/Differential
SPECIFICATIONS
Material
Torque Specifications
DESCRIPTION AND OPERATION
Rear Drive Axle and Differential
The rear drive axle consists of the following components:
Dished circular flange
Full-time Active Torque Coupling (ATC)
Aluminum housing with steel housing cover
Matched ring and pinion ...
Disassembly
Engine
Special Tool(s)
Material
NOTICE: During engine repair procedures, cleanliness is extremely
important. Any foreign material, including any material created while cleaning
gasket surfaces that enters the oil passages, coolant passages or the oil pan,
can cause engine failure.
NOTE:& ...
