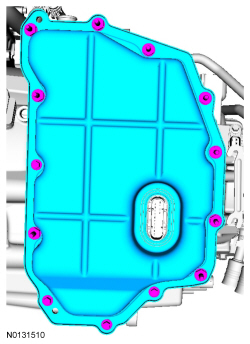
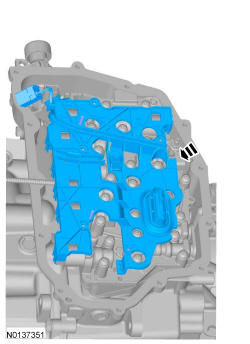
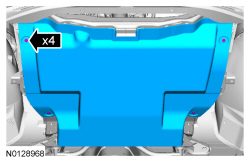
Main Control Cover
Material
Removal
- With the vehicle in NEUTRAL, position it on a hoist. Refer to Section 100-02.
- Remove the ACL assembly. Refer to Section 303-12.

- Drain the fluid.
- Tighten to 12 Nm (106 lb-in).


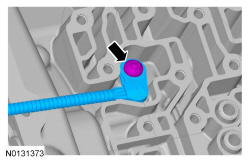
- NOTE: Note the location of the studbolts for assembly.
Installation
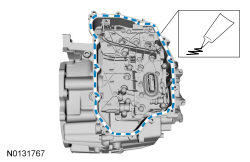
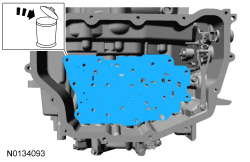
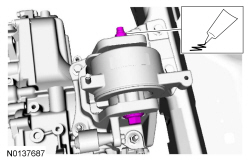
- Clean the specified component with the specified material.
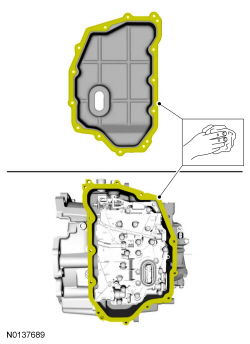
- NOTE: Be sure the sealing surface of the main control cover and
the transmission housing are free of oil before applying Ultra Silicone
Sealant.
Apply the substance from the specified tube.
Material: Ultra Silicone Sealant TA-29.
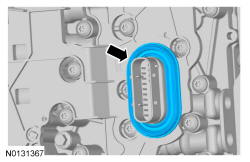
- NOTICE: Inspect the main control-to-main control cover grommet
to make sure that it seals on the inside of the main control cover or a
transmission fluid leak will occur.
NOTE: Install the studbolts in the locations noted during disassembly.
- Tighten to 12 Nm (106 lb-in).


-
- Tighten to 5 Nm (44 lb-in).
-
- Tighten to 9 Nm (80 lb-in).
- Install the ACL assembly. Refer to Section 303-12.
- Fill the transmission with clean transmission fluid. Refer to Transmission Fluid Drain and Refill.
Manual Control Lever Shaft Seal
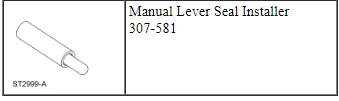
Special Tool(s)
Removal
- Remove the TR sensor. For additional information, refer to Digital Transmission Range (TR) Sensor in this section.
- Screwdriver. Discard the specified component. Follow local disposal regulations.

Installation
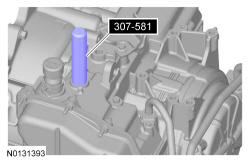
- Special Tool(s): Manual Lever Seal Installer 307-581.
- Install the TR sensor. For additional information, refer to Digital Transmission Range (TR) Sensor in this section.
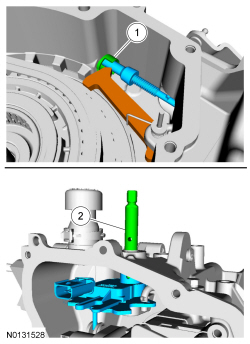
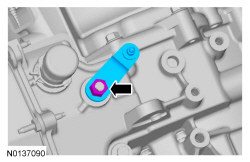
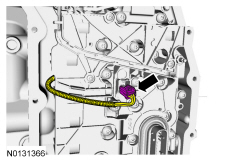
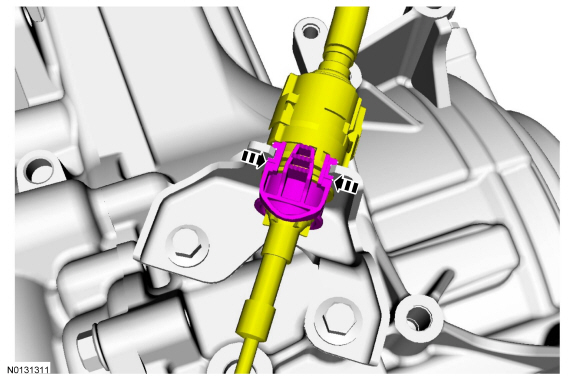
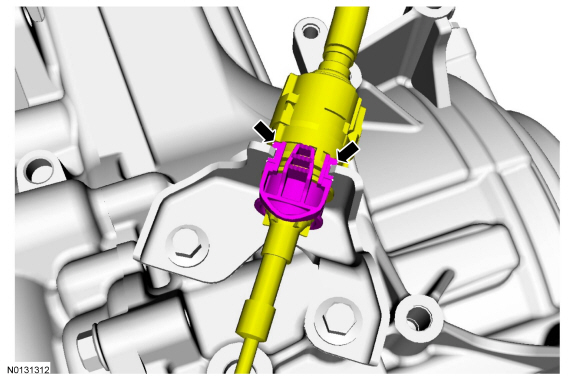
Digital Transmission Range (TR) Sensor
Removal
- Remove the main control cover. Refer to Main Control Cover.


- NOTICE: Do not drive the manual control shaft pin through the
manual control shaft. The manual control shaft pin will contact the
transmission case causing damage to the transmission case.
Locking pliers. Discard the specified component. Follow local disposal regulations.
-
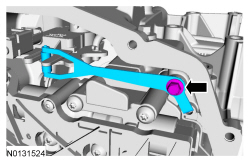
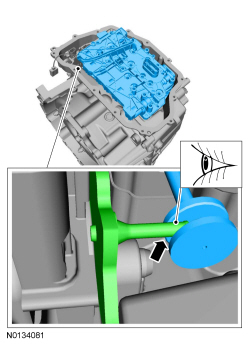
- Hold the TR sensor in place and slide the manual shaft outward until the manual shaft is out of the transmission case.
- Remove the TR sensor from the transmission, leaving the park pawl actuating rod attached to the TR sensor.
Installation
-
- Install the TR sensor and park pawl actuating rod in the transmission case.
- Install the manual shaft in the transmission case through the TR sensor.
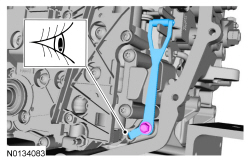
- NOTE: Be sure that the TR sensor manual pin is correctly
installed in the manual valve.
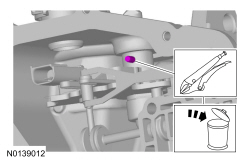
Visual check.
- Pin punch.
New TR sensor locking pin.
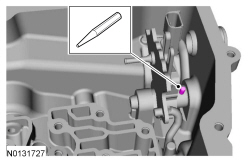
- Alignment tab in the alignment hole. Visual check.
- Tighten to 13 Nm (115 lb-in).

- Install the main control cover. Refer to Main Control Cover.
- NOTICE: Make sure that when installing the manual control
lever it is fully seated onto the manual control lever shaft or damage to
the manual control lever shaft will occur and the lever will come loose.
NOTICE: Make sure to hold the manual control lever while tightening the manual control lever nut or damage to the manual control lever and park components will occur.
- Tighten to 24 Nm (18 lb-ft).
- Connect the selector lever cable end to the manual control lever with the manual control lever and selector lever in DRIVE. Check selector lever cable adjustment. Refer to Section 307-05.
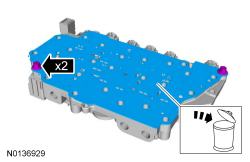
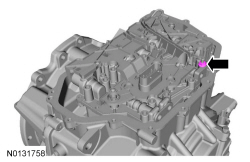
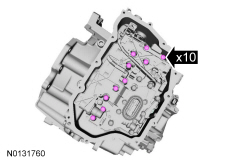
Solenoid Body Leadframe
Special Tool(s)
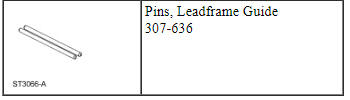
Removal
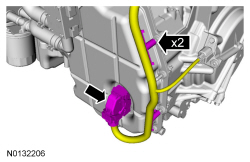
- Remove the main control cover. For additional information, refer to Main Control Cover in this section.
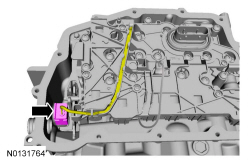
- NOTICE: Be careful not to bend or twist the leadframe or the solenoid terminals when removing the leadframe or damage can occur to the leadframe or the solenoids.
Installation
- Special Tool(s): Pins, Leadframe Guide 307-636.
- Special Tool(s): Pins, Leadframe Guide 307-636.


- Install the main control cover. For additional information, refer to Main Control Cover in this section.
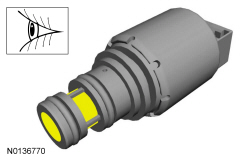
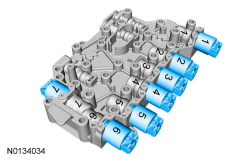
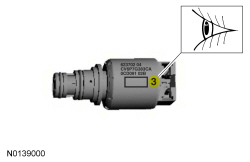
Solenoids
Removal
- Remove the solenoid body leadframe. Refer to Solenoid Body Leadframe in this section.
- NOTICE: The solenoids are calibrated from the factory and are
not all the same. Failure to mark the solenoids to the ports they were
originally in can result in mixing the solenoids and can cause damage to the
transmission or a harsh shift.
Using a paint pen, number the solenoids and solenoid body to clearly mark which solenoid was removed from which bore in the solenoid body.


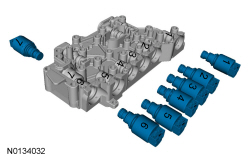
Installation
- Inspect the solenoid screens for debris that may restrict fluid flow through the screen.
- NOTICE: The solenoids are calibrated from the factory and are
not all the same. Failure to install the solenoids in the ports they were
originally in can result in damage to the transmission or a harsh shift.
If new solenoid(s) are not being installed, position the solenoids in the solenoid body ports from which their numbers correspond.
- If installing a new VFS , determine the base part number of the
solenoid(s). The TCC solenoid, SSA and SSC are all normally low pressure
solenoids. The LPC solenoid, SSB and SSD are all normally high pressure
solenoids. SSE is not a VFS ; it is an ON/OFF solenoid.
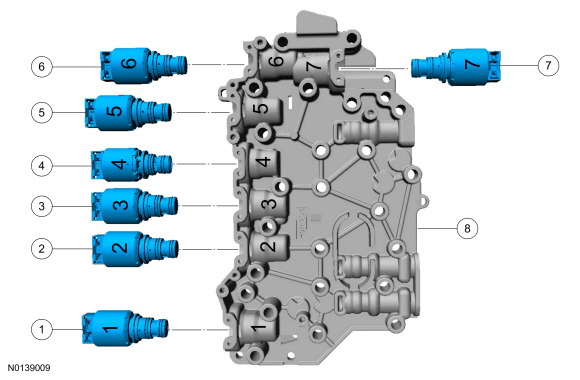
- If installing new solenoids, note the color of the plastic nozzle and the large O-ring. High pressure solenoids, such as the LPC solenoid, SSB and SSD , have black plastic nozzles and orange O-rings. Low pressure solenoids, such as the TCC solenoid, SSA and SSC , have brown plastic nozzles and green O-rings. The solenoids can only be replaced with the same color solenoid.
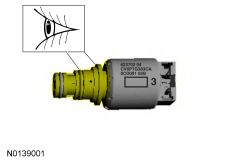
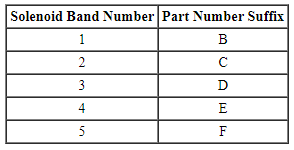
- Determine the part number suffix by checking the solenoid service band number etched on the side of the solenoid. The band number is next to the two-dimensional matrix barcode on the side of the solenoid and will be a 1, 2, 3, 4 or 5. Determine the part number suffix and match the new solenoid base part number and suffix with the old solenoid.
- Solenoid retaining pins.
- Install the solenoid body leadframe. Refer to Solenoid Body Leadframe in this section.
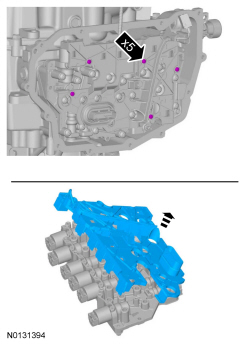
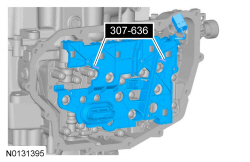
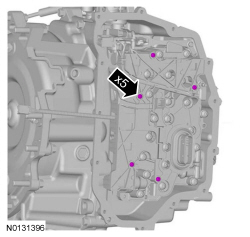
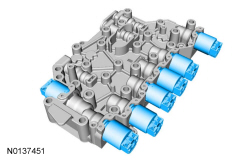
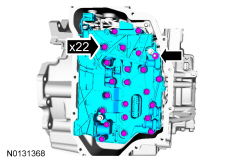
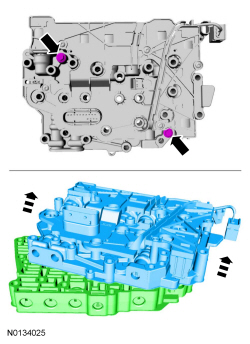
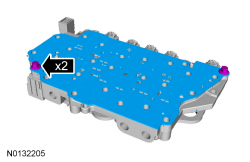
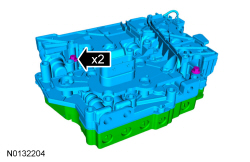
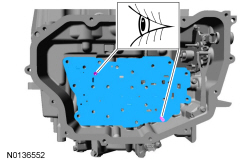
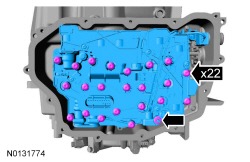
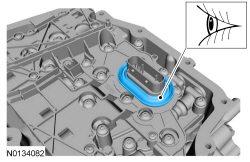
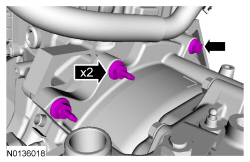
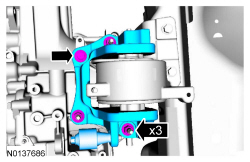
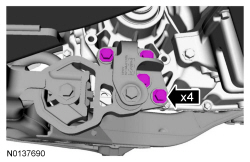
Main Control Valve Body
Removal
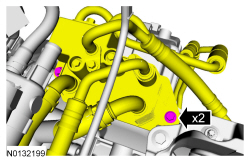
- Remove the main control cover. Refer to Main Control Cover.


- NOTICE: The main control should be handled with care or damage to the main control may occur.
Installation
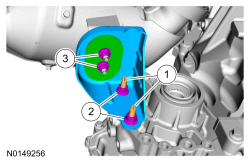
- New separator plate.
- Tighten to 10 Nm (89 lb-in).
-
- Tighten to 10 Nm (89 lb-in).
- Align the new separator plate on the stud and the guide pin.
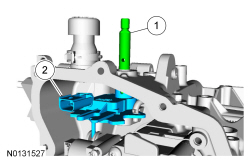
- NOTE: Be sure that the manual pin (part of the TR sensor) is correctly installed in the manual valve.

- Nut hand-tight.
- Short bolts hand-tight.
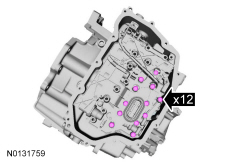
- Long bolts hand-tight.
- Tighten in a crisscross pattern.
- Tighten to 10 Nm (89 lb-in).
- NOTE: Be sure the main control-to-cover seal is installed with the holes facing up.


- Install the main control cover. Refer to Main Control Cover.
- NOTE: The solenoid body strategy data file and solenoid body
identification must be updated anytime a new solenoid body is installed. A
new solenoid body service tag must be installed over the current solenoid
body service tag on top of the transmission case.
Refer to Solenoid Body Strategy Download.
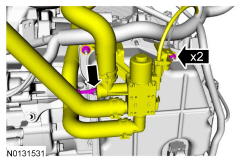
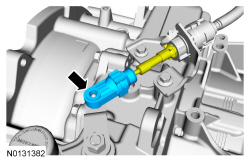
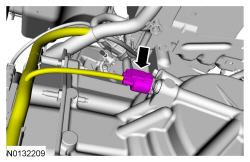
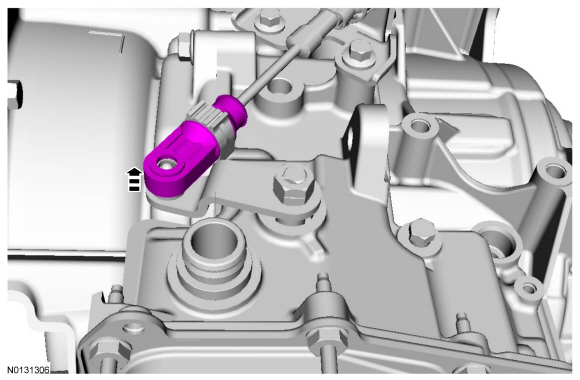
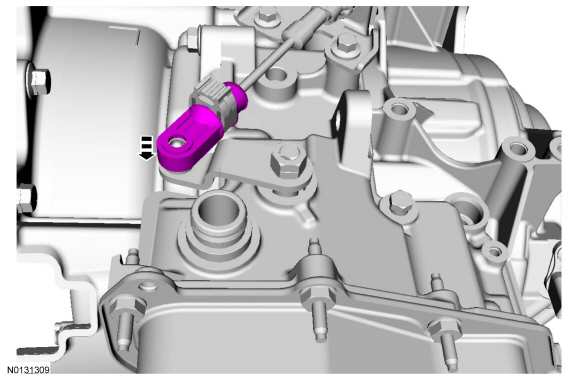
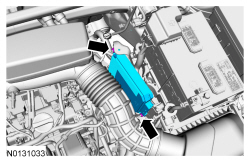
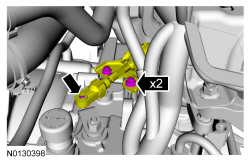
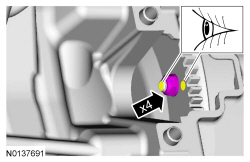
Output Shaft Speed (OSS) Sensor
Removal
- Remove the main control. For additional information, refer to Main Control Valve Body in this section.

Installation
-
- Tighten to 10 Nm (89 lb-in).
- Install the main control. For additional information, refer to Main Control Valve Body in this section.
Solenoid Body Assembly
- Remove the solenoid body assembly. For additional information, refer to Main Control Valve Body.
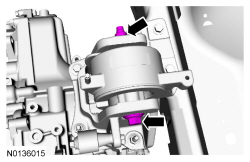
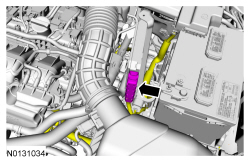
Turbine Shaft Speed (TSS) Sensor
Removal
- With the vehicle in NEUTRAL, position it on a hoist. For additional information, refer to Section 100-02.
Installation
-
- Tighten to 10 Nm (89 lb-in).


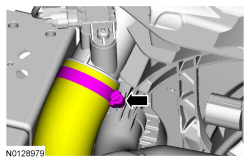
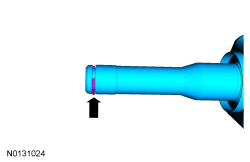
Halfshaft Seal - RH
Special Tool(s)
Removal
- With the vehicle in NEUTRAL, position it on a hoist. Refer to Section 100-02.
- Remove the intermediate shaft. Refer to Section 205-04.
- General Equipment: Awl.

- General Equipment: Dent Puller.
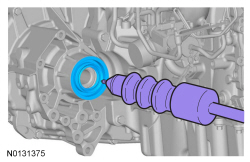
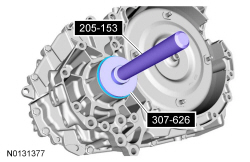
Installation
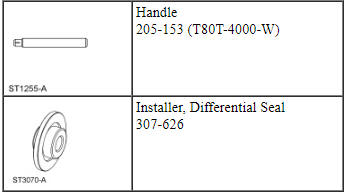
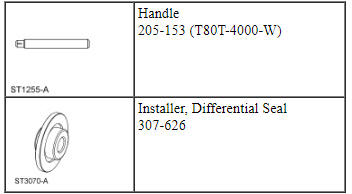
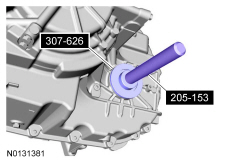
- Special Tool(s): Installer, Differential Seal 307-626 and Handle 205-153 (T80T-4000-W).
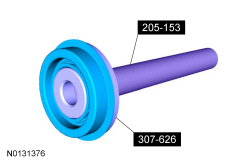
- Special Tool(s): Installer, Differential Seal 307-626 and Handle 205-153 (T80T-4000-W).
- Install the intermediate shaft. Refer to Section 205-04.
- Check and top off the transmission fluid to the correct level. Refer to Transmission Fluid Level Check.
Halfshaft Seal - LH
Special Tool(s)
Removal
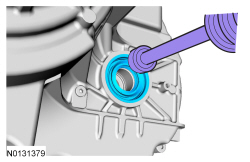
- With the vehicle in NEUTRAL, position it on a hoist. For additional information, refer to Section 100-02.
- Remove the front LH halfshaft. For additional information, refer to Section 205-04.
- General Equipment: Awl.
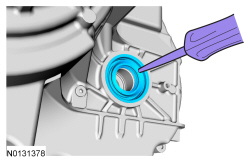
- General Equipment: Dent Puller.
Installation
- Special Tool(s): Installer, Differential Seal 307-626 and Handle 205-153 (T80T-4000-W).
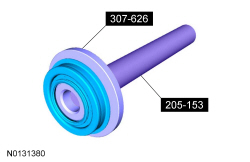
- Special Tool(s): Installer, Differential Seal 307-626 and Handle 205-153 (T80T-4000-W).
- Install the front LH halfshaft. For additional information, refer to Section 205-04.
- Check and top off the transmission fluid to the correct level. For additional information, refer to Transmission Fluid Level Check in this section.
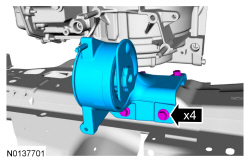
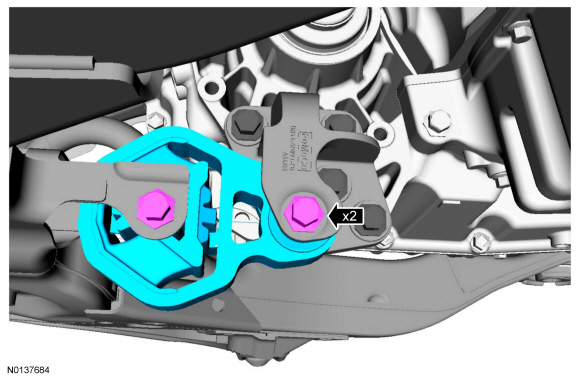
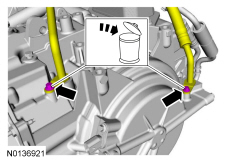
Transaxle Support Insulator
Special Tool(s)
Material

Removal
- With the vehicle in NEUTRAL, position it on a hoist. Refer to Section 100-02.
- Remove the ACL and the outlet pipe. Refer to Section 303-12.
- Remove the battery tray. Refer to Section 414-01.
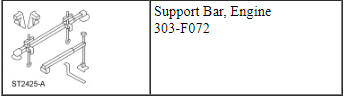
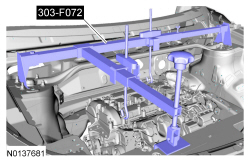
- Special Tool(s): Support Bar, Engine 303-F072.


Installation
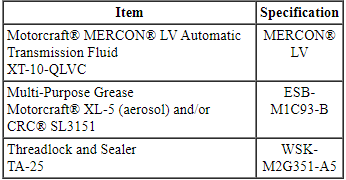
- Wire brush. Apply the substance from the specified tube.
Material: Threadlock and Sealer TA-25.- Tighten to 55 Nm (41 lb-ft).
- Tighten to 70 Nm (52 lb-ft).
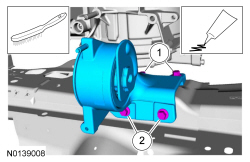
- Apply the substance from the specified tube.
Material: Threadlock and Sealer TA-25.- Tighten the 3 nuts to 63 Nm (46 lb-ft).
- Tighten the bolt to 80 Nm (59 lb-ft).

- Apply the substance from the specified tube.
Material: Threadlock and Sealer TA-25.- Tighten to 175 Nm (129 lb-ft).

- NOTE: When installing the selector lever cable, make sure that both selector lever cable locking tabs are locked in place. Press the selector lever cable into the selector lever cable bracket and listen for the selector lever cable retainer to click in place. Pull back on the selector lever cable to make sure that the selector lever is locked into the selector lever cable bracket.
- NOTICE: To prevent selector lever cable damage, do not apply
force to the selector lever cable between the manual control lever and the
selector lever cable bracket.
NOTE: Make sure that the selector lever cable end is correctly installed onto the manual control lever ball stud by pulling back on the selector lever cable end.
- Install the battery tray and battery. Refer to Section 414-01.
- Install the ACL and the outlet pipe. Refer to Section 303-12.
Transaxle Support Insulator - Anti-Roll
Removal
- With the vehicle in NEUTRAL, position it on a hoist. Refer to Section 100-02.

Installation
- Wire brush. Apply the substance from the specified tube.
Material: Threadlock and Sealer TA-25.- Tighten to 103 Nm (76 lb-ft).


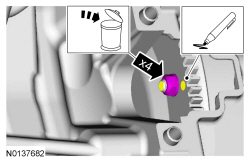
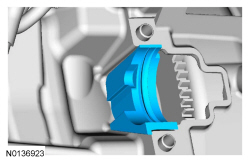
Transaxle Case Bushing
Special Tool(s)
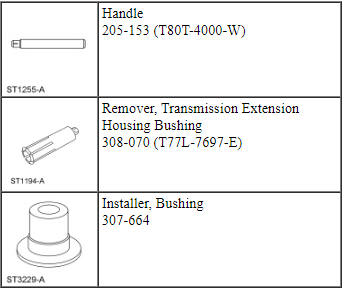
Removal

- Remove the front LH halfshaft seal. For additional information, refer to Halfshaft Seal - LH in this section.
- NOTE: Leave the drain plug out after the transmission fluid
drains. The drain plug will need to remain out to clean any debris from the
damaged or worn bushing.
Drain the transmission fluid.
- Special tool(s): Step Plate 205-D015 (D80L-630-4).

- Special tool(s): Remover, Transmission Extension Housing Bushing 308-070 (T77L-7697-E).
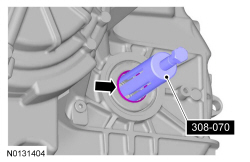
- Special tool(s): Step Plate 205-D015 (D80L-630-4).
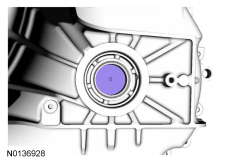
Installation
- Special tool(s): Installer, Bushing 307-664, Handle 205-153 (T80T-4000-W).
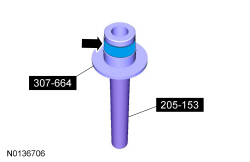
- Clean the specified component with the specified material.
Special tool(s): Installer, Bushing 307-664, Handle 205-153 (T80T-4000-W).
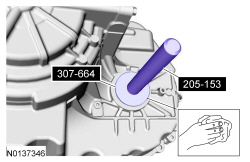
-
- Tighten to 12 Nm (106 lb-in).

- Install a new LH halfshaft seal. For additional information, refer to Halfshaft Seal - LH in this section.
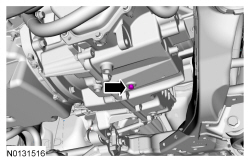
Transmission Control Module (TCM)
Removal
- NOTICE: Keep the TCM electrical connector straight when disconnecting it or damage to the connector terminals can occur.

Installation
-
- Tighten to 20 Nm (177 lb-in).

- NOTICE: Keep the TCM electrical connector straight when connecting it or damage the connector terminals can occur.
- Restore the module configuration. Carry out the module configuration restore steps of the PMI procedure. For additional information, refer to Section 418-01.
- Download the solenoid body strategy. For additional information, refer to Solenoid Body Strategy Download in this section.
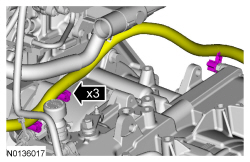
Transaxle
Special Tool(s)
Material
Removal
- With the vehicle in NEUTRAL, position it on a hoist. Refer to Section 100-02.
- Remove the ACL and the outlet pipe. Refer to Section 303-12.
- Remove the battery tray. Refer to Section 414-01.

- Discard the specified component. Follow local disposal regulations.
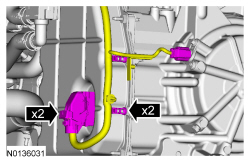
- NOTE: If the transmission fluid cooler tube seals or backing
rings are stuck in the transmission case, remove the seals and backing
rings.
Visual check.


- Remove the starter. Refer to Section 303-06.

- NOTICE: Only rotate the engine in a clockwise direction or
engine damage will occur.
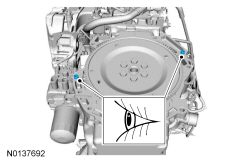
Index mark one stud and the flexplate for assembly reference. Marker. Discard the specified component. Follow local disposal regulations.

- NOTE: When removing the front subframe, it is not necessary to
remove the roll restricter through bolt.
Remove the subframe. Refer to Section 502-00.
- NOTE: If transmission disassembly or installation of a new
transmission is necessary, drain the transmission fluid.
- Tighten to 12 Nm (106 lb-in).
- Relocate and support the component.

- Relocate and support the component.
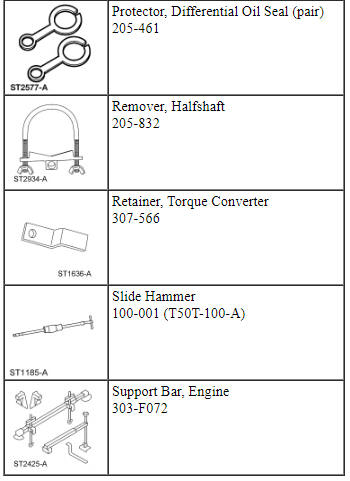
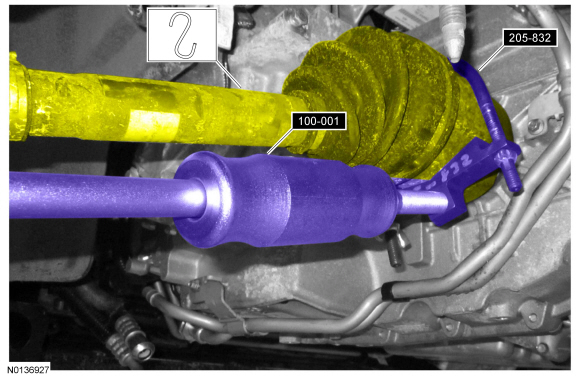
Special Tool(s): Remover, Halfshaft 205-832, Slide Hammer 100-001 (T50T-100-A).


- Special Tool(s): Support Bar, Engine 303-F072.

- Support the transmission. Secure the transmission to the transmission
jack with a safety strap.
General Equipment: Transmission Jack.

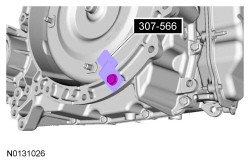
- Special Tool(s): Retainer, Torque Converter 307-566.
- If the transmission is to be overhauled or if installing a new or re-manufactured transmission, carry out the transmission fluid cooler backflushing and cleaning. Refer to the Transmission Fluid Cooler Backflushing and Cleaning in Section 307-02B.
Installation
NOTICE: Prior to installing a new, re-manufactured or overhauled transmission, clean the transmission fluid cooler tubes. Failure to clean the transmission fluid cooler tubes can result in transmission failure.
NOTE: If the transmission was overhauled, or if installing a new transmission and the transmission fluid cooler has not been flushed, flush the transmission fluid cooler at this time. Refer to the Transmission Fluid Cooler Backflushing and Cleaning in Section 307-02B. Clean the transmission-mounted transmission fluid cooler tubes by hand.
- Apply the substance from the specified tube.
Material: Multi-Purpose Grease XG-4 and/or XL-5.
- NOTICE: If the transmission is not positioned on the dowel
pins, damage to the transmission may occur.
NOTE: If the dowel pins were pulled out of the engine block during removal, install new dowel pins in the engine block.
Visual check.
- Support the transmission. Secure the transmission to the transmission
jack with a safety strap.
General Equipment: Transmission Jack.
- Position the transmission behind the engine and remove the Special Tool.
Special Tool(s): Retainer, Torque Converter 307-566.

-
- Tighten to 48 Nm (35 lb-ft).
- Apply the substance from the specified tube.
Material: Threadlock and Sealer TA-25.- Tighten the nuts to 63 Nm (46 lb-ft).
- Tighten the bolt to 80 Nm (59 lb-ft).

- Apply the substance from the specified tube.
Material: Threadlock and Sealer TA-25.- Tighten to 175 Nm (129 lb-ft).
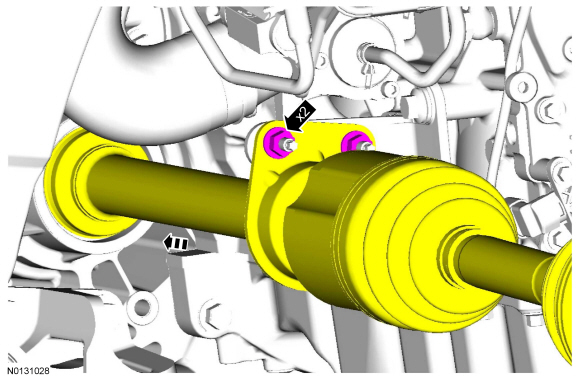
-
- Tighten to 18 Nm (13 lb-ft).
- Tighten to 40 Nm (30 lb-ft).
- Tighten to 25 Nm (18 lb-ft).
-
- Tighten to 9 Nm (80 lb-in).
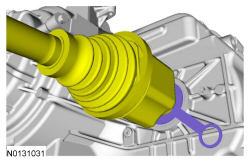
- NOTICE: Make sure to install the correct circlip for this
application. Failure to use the correct diameter circlip may result in shaft
removal concerns or shaft damage during vehicle operation.
Install a new circlip.
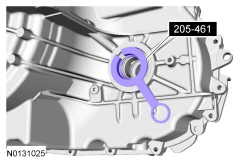
- Special Tool(s): Protector, Differential Oil Seal (pair) 205-461.
- NOTICE: The sharp edges on the halfshaft splines can slice or
puncture the oil seal. Use care when inserting the halfshaft into the
transmission or damage to the seal may occur.
NOTE: After insertion, pull the halfshaft inner end to make sure the circlip is locked.
-
- Tighten to 25 Nm (18 lb-ft).
- Install the subframe. Refer to Section 502-00.
-
- Tighten to 90 Nm (66 lb-ft).
- NOTICE: Only rotate the engine in a clockwise direction or
engine damage will occur.
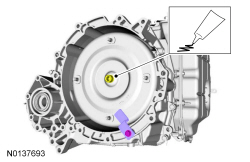
Install new torque converter nuts. Align the index mark made during removal. Visual check.
- Tighten to 40 Nm (30 lb-ft).
- Install the starter. Refer to Section 303-06.
-
- Tighten to 48 Nm (35 lb-ft).

-
- Tighten to 30 Nm (22 lb-ft).
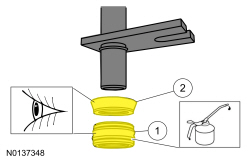
- Visual check. Apply the specified lubricant to the specified component.
Material: Motorcraft MERCON LV Automatic Transmission Fluid XT-10-QLVC.- Seal
- Backing ring
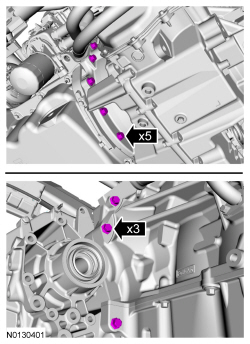
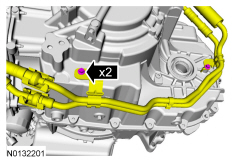
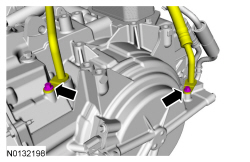
- Install new transmission fluid cooler tube bolts.
- Tighten to 9 Nm (80 lb-in).
-
- Tighten to 9 Nm (80 lb-in).

-
- Tighten to 25 Nm (18 lb-ft).

- Install the battery tray and battery. Refer to Section 414-01.
- Adjust the selector lever cable. Refer to Section 307-05.
- Install the ACL and the outlet pipe. Refer to Section 303-12.
- Fill the transmission with clean transmission fluid. Refer to Transmission Fluid Drain and Refill.
- After completing the repairs, perform the Misfire Monitor Neutral Profile Correction procedure.
- If a new solenoid body is installed, the solenoid body strategy must be updated. Refer to Solenoid Body Strategy Download.
 General Procedures
Solenoid Body Identification Procedure
Original Solenoid Body Service Tag
Using the scan tool, select Powertrain, Transmission and Transmission
Solenoid Body Identification from the toolbox icon a ...
 Disassembly and Assembly
Main Control - Overhaul
Special Tool(s)
Main Control
Main Control Valve Body
Solenoid Body
Main Control Valve Body
Check balls
Solenoid damper
NOTICE ...
Other materials:
Description and Operation
Instrument Panel Cluster (IPC)
Overview
Base IPC
Tachometer
Main menu navigation
Main menu text display
LH turn indicator
TPMS warning indicator
MIL
Stability-traction control indicator (sliding car icon)
Stability-traction control disabled indicator (sliding car OFF icon)
Air b ...
Getting the services you need
Warranty repairs to your vehicle must be performed by an authorized
dealer. While any authorized dealer handling your vehicle line will
provide warranty service, we recommend you return to your selling
authorized dealer who wants to ensure your continued satisfaction.
Please note that certain ...
Disassembly
Engine
Special Tool(s)
Material
WARNING: Do not smoke, carry lighted tobacco or have an open flame of any
type when working on or near any fuel-related component. Highly flammable
mixtures are always present and may be ignited. Failure to follow these
instructions may result in serious person ...
