Main Control - Overhaul
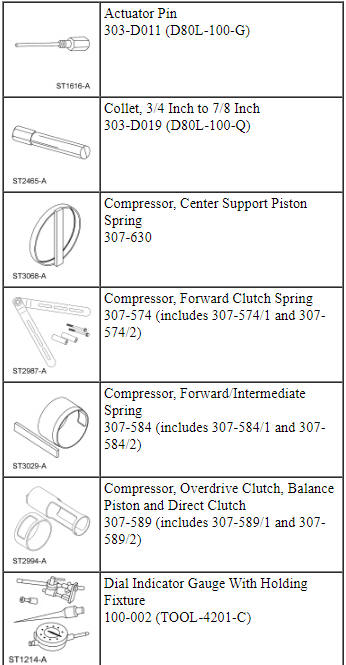
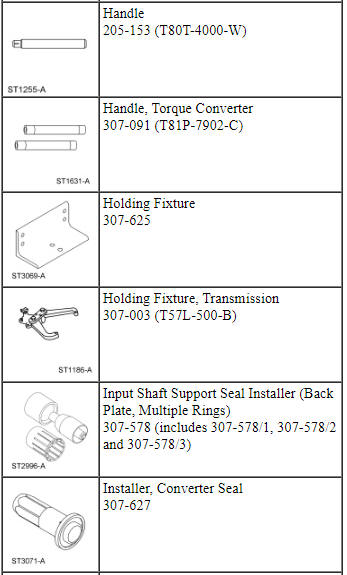
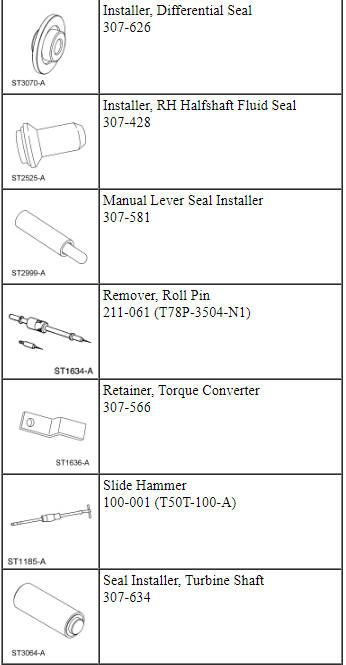
Special Tool(s)
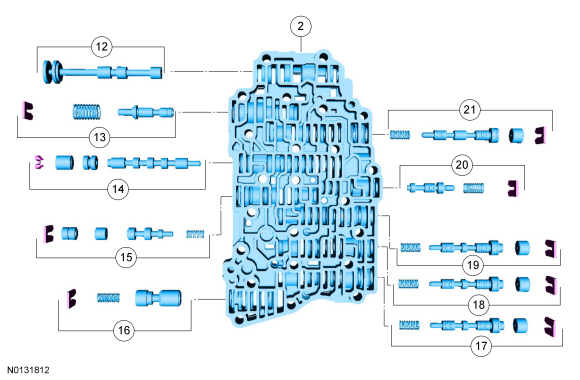
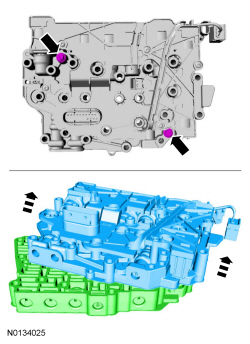
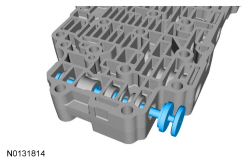
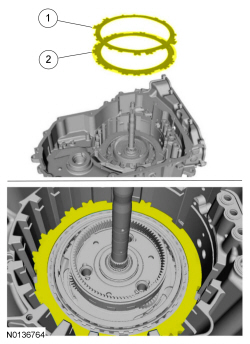
Main Control
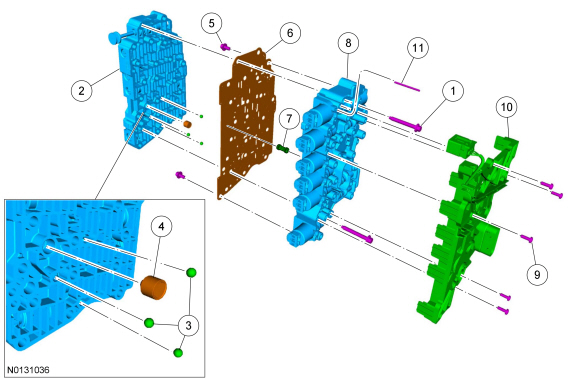
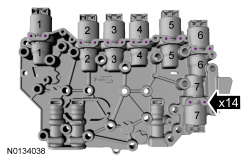
Main Control Valve Body
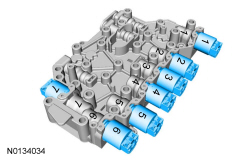
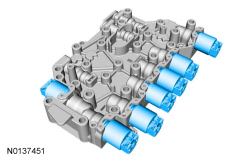
Solenoid Body

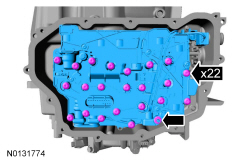
Main Control Valve Body
-
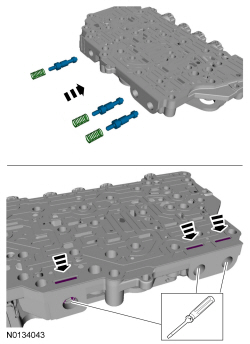
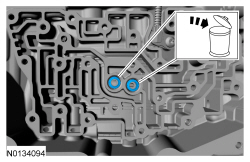
- Check balls
- Solenoid damper
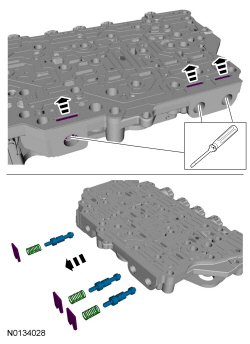
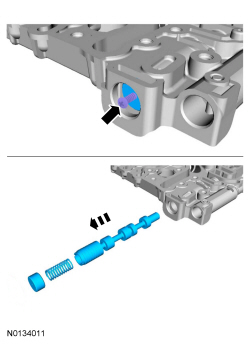
- NOTICE: Remove the valves by tapping the valve body on the
palm of the hand to slide the valves out of the bores or by threading a 4-mm
bolt into the valves and pulling them out. It may be necessary to remove the
valves and springs using a pick. If it is necessary to use a pick, use
extreme caution to prevent damaging the valves or valve bores. If necessary,
disassemble parts of the main control valve body in small groups. Take
special care when handling the main control components, since they are the
most precise and delicate parts of the transmission. Neatly arrange the
parts as they are removed to avoid mixing similar pieces.
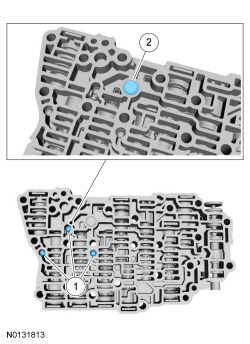
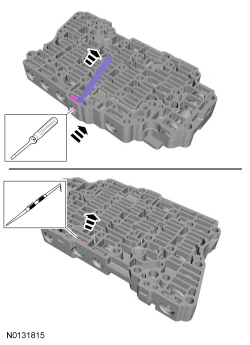
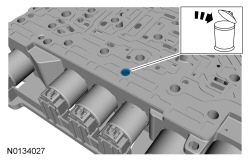
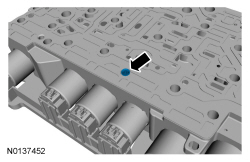
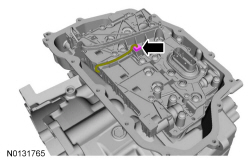
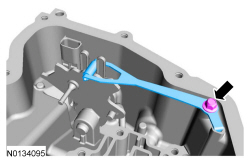
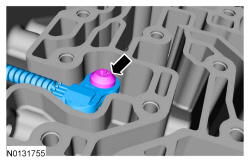
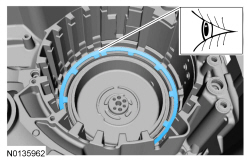
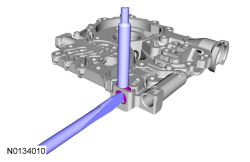
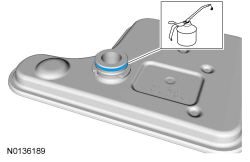
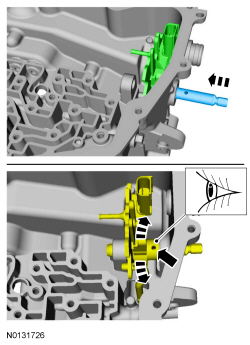
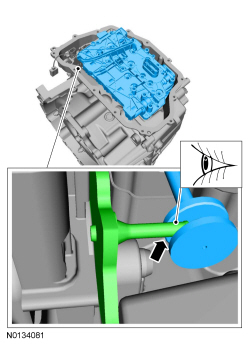
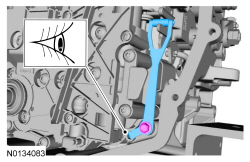
NOTE: The bypass valve is held in with a spring-loaded retainer. Be careful not to lose the retainer when removing it.
Use a pick to remove the bypass valve retainer.
General Equipment: Magnet, 4-mm bolt.
- NOTICE: Do not stone or polish any valves or damage to the
valves can occur. If the valves do not move freely, install a new assembly.
Clean the valves, springs and main control valve body.
- NOTICE: Do not stone or polish any valves or damage to the
valves can occur. If the valves do not move freely during assembly, install
a new valve body.
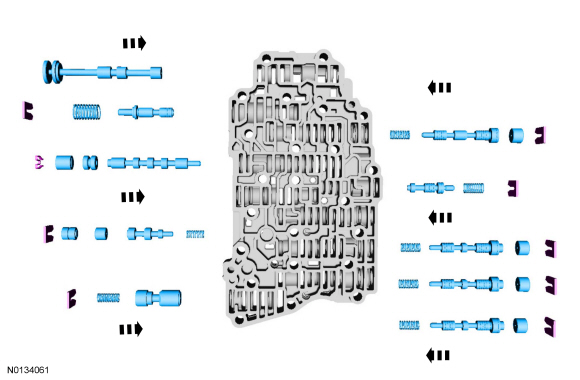
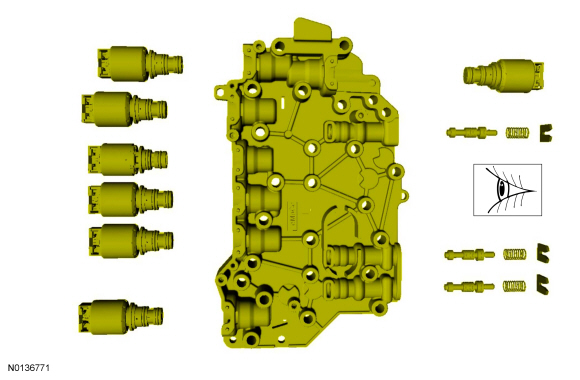
For valve and spring locations refer to the Valve Body illustration at the beginning of this procedure.

-
- Check balls
- Solenoid damper

- For disassembly and assembly of the solenoid body, refer to Solenoid Body in this procedure.
-
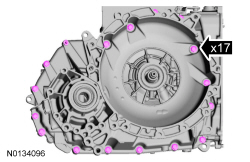
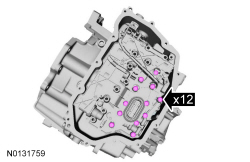
- Tighten to 10 Nm (89 lb-in).
-
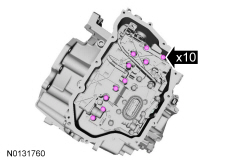
- Tighten to 10 Nm (89 lb-in).

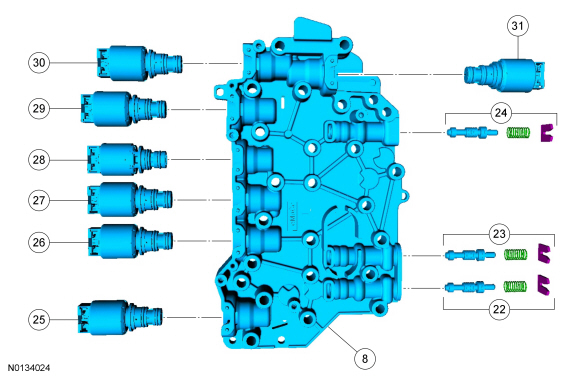
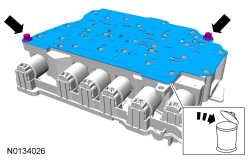
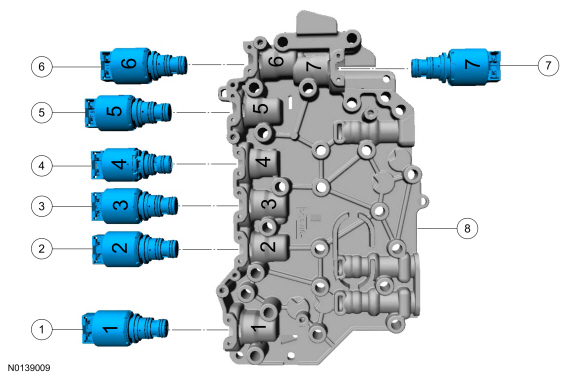
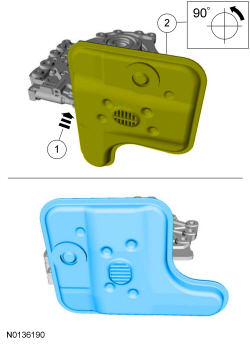
Solenoid Body
- If not previously done, separate the solenoid body from the valve body.


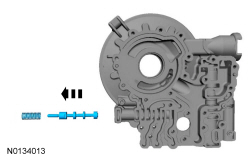
- Compress the valve springs and remove the retainers with a magnet.
Remove the individual valves and springs from the solenoid body by tapping
it on the palm of the hand to slide the valves out of the bores.
General Equipment: Magnet.
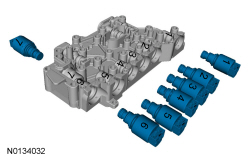
- NOTICE: Be careful not to bend or twist the solenoid body
leadframe or the solenoid terminals when removing the leadframe or damage
can occur to the leadframe or the solenoids.
Lift straight up evenly.

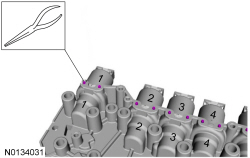
- NOTICE: The solenoids are calibrated from the factory and are
not all the same. Failure to mark the solenoids to the ports they were
originally in can result in mixing the solenoids and can cause damage to the
transmission or a harsh shift.
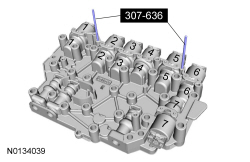
Number the solenoids and the solenoid body to correspond with the ports from which the solenoids are located in the solenoid body.
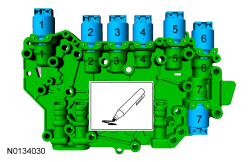
- NOTICE: Be careful not to wash the numbers from the solenoids
or the solenoid body. Failure to install the solenoids in the ports they
were originally in can result in damage to the transmission or a harsh
shift.
NOTICE: Do not stone or polish any valves or damage to the valves can occur. If the valves do not move freely during assembly, install a new solenoid body.
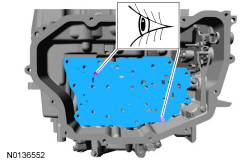
Clean and inspect the solenoid body, solenoids and valve assemblies for damage.
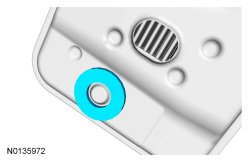
- Inspect the solenoid screens for debris that may restrict fluid flow through the screen.
- NOTICE: The solenoids are calibrated from the factory and are
not all the same. Failure to install the solenoids in the ports they were
originally in can result in damage to the transmission or a harsh shift.
If new solenoid(s) are not being installed, position the solenoids in the solenoid body ports from which their numbers correspond.
- If installing a new VFS , determine the base part number of the
solenoid(s). The TCC solenoid, SSA and SSC are all normally low pressure
solenoids. The LPC solenoid, SSB and SSD are all normally high pressure
solenoids. The SSE is not a VFS , it is an ON/OFF solenoid.
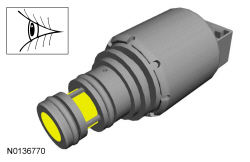
- If installing new solenoids, note the color of the plastic nozzle and the large O-ring. High pressure solenoids, such as the LPC solenoid, SSB and SSD , have black plastic nozzles and orange O-rings. Low pressure solenoids, such as the TCC solenoid, SSA and SSC , have brown plastic nozzles and green O-rings. The solenoids can only be replaced with the same color solenoid.
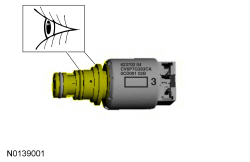
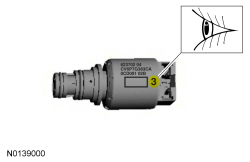
- Determine the part number suffix by checking the solenoid service band number etched on the side of the solenoid. The band number is next to the two-dimensional matrix barcode on the side of the solenoid and will be a 1, 2, 3, 4 or 5. Determine the part number suffix and match the new solenoid base part number and suffix with the old solenoid.
- Solenoid retaining pins.
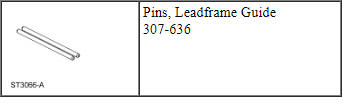
- Special Tool(s): Pins, Leadframe Guide 307-636.
- NOTICE: Be careful not to bend or twist the solenoid body
leadframe or the solenoid terminals when installing the leadframe or damage
can occur to the leadframe or the solenoids.
Push straight down evenly.
- NOTICE: If the valves do not move freely during assembly,
install a new solenoid body. Failure to install a new solenoid body can
result in a harsh shift or damage to the transmission.
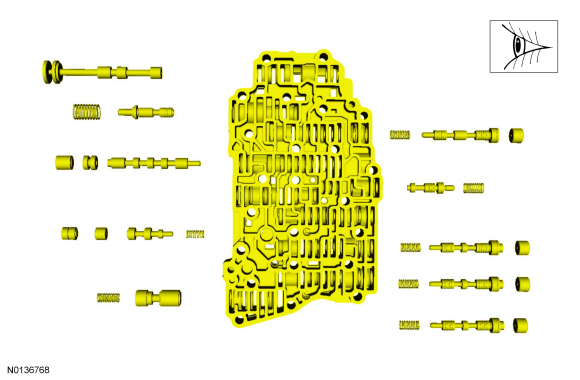
For valve and spring location, refer to the Solenoid Body illustration at the beginning of this procedure.
-
- Tighten to 10 Nm (89 lb-in).

- If not previously done, refer to Main Control Valve Body in this procedure for disassembly and assembly of the valve body.
-
- Tighten to 10 Nm (89 lb-in).
Transaxle - Overhaul
Special Tool(s)

Material
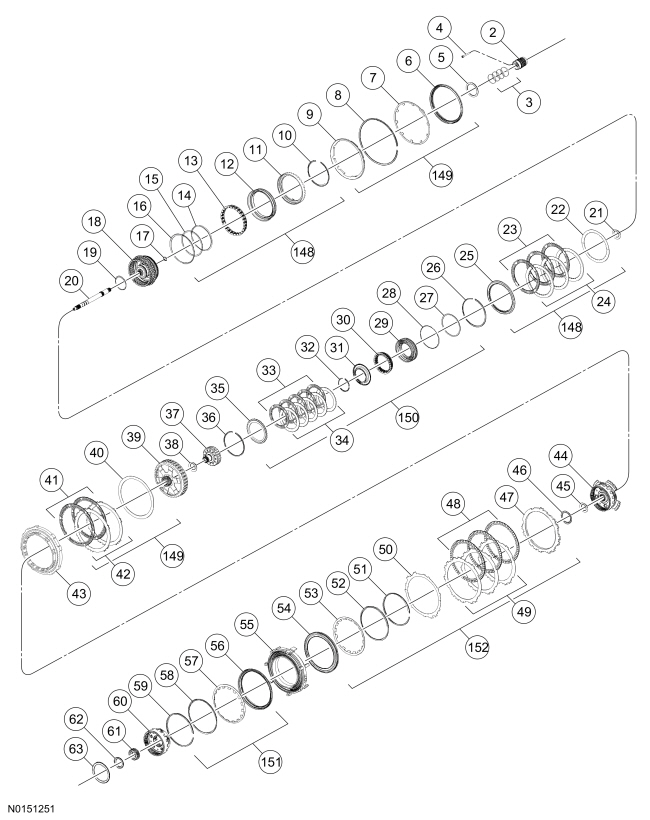
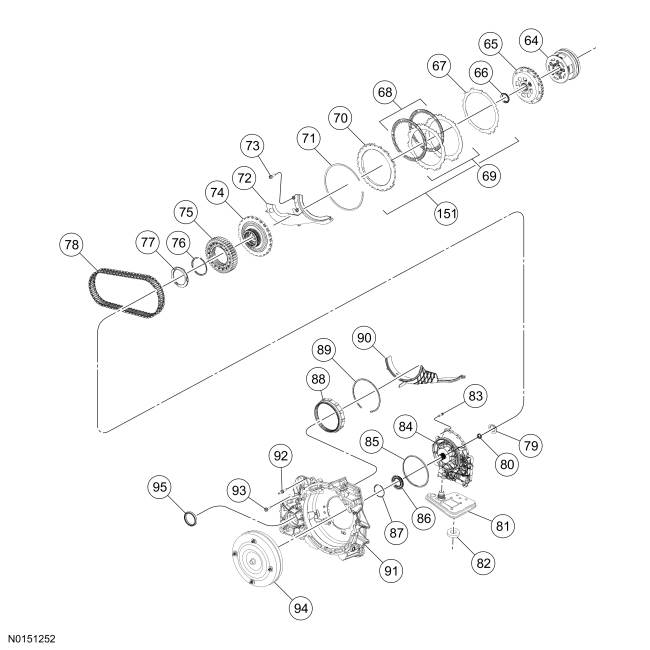
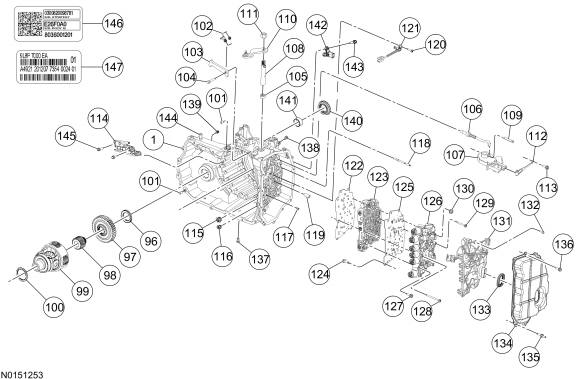
Disassembled Views
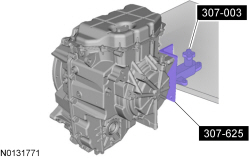
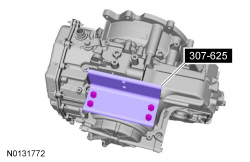
- Special Tool(s): Holding Fixture 307-625.

- Special Tool(s): Holding Fixture, Transmission 307-003 (T57L-500-B),
Holding Fixture 307-625.
General Equipment: Work Bench.

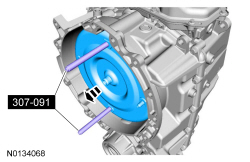
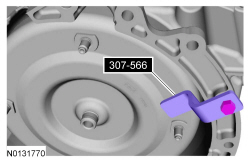
- Special Tool(s): Retainer, Torque Converter 307-566.
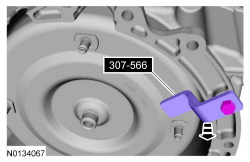
- NOTICE: The torque converter is heavy. Be careful not to drop
it or damage will result.
Special Tool(s): Handle, Torque Converter 307-091 (T81P-7902-C).
- NOTICE: Do not use water-based cleaners or mineral spirits to
clean or flush the torque converter or transmission damage will occur. Use
only clean transmission fluid designated for the transmission and torque
converter being serviced.
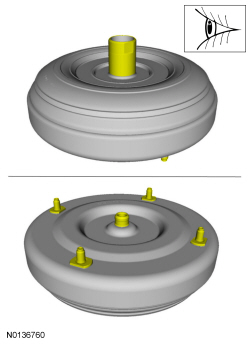
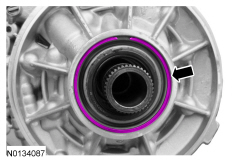
- Inspect the sealing surface for a groove worn from the seal. Install a new torque converter if necessary.
- A new or remanufactured torque converter must be installed if one or
more of the following statements is true:
- A torque converter malfunction has been determined based on complete diagnostic procedures.
- The torque converter stud or studs, impeller hub or bushing are damaged.
- The torque converter exhibits external discoloration (due to overheating).
- There is evidence of transmission assembly or fluid
contamination due to the following transmission or converter failure
modes.
- Major metallic failure
- Multiple clutch plates or band failures
- Sufficient component wear which results in metallic contamination
- Water or antifreeze contamination
- If none of the above conditions are present, continue with the following fluid inspection.
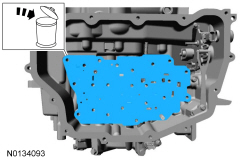
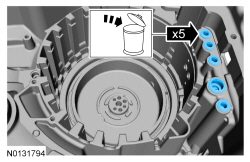
- Pour a small amount of transmission fluid from the torque converter onto an absorbent white tissue or through a paper filter.
- Examine the fluid for contaminants. The fluid must be free of metallic contaminants.
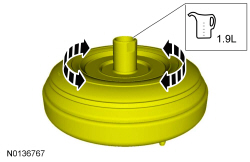
- NOTICE: Do not use water-based cleaners or mineral spirits to
clean or flush the torque converter or transmission damage will occur.
Drain the remaining fluid from the torque converter. Apply the specified amount of fluid.
- Agitate by hand.
- Thoroughly drain the fluid.
Material: Clean Motorcraft MERCON LV Automatic Transmission Fluid XT-10-QLVC.
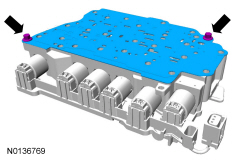
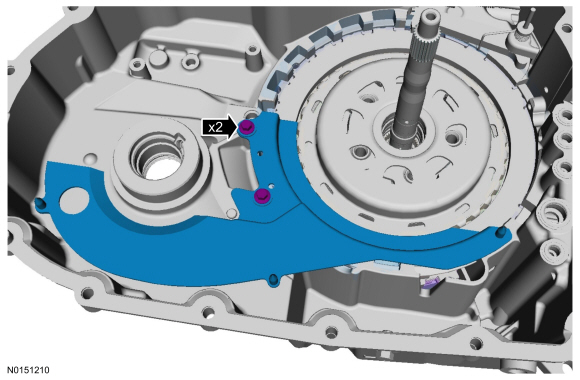
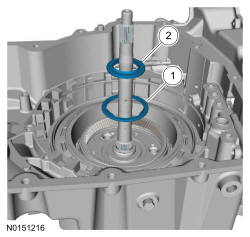
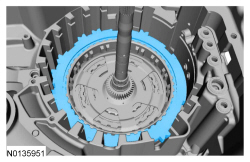
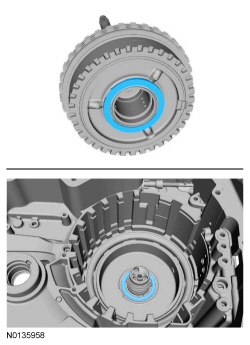
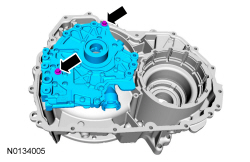
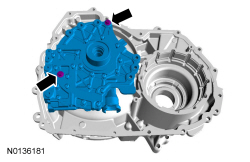
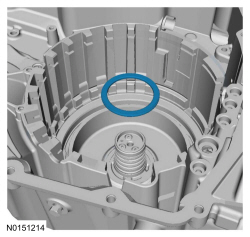
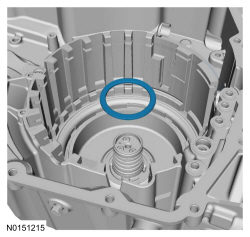
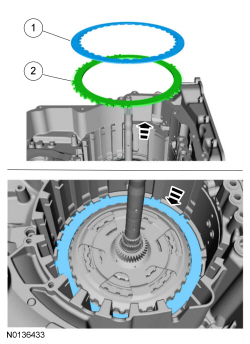
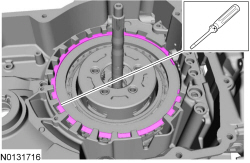
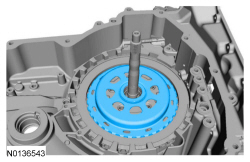
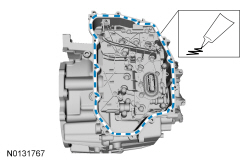
- NOTE: Note the location of the stud bolts for assembly.
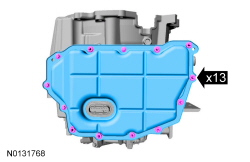

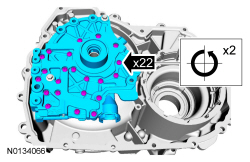
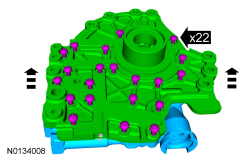
- NOTE: Note the location of the short and long main control-to-transmission case bolts for reassembly.

- Clean and inspect the main control assembly for damage. If damage is found install a new main control assembly. If the main control assembly is not damaged, disassemble the main control assembly and clean it. Refer to Main Control - Overhaul.

- NOTE: Note the location of the stud bolts for assembly.
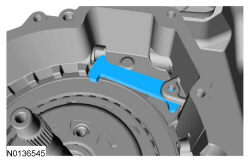
- General Equipment: Pry Bar.

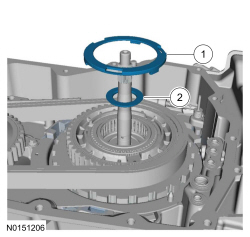
- No. 15 thrust bearing

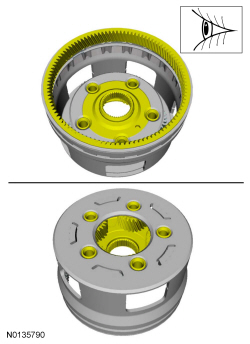
- Check that bearings spin freely and do not move back and forth or side to side excessively. Check for damage or excessive wear. Install new components, if necessary. Refer to Differential Gear Assembly.
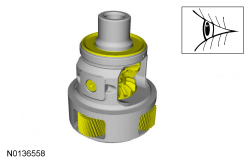

- Check for damage or excessive wear.


-
- No. 13 thrust washer
- No. 11 thrust bearing
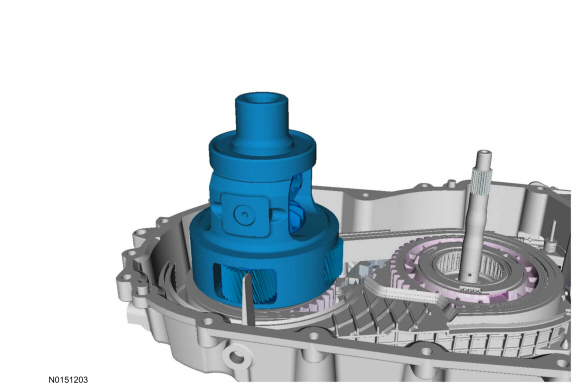
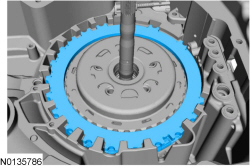
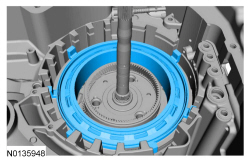
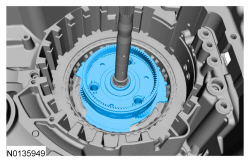
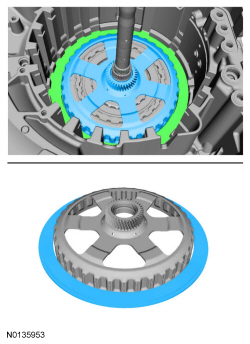
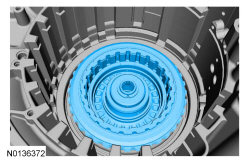
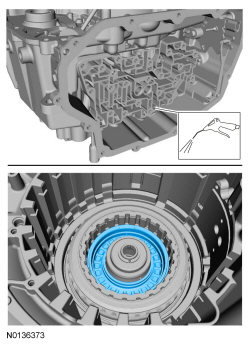
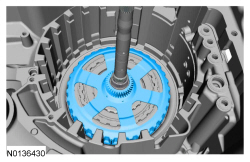
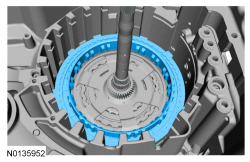
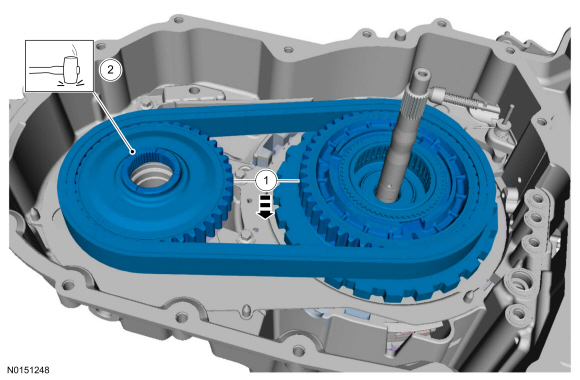
- NOTE: Simultaneously lift the drive, driven sprockets and chain.
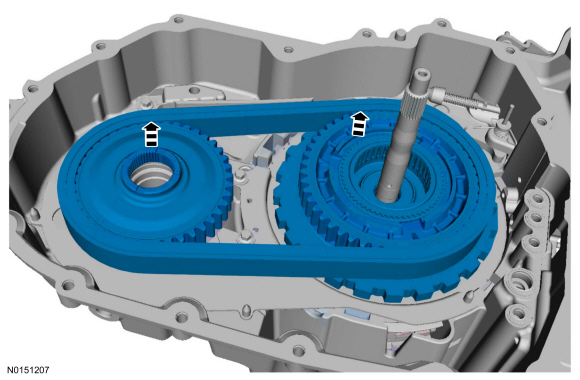
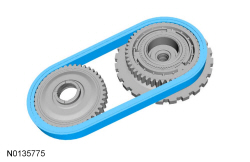
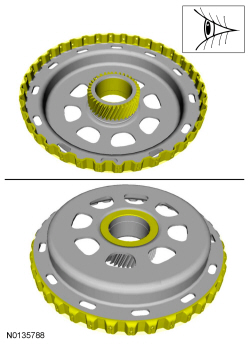
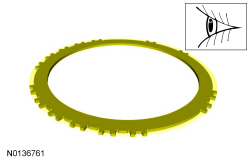
- Check for damage or excessive wear.
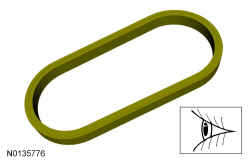
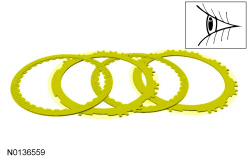
- Check for stretching or tightness of the chain links.
- Check that the chain moves freely.
- Check that bearing spins freely. Check for damage or excessive wear.
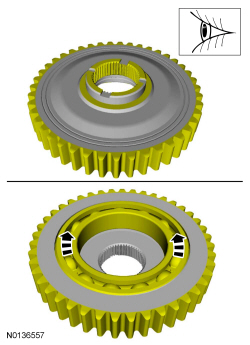

- Check for damage or excessive wear.
- Check for damage or excessive wear.


-
- No. 12 thrust bearing
- No. 10 thrust bearing
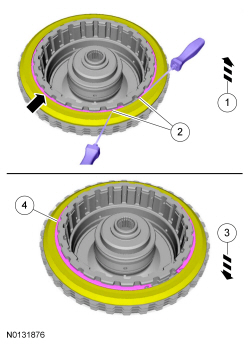
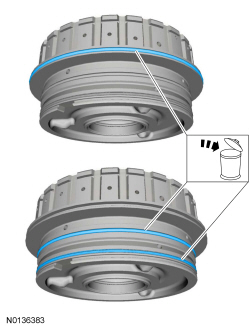
- NOTE: Note the location of the snap ring gap for assembly.
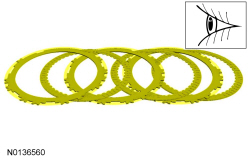
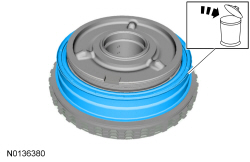
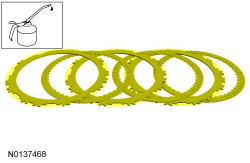
- Clutch pressure plate, clutch plates and wave spring.
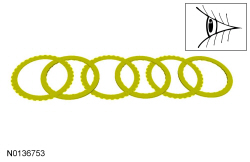
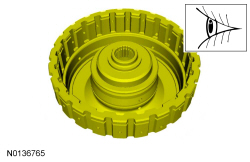
- Inspect the clutch plate and pressure plate surfaces for damage or excessive wear.
- Check for damage or excessive wear.

- Check that bearings spin freely and do not move back and forth or side to side excessively. Check for damage or excessive wear.
-
- No. 7 thrust bearing
- No. 8 thrust bearing


- Check that bearings spin freely and do not move back and forth or side to side excessively. Check for damage or excessive wear.
- Check for damage or excessive wear.
-
- No. 5 thrust bearing
- No. 6 thrust bearing
- Check that bearings spin freely and do not move back and forth or side to side excessively. Check for damage or excessive wear.
- Wave spring, clutch plates and pressure plate.
- Inspect the clutch plate and pressure plate surfaces for damage or excessive wear.

- NOTICE: Do not clean in water or with water-based solvents.
Damage to the component may occur.
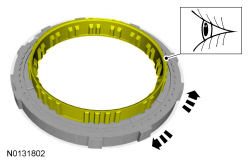
NOTE: The low OWC should not be disassembled.
Check for cracks and damaged splines. The internal splined section should rotate clockwise and lock when rotated counterclockwise.
- Check for burned or excessively worn surface.
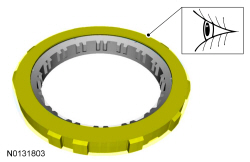
- Inspect the clutch plate surfaces for damage or excessive wear.

- Check for damage or excessive wear.

- Pressure plate and the wave spring.
- Inspect the pressure plate surface for damage or excessive wear.
- No. 3 thrust bearing

- NOTE: If the No. 1 thrust bearing is stuck to the overdrive/direct clutch assembly, remove the No. 1 thrust bearing from the overdrive/direct clutch assembly.
- NOTE: Note the location of the snap ring gap for assembly.
- NOTE: Note the position of the return spring for assembly.
- NOTE: Note the position of the intermediate clutch piston for assembly.
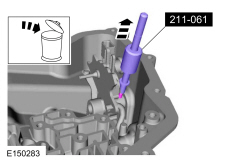
- NOTICE: Do not drive the manual control shaft pin through the
manual control shaft. The manual control shaft pin will contact the
transmission case causing damage to the transmission case.
Special Tool(s): Remover, Roll Pin 211-061 (T78P-3504-N1).
- General Equipment: Pry Bar.
- NOTICE: If the LH transmission case bushing or the LH
halfshaft bushing surface shows signs of excessive wear or damage, a new LH
transmission case bushing and a new LH halfshaft must be installed, or
excessive noise or transmission failure can occur.
If the LH transmission case bushing or the LH halfshaft shows signs of excessive wear or damage, install new components. Refer to Transaxle Case.

- General Equipment: Pry bar.
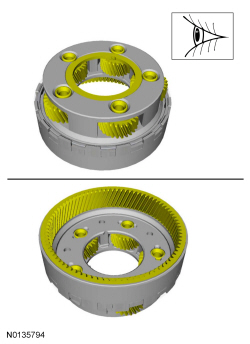
- If the differential ring gear shows signs of excessive wear or damage replace the differential ring gear. Refer to Transaxle Case.


- Special Tool(s): Slide Hammer 100-001 (T50T-100-A), Actuator Pin 303-D011 (D80L-100-G), Collet, 3/4 Inch to 7/8 Inch 303-D019 (D810L-100-Q).
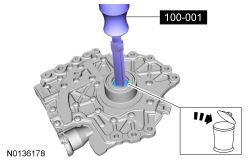

- General Equipment: Dent puller.
- Bolts hand-tight.
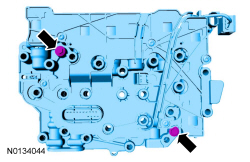
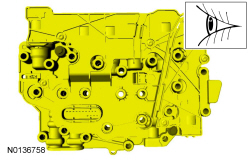
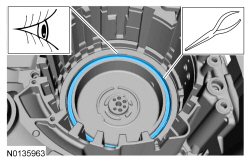
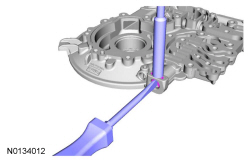
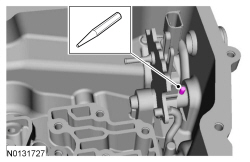
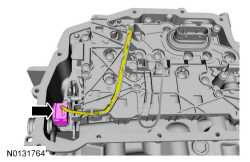
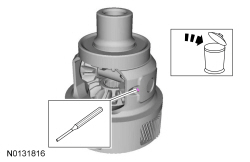
- Compress the valve spring with a screwdriver and remove the retainer
with a magnet.
General Equipment: Screwdriver, Magnet.
- General Equipment: M4 bolt.
- Compress the valve spring with a screwdriver and remove the retainer
with a magnet.
General Equipment: Screwdriver, Magnet.
- Clean and inspect the components of the pump assembly for wear or damage. Inspect the fluid drained from the pump assembly for excessive metal or foreign material. If excessive wear, damage or excessive metal is found, replace the pump assembly as an assembly.
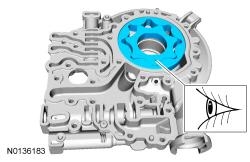
- NOTE: TCC control valve retainer shown assembled in the pump body, main pressure regulator valve retainer similar.

- NOTE: The dot on the inner pump gear faces up.
- Bolts hand-tight.
- Bolts hand-tight.

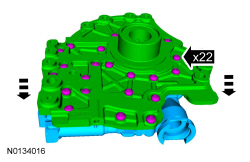
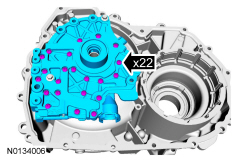
-
- Tighten to 10 Nm (89 lb-in).

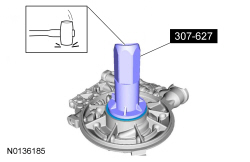
- Special Tool(s): Installer, Converter Seal 307-627.
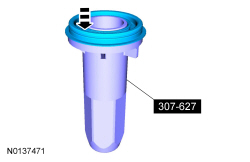
- Special Tool(s): Installer, Converter Seal 307-627.

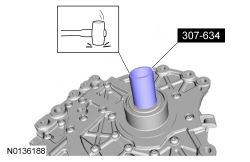
- Special Tool(s): Seal Installer, Turbine Shaft 307-634.
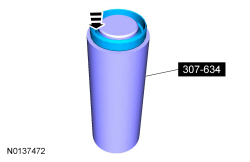
- Special Tool(s): Seal Installer, Turbine Shaft 307-634.
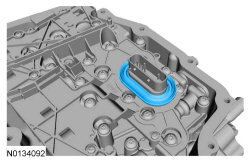
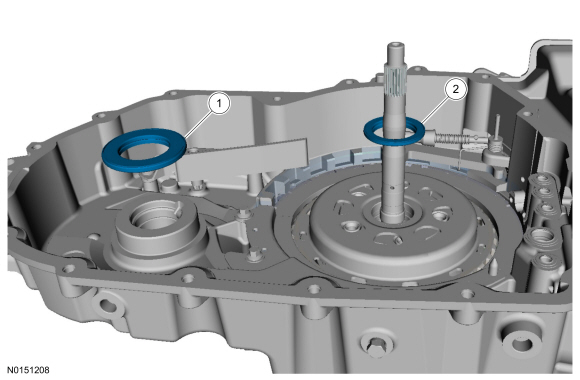
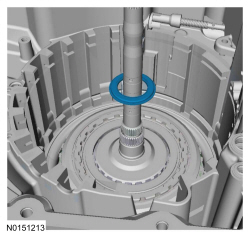
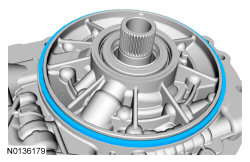
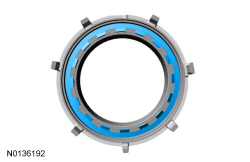
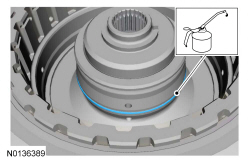
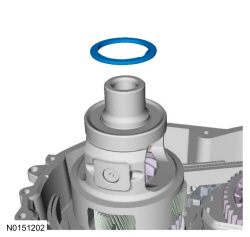
- New O-ring.
Material: Motorcraft MERCON LV Automatic Transmission Fluid XT-10-QLVC.
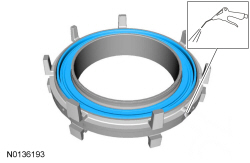
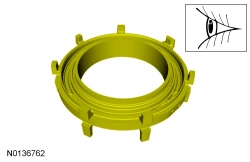
- NOTICE: The piston return spring, snap ring or snap ring
retainer from the low/reverse clutch side of the center support are not
interchangeable with the forward clutch side of the center support. When
disassembling the center support, be careful not to mix the components from
the low/reverse clutch side with the forward clutch side of the center
support. Failure to assemble the center support with the components in the
correct side will result in damage to the center support, low/ reverse or
forward clutch.
NOTE: The low/reverse clutch piston in the center support is the side of the center support with the long legs.
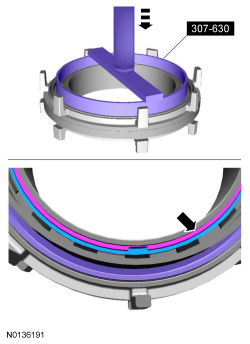
Position the center support on a press with the long legs facing up.
Special Tool(s): Compressor, Center Support Piston Spring 307-630.
General Equipment: Shop Press.

- Apply 483 kPa (70 psi) of air pressure.
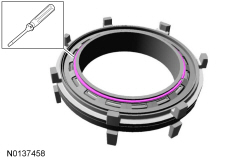
- NOTE: The forward clutch piston in the center support is the side
of the center support with the short legs.
Position the center support on a press with the short legs facing up.
Special Tool(s): Compressor, Center Support Piston Spring 307-630.
General Equipment: Shop Press.
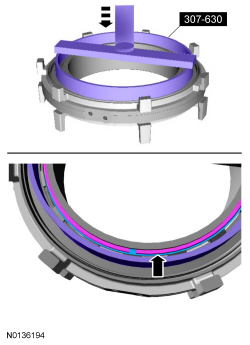
- Apply 483 kPa (70 psi) of air pressure.
- Check for damage or excessive wear.
- NOTE: The forward clutch piston in the center support is the side
of the center support with the short legs.
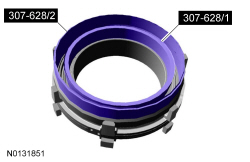
Short leg side of the center support facing up.
Special Tool(s): Seal Protector, Low Reverse Piston 307-628/2, Seal Protector, Low Reverse / 1-2-3-4 Piston 307-629.
- Shop Supplies: Petroleum Jelly.

- Special Tool(s): Seal Protector, Low Reverse Piston 307-628/2, Seal Protector, Low Reverse / 1-2-3-4 Piston 307-629.
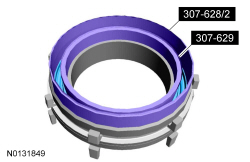
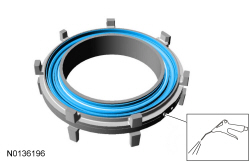
- NOTICE: The piston return spring, snap ring or snap ring retainer from the low/reverse clutch side of the center support are not interchangeable with the forward clutch side of the center support. When assembling the center support, be careful not to mix the components from the low/reverse clutch side with the forward clutch side of the center support. Failure to assemble the center support with the components in the correct side will result in damage to the center support, low/reverse or forward clutch.

- Position the center support on a press with the short legs facing up.
Special Tool(s): Compressor, Center Support Piston Spring 307-630.
General Equipment: Shop Press.

- Check the snap ring to be sure it is seated in the groove.
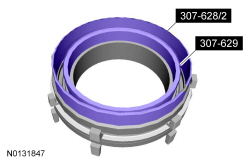
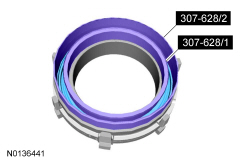
- Position the center support with the long legs facing up.
Special Tool(s): Seal Protector, Low Reverse Piston 307-628 (includes 307-628/1 and 307-628/2).
- Shop Supplies: Petroleum Jelly.
- Special Tool(s): Seal Protector, Low Reverse Piston 307-628 (includes 307-628/1 and 307-628/2).

- Position the center support on a press with the long legs facing up.
Special Tool(s): Compressor, Center Support Piston Spring 307-630.
General Equipment: Shop Press.
- Check the snap ring to be sure it is seated in the groove.
- Check for damage or excessive wear.
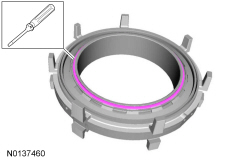
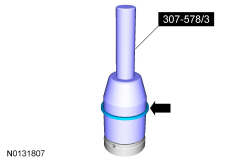
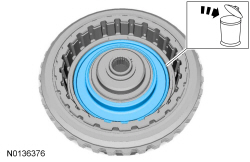
- Align the bottom edge of the tool with the top edge of the bottom
Teflon seal groove.
Special Tool(s): Input Shaft Support Seal Installer (Back Plate, Multiple Rings) 307-578/3.
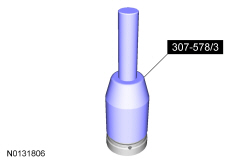
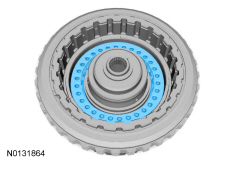
- Special Tool(s): Input Shaft Support Seal Installer (Back Plate, Multiple Rings) 307-578/3.
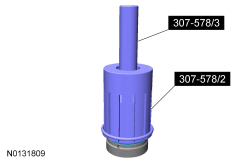
- Special Tool(s): Input Shaft Support Seal Installer (Back Plate, Multiple Rings) 307-578/2, Input Shaft Support Seal Installer (Back Plate, Multiple Rings) 307-578/3.
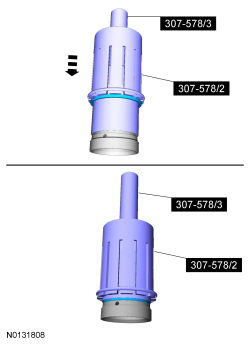
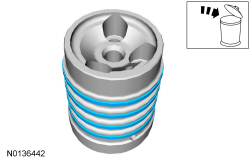
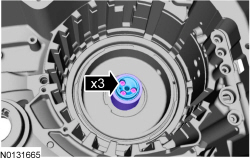
- Remove tools and repeat steps for the other 3 Teflon seals.
Special Tool(s): Input Shaft Support Seal Installer (Back Plate, Multiple Rings) 307-578/2, Input Shaft Support Seal Installer (Back Plate, Multiple Rings) 307-578/3.
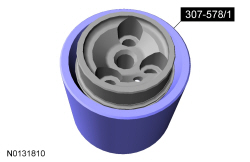
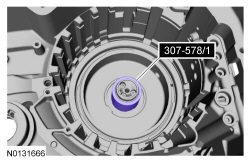
- Special Tool(s): Input Shaft Support Seal Installer (Back Plate, Multiple Rings) 307-578/1.
- No. 2 thrust bearing

- Inspect the clutch plate and pressure plate surfaces for damage or excessive wear.
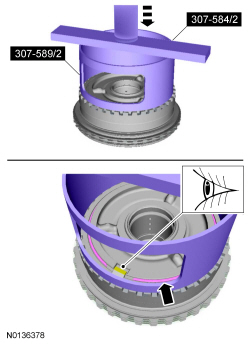
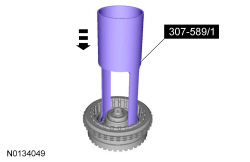
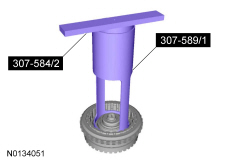
- Special Tool(s): Compressor, Overdrive Clutch, Balance Piston and Direct Clutch 307-589/1, Compressor, Forward/Intermediate Spring 307-584/2.
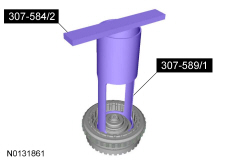
- Special Tool(s): Compressor, Overdrive Clutch, Balance Piston and Direct
Clutch 307-589/1, Compressor, Forward/Intermediate Spring 307-584/2.
General Equipment: Shop Press.
-
- Tighten to 12 Nm (106 lb-in).
- Remove the special tool.
Special Tool(s): Input Shaft Support Seal Installer (Back Plate, Multiple Rings) 307-578/1.
- No. 1 thrust bearing
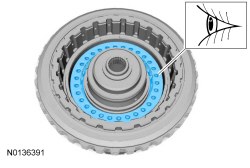
- Apply compressed air to the piston port.
- NOTICE: Only compress the direct clutch piston return spring
far enough to take the tension from the direct clutch cylinder off the snap
ring. If the piston is compressed too far, the piston alignment tab may be
broken off.
Special Tool(s): Compressor, Overdrive Clutch, Balance Piston and Direct Clutch 307-589/2, Compressor, Forward/Intermediate Spring 307-584/2.
General Equipment: Shop Press.

-
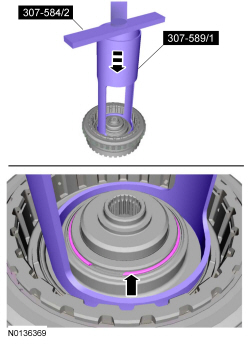
- Slightly lift up on the clutch so that the snap ring floats freely.
- Compress the snap ring.
- Allow the clutch and pressure plate to drop so that the snap ring is out of the pressure plate groove.
- Remove the snap ring.
General Equipment: Screwdrivers.
- Inspect the clutch plate and pressure plate surfaces for damage or excessive wear.
- Check for damage or excessive wear.
- Shop Supplies: Petroleum Jelly.
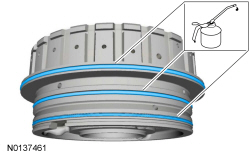

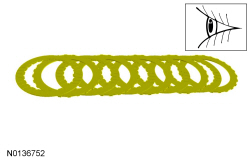
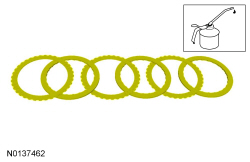
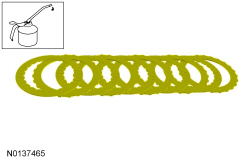
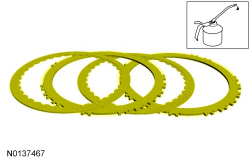
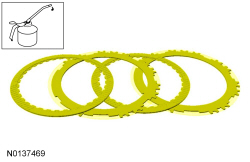
- Soak the clutch plates.
Material: Clean Motorcraft MERCON LV Automatic Transmission Fluid XT-10-QLVC.

-
- Compress the snap ring.
- Lift the clutch so that the snap ring is in the groove of the pressure plate.
- Release the tension on the snap ring.
General Equipment: Snap-ring Pliers.
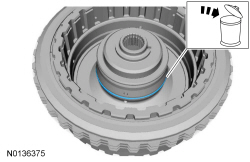
- NOTE: Install the return spring with the flat side facing down.
- Shop Supplies: Petroleum Jelly.

- NOTICE: Only compress the direct clutch piston return spring
far enough to take the tension from the direct clutch cylinder off the snap
ring. If the piston is compressed too far, the piston alignment tab may be
broken off.
Special Tool(s): Compressor, Overdrive Clutch, Balance Piston and Direct Clutch 307-589/2, Compressor, Forward/Intermediate Spring 307-584/2.
General Equipment: Shop Press.

- Shop Supplies: Petroleum Jelly.
- Shop Supplies: Petroleum Jelly.
- Install by hand.
Special Tool(s): Compressor, Overdrive Clutch, Balance Piston and Direct Clutch 307-589/1.
- NOTE: Holes face up on the clutch piston return spring.
- Shop Supplies: Petroleum Jelly.
- Special Tool(s): Compressor, Overdrive Clutch, Balance Piston and Direct Clutch 307-589/1, Compressor, Forward/Intermediate Spring Compressor 307-584/2.
- Special Tool(s): Compressor, Overdrive Clutch, Balance Piston and Direct
Clutch 307-589/1, Compressor, Forward/Intermediate Spring Compressor
307-584/2.
General Equipment: Shop Press.

- No. 2 thrust bearing
- Soak the clutch plates.
Material: Clean Motorcraft MERCON LV Automatic Transmission Fluid XT-10-QLVC.


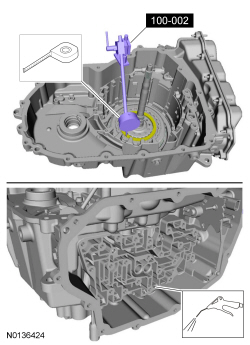
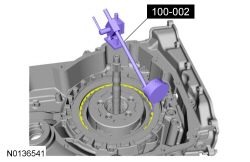
- Special Tool(s): Dial Indicator Gauge With Holding Fixture 100-002 (TOOL-4201-C).
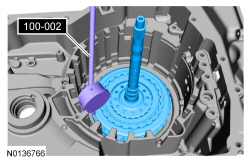
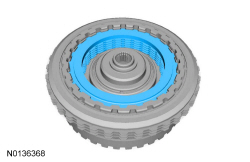
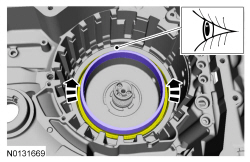
- Position the plunger on the overdrive (4, 5, 6) clutch pressure plate.
Apply 483 kPa (70 psi) of air pressure to the overdrive (4, 5, 6) clutch
piston port while recording the clutch pack clearance on the Dial Indicator.
The clearance should be between 0.950 mm (0.037 in) and 1.778 mm (0.07 in).
If the clearance is out of range, check the overdrive (4, 5, 6) clutch pack
for correct installation. If the overdrive (4, 5, 6) clutch pack is
correctly installed, install a new overdrive (4, 5, 6) clutch pack.
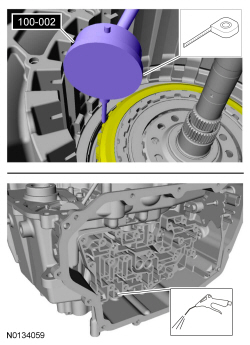
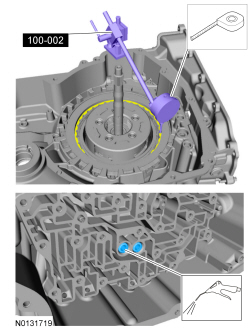
Special Tool(s): Dial Indicator Gauge With Holding Fixture 100-002 (TOOL-4201-C).
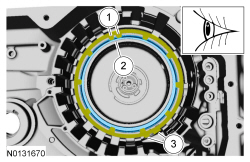
- Position the plunger on one of the top direct (3, 5, R) clutch plate
tabs. Apply 483 kPa (70 psi) of air pressure to the direct (3, 5, R) clutch
piston port while recording the clutch pack clearance on Dial Indicator. The
clearance should be between 0.412 mm (0.016 in) and 1.728 mm (0.068 in). If
the clearance is out of range, check the direct (3, 5, R) clutch pack for
correct installation. If the direct (3, 5, R) clutch pack is correctly
installed, install a new direct (3, 5, R) clutch pack.
Special Tool(s): Dial Indicator Gauge With Holding Fixture 100-002 (TOOL-4201-C).
- Special Tool(s): Dial Indicator Gauge With Holding Fixture 100-002 (TOOL-4201-C).
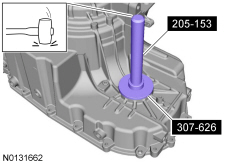
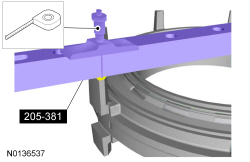
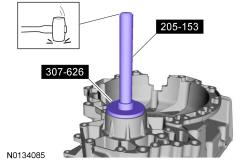
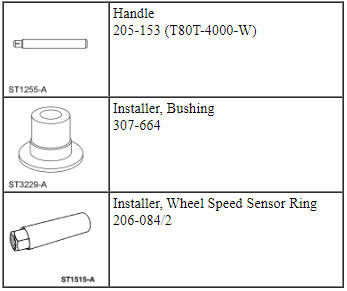
- Special Tool(s): Handle 205-153 (T80T-4000-W), Installer, Differential Seal 307-626.
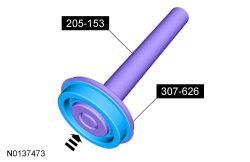
- Special Tool(s): Handle 205-153 (T80T-4000-W), Installer, Differential Seal 307-626.
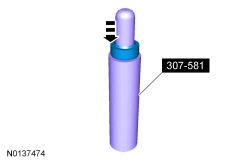
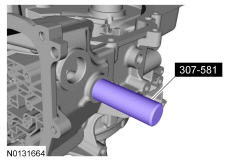
- Special Tool(s): Manual Lever Seal Installer 307-581.
- Special Tool(s): Manual Lever Seal Installer 307-581.
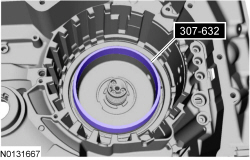
- Special Tool(s): Seal Protector, 2-6 Piston 307-632.
- Material: Clean Motorcraft MERCON LV Automatic Transmission Fluid XT-10-QLVC.
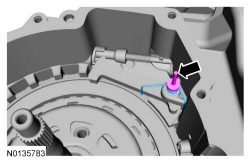
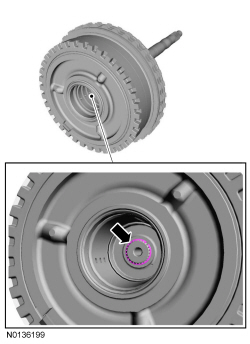
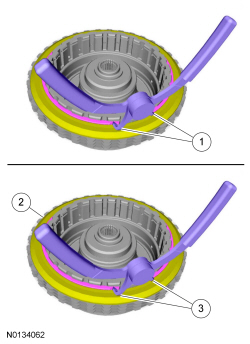
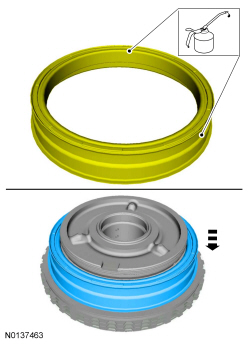
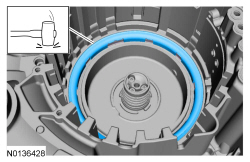
- NOTICE: Be sure the bleed hole is aligned in the correct position as noted during disassembly or damage to the transmission can occur.
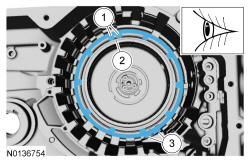
- Position the clutch piston return spring on the piston to align the
piston before pushing it in its bore. The tabs of the return spring should
fit into the indentions of the piston and the 2 outer tabs should be at the
clockwise most position of the open area at the bottom of the transmission
case. The bleed hole on the piston should be aligned between the inner
double tabs of the return spring.
- Inner double tabs
- Bleed hole
- Outer tabs
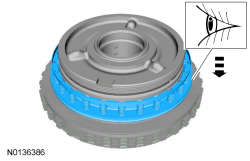
- Push the clutch piston into the clutch cylinder by hand.
Special Tool(s): Compressor, Forward/Intermediate Spring 307-584/1.
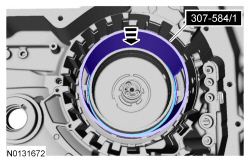
- NOTICE: Be sure the return spring is positioned correctly with
the forward clutch bleed hole aligned between the inner double tabs and the
outer tab in the clockwise most position of the slot at the bottom of the
case or damage to the transmission can occur.
The tabs of the return spring should fit into the indentions of the piston and the 2 outer tabs should be at the clockwise most position of the slot at the bottom of the case. The bleed hole on the piston should be aligned between the inner double tabs of the return spring.
- Inner double tabs
- Bleed hole
- Outer tabs
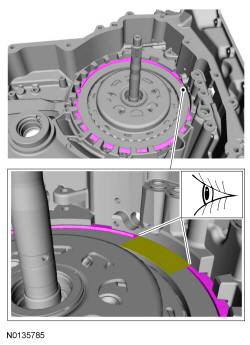
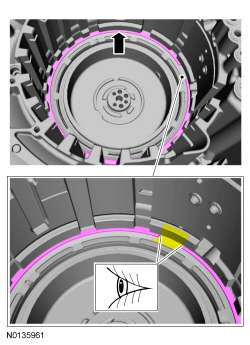
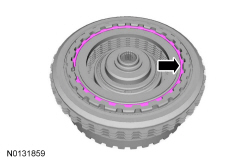
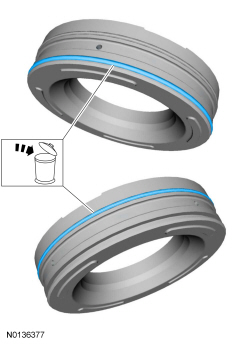
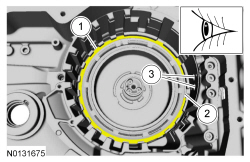
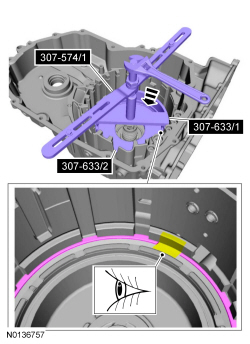
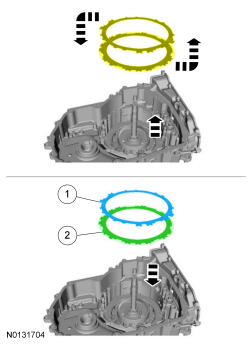
- NOTICE: Be sure the snap ring is aligned with the gap facing
the front of the transmission or damage to the transmission can occur. The
front of the transmission is where the low/reverse and forward (1, 2, 3, 4)
clutch hydraulic ports are located.
Align the gap of the snap ring to face the front of the transmission.
- Snap ring
- Snap ring gap
- Clutch hydraulic ports (located at the front of the transmission case)
- Special Tool(s): Spring Compressor, 2-6 Piston Return 307-633/2.
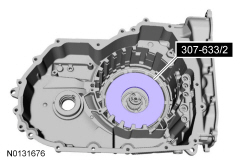
- Special Tool(s): Spring Compressor, 2-6 Piston Return 307-633/1.
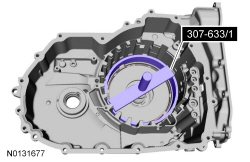
- Special Tool(s): Compressor, Forward Clutch Spring 307-574/1.
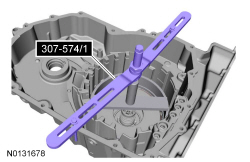
- NOTICE: Be sure the return spring is centered or it can bind
on the snap ring groove and cause damage to the transmission case.
Special Tool(s): Compressor, Forward Clutch Spring 307-574/1, Spring Compressor, 2-6 Piston Return 307-633 (Includes 307-633/1 and 307-633/2).
General Equipment: Wrench.
- Tap the ring in place.
- NOTICE: Be sure to install the No. 1 thrust bearing with the
flat side facing up or damage to the transmission can occur.
No. 1 thrust bearing

- NOTICE: Be sure to install the No. 3 thrust bearing with the flat side facing down or damage to the transmission can occur.

- Clutch wave spring.
- Soak the clutch plates.
Material: Clean Motorcraft MERCON LV Automatic Transmission Fluid XT-10-QLVC.
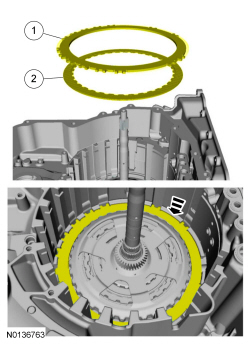
- Position the clutch plates, temporarily reversing the top friction and
steel plates for the clutch stack-up measurement.
- Steel plate
- Friction plate
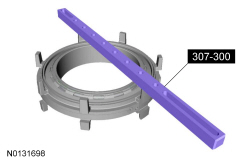
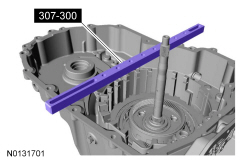
- Special Tool(s): Shim Selection Gauge 307-300 (T94P-77000-Q) (17-055).
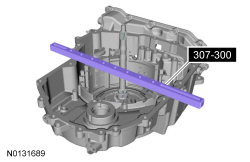
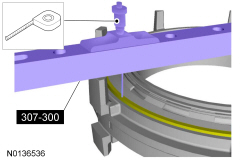
- Record as measurement A, the distance from the Shim Selection Gauge
307-300 (T94P-77000-Q) (17-055) to the top of the clutch plate at 3
different points and average the 3 distances.
Special Tool(s): Shim Selection Gauge 307-300 (T94P-77000-Q) (17-055).
General Equipment: Depth Gauge.
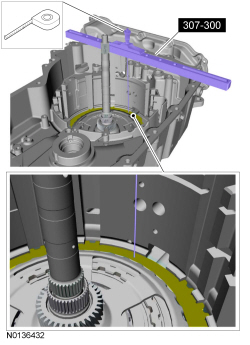
- Record as measurement B, the distance from the top of Shim Selection
Gauge 307-300 (T94P-77000-Q) (17-055) to the transmission case step above
the intermediate (2, 6) clutch.
Special Tool(s): Shim Selection Gauge 307-300 (T94P-77000-Q) (17-055).
General Equipment: Depth Gauge.
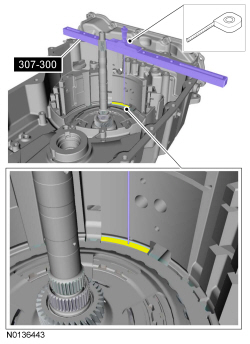
- Subtract measurement B from measurement A The clearance should be between 0.240 mm (0.009 in) and 2.60 mm (0.102 in). If the clearance is out of range, check the intermediate (2, 6) clutch pack for correct installation. If the intermediate (2, 6) clutch pack is correctly installed, install a new clutch pack.

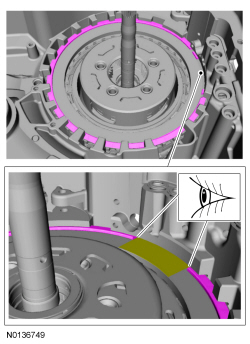
- NOTE: When the intermediate (2, 6) clutch is correctly installed,
a friction plate is on top.
- Friction plate
- Steel plate

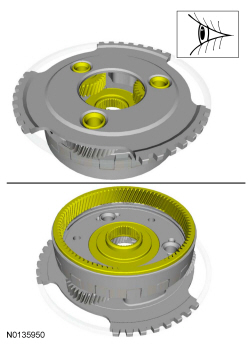
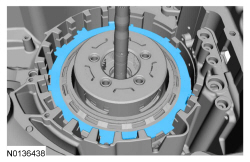
- NOTE: Note the position of the pressure plate. When installing the center support, the long support legs must fit through the pressure plate and rest on the OWC.
- Soak the clutch plates.
Material: Clean Motorcraft MERCON LV Automatic Transmission Fluid XT-10-QLVC.
- Position the wave spring and clutch plate, temporarily reversing the
wave spring and steel plate for the clutch stack-up measurement.
- Steel plate.
- Wave spring.
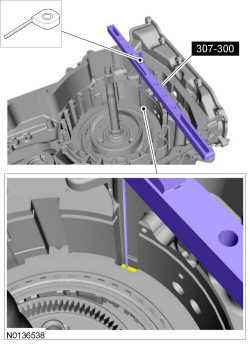
- Position the center support with the long legs facing up.
Special Tool(s): Shim Selection Gauge 307-300 (T94P-77000-Q) (17-055).
- Record as measurement A, the distance from the top of Shim Selection
Gauge 307-300 (T94P-77000-Q) (17-055) to the contact surface of the
low/reverse clutch piston.
Special Tool(s): Shim Selection Gauge 307-300 (T94P-77000-Q) (17-055).
General Equipment: Depth Gauge.
- Record as measurement B, the distance from the top of Shim Selection
Gauge 307-300 (T94P-77000-Q) (17-055) to the leg surface of the center
support.
Special Tool(s): Shim Selection Gauge 307-300 (T94P-77000-Q) (17-055).
General Equipment: Depth Gauge.
- Subtract measurement B from measurement A and record as measurement C.
Description Reading Measurement A Measurement B Subtract measurement B from measurement A and record as measurement C.
- Special Tool(s): Shim Selection Gauge 307-300 (T94P-77000-Q) (17-055).
- Record as measurement D, the distance from the Shim Selection Gauge
307-300 (T94P-77000-Q) (17-055) to the top of the OWC.
Special Tool(s): Shim Selection Gauge 307-300 (T94P-77000-Q) (17-055).
General Equipment: Depth Gauge.
- Record as measurement E, the distance from the top of Shim Selection
Gauge 307-300 (T94P-77000-Q) (17-055) to the top of the low/reverse clutch
at 3 different points and average the 3 distances.
Special Tool(s): Shim Selection Gauge 307-300 (T94P-77000-Q) (17-055).
General Equipment: Depth Gauge.
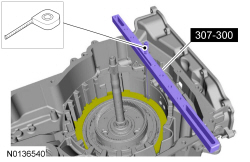
- Subtract measurement E from measurement D and record as measurement F.
- Subtract measurement F from measurement C to get the low/reverse clutch clearance. The clearance should be between 0.406 mm (0.015 in) and 2.000 mm (0.078 in). If the clearance is out of range, check the low/reverse clutch pack for correct installation. If the low/reverse clutch pack is correctly installed, install a new clutch pack.

- NOTE: When the low/reverse clutch is correctly installed, the
wave spring is on top.
- Wave spring
- Steel plate
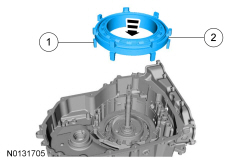
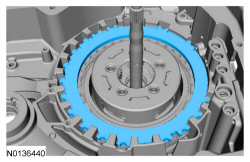
- NOTE: Be sure the center support is installed with the long
support legs facing down and the feed holes facing the front of the
transmission.
- Long legs face down.
- Feed holes face the front of the transmission case.
-
- No. 5 thrust bearing
- No. 6 thrust bearing


-
- No. 7 thrust bearing
- No. 8 thrust bearing

- Wave spring.
- Soak the clutch plates.
Material: Clean Motorcraft MERCON LV Automatic Transmission Fluid XT-10-QLVC.
- Clutch plates.

- Pressure plate.
- NOTICE: Be sure to install the forward (1, 2, 3, 4) clutch
beveled snap ring with the flat side facing down or the snap ring can come
loose, causing damage to the transmission.
Clutch beveled snap ring with the flat side down with the gap facing the front of the transmission.
- Seat the snap ring in the snap ring groove.
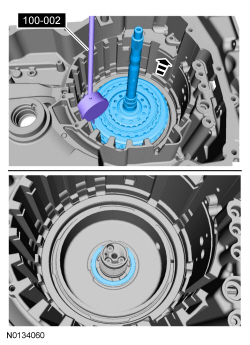
- Position the plunger on the top clutch friction plate.
Special Tool(s): Dial Indicator Gauge With Holding Fixture 100-002 (TOOL-4201-C).
- Apply 483 kPa (70 psi) of air pressure to the clutch piston port while
recording the clutch pack clearance on the Dial Indicator. The clearance
should be between 0.076 mm (0.002 in) and 1.840 mm (0.072 in). If the
clearance is out of range, check the forward (1, 2, 3, 4) clutch pack for
correct installation and the transmission for correct assembly. If the
forward (1, 2, 3, 4) clutch pack is correctly installed, install a new
forward (1, 2, 3, 4) clutch pack.
Special Tool(s): Dial Indicator Gauge With Holding Fixture 100-002 (TOOL-4201-C).
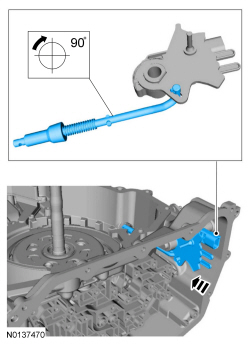
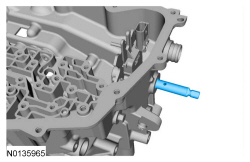
- Align the manual control shaft pin holes.
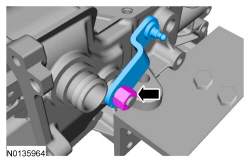
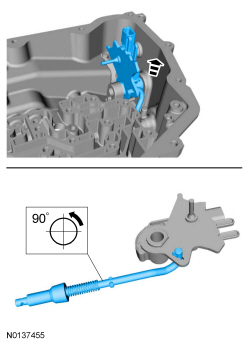
- NOTICE: Make sure to hold the manual control lever while
tightening the manual control lever nut or damage to the manual control
lever and park components will occur.
- Tighten to 24 Nm (18 lb-ft).

-
- Tighten to 12 Nm (106 lb-in).

-
- Tighten to 12 Nm (106 lb-in).

-
- No. 12 thrust bearing
- No. 10 thrust bearing

-
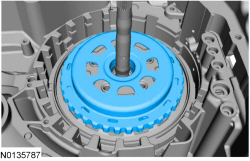
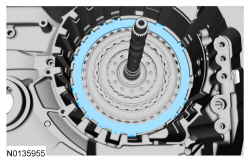
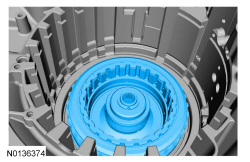
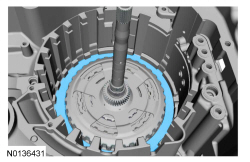
- Simultaneously lower the drive, driven sprockets and chain.
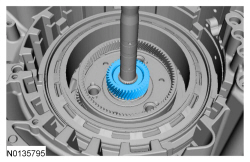
- Lightly tap on the driven sprocket to be sure it is fully seated in the case.
-
- No. 13 thrust washer
- No. 11 thrust bearing


- No. 15 thrust bearing
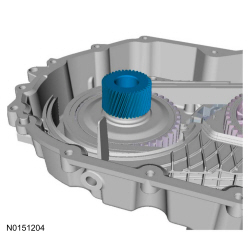
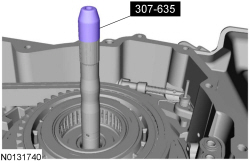
- Special Tool(s): Seal Protector, Turbine Shaft 307-635.
- FWD Vehicles.
Special Tool(s): Handle 205-153 (T80T-4000-W), Installer, Differential Seal 307-626.
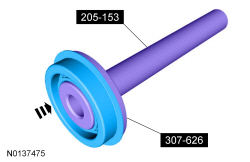
- FWD Vehicles.
Special Tool(s): Handle 205-153 (T80T-4000-W), Installer, Differential Seal 307-626.
- AWD Vehicles.
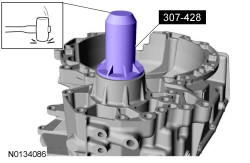
Special Tool(s): Installer, RH Halfshaft Fluid Seal 307-428.
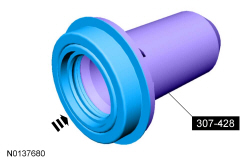
- AWD Vehicles.
Special Tool(s): Installer, RH Halfshaft Fluid Seal 307-428.
-
- Tighten to 35 Nm (26 lb-ft).
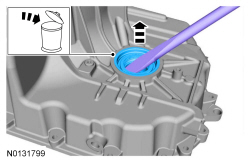
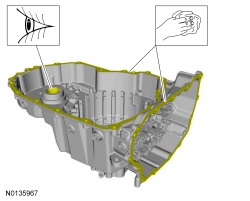
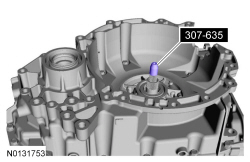
- NOTE: Be sure the sealing surfaces of the torque converter
housing and the transmission housing are free of oil before applying
silicone.
Material: Ultra Silicone Sealant TA-29.

- NOTE: Be sure the torque converter housing stud bolt is in the
correct location as noted during disassembly.
- Tighten to 24 Nm (18 lb-ft).

- Remove the special tool.
Special Tool(s): Seal Protector, Turbine Shaft 307-635.
-
- Tighten to 10 Nm (89 lb-in).
-
- Tighten to 10 Nm (89 lb-in).

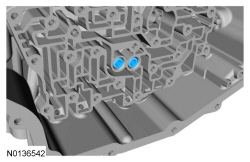
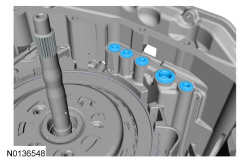
- Align the new separator plate on the stud and the guide pin.
- NOTE: Be sure that the manual pin (part of the TR sensor) is correctly installed in the manual valve.
- Nut hand-tight.
- Short bolts hand-tight.
- Long bolts hand-tight.
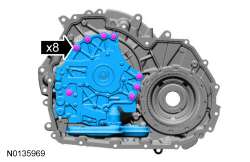
- Tighten in a crisscross pattern.
- Tighten to 10 Nm (89 lb-in).
- Alignment tab in the alignment hole.
- Tighten to 13 Nm (115 lb-in).
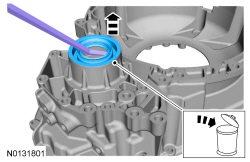
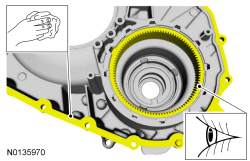
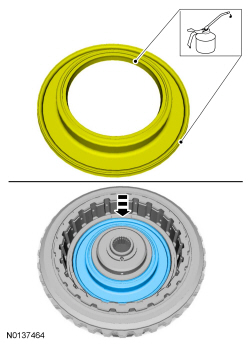
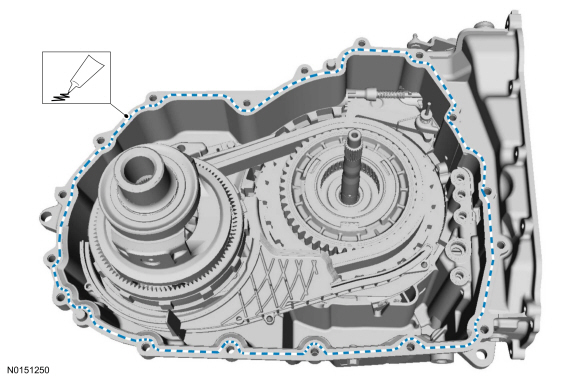
- NOTE: Be sure the main control-to-cover seal is installed with the holes facing up.


- Material: Ultra Silicone Sealant TA-29.
- NOTE: Install the main control cover stud bolts in the correct
location as noted during disassembly.
- Tighten to 12 Nm (106 lb-in).

- NOTICE: The torque converter is heavy. Be careful not to drop
it or damage will result.
Special Tool(s): Handle, Torque Converter 307-091 (T81P-7902-C).

- Special Tool(s): Retainer, Torque Converter 307-566.
- Special Tool(s): Holding Fixture, Transmission 307-003 (T57L-500-B), Holding Fixture 307-625.
- Special Tool(s): Holding Fixture 307-625.
DISASSEMBLY AND ASSEMBLY OF SUBASSEMBLIES
Transaxle Case
Special Tool(s)
Disassembly
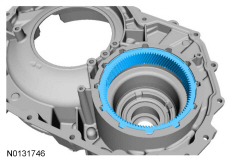
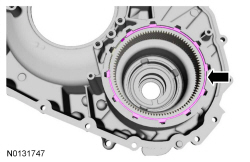
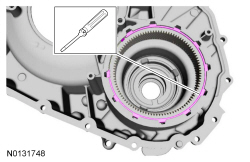
- NOTE: Press the bushing out of the transmission case from the
outside to the inside so that the transmission case rests on a flat surface.
Discard the specified component. Follow local disposal regulations.
Special Tool(s): Installer, Wheel Speed Sensor Ring 206-084/2.
General Equipment: Shop Press.


Assembly
- NOTICE: Be sure the flat side of the beveled snap ring is facing down or the ring can come loose, causing damage to the transmission.
- Seat the snap ring. Screwdriver.
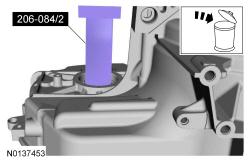
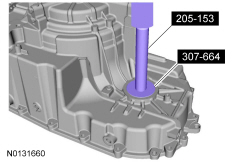
- Special Tool(s): Handle 205-153 (T80T-4000-W), Installer, Bushing 307-664.
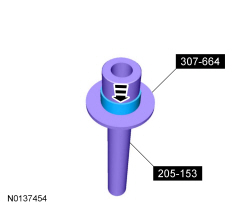
- Special Tool(s): Handle 205-153 (T80T-4000-W), Installer, Bushing
307-664.
General Equipment: Shop Press.
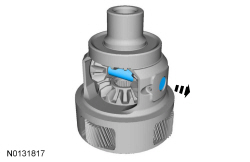
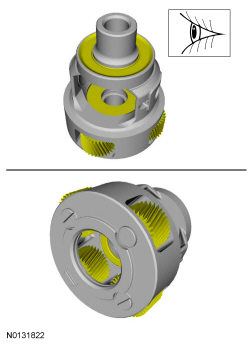
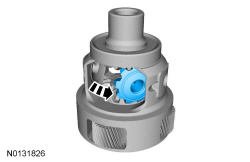
Differential Gear Assembly
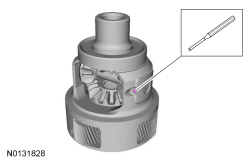
Disassembly
- Pin punch. Discard the specified component. Follow local disposal regulations.
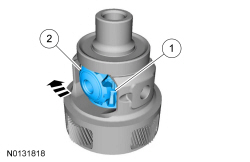
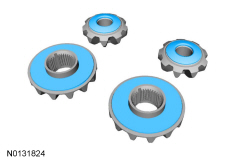
- NOTICE: Do not mix up the washers from the side or spider
gears that they were originally assembled with. Assembly of the differential
with the wrong washers can cause excessive wear to the differential carrier,
spider or side gears.
- Side gear
- Spider gear
- NOTICE: Do not mix up the washers from the side or spider gears that they are assembled with. Assembly of the differential with the wrong washers can cause excessive wear to the differential carrier, spider or side gears.
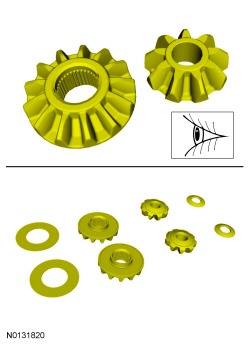
Assembly
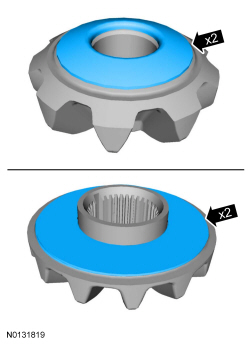
- Check for damage or excessive wear. Visual check.
- Check for damage or excessive wear. Visual check.
- Check that bearings spin freely and do not move back and forth or side to side excessively. Check for damage or excessive wear. Visual check.
- NOTICE: Do not mix up the washers from the side or spider gears that they were originally assembled with. Assembly of the differential with the wrong washers can cause excessive wear to the differential carrier, spider or side gears.
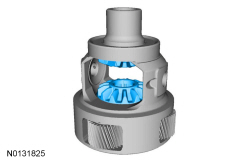
- Align the roll pin holes. Visual check.

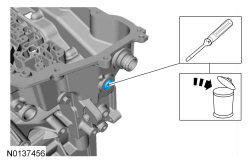
- New roll pin. Pin punch.
 Removal and Installation
Main Control Cover
Material
Removal
With the vehicle in NEUTRAL, position it on a hoist. Refer to Section
100-02.
Remove the ACL assembly. Refer to Section 303-12.
...
 Transaxle/Transmission Cooling - 6F50/6F55
SPECIFICATIONS
General Specifications
Material
a 6F50 transmission.
b 6F55 transmission.
Torque Specifications
a 3.5L GTDI
b 3.5L Ti-VCT
DESCRIPTION AND OPERATION
Transaxle Cool ...
Other materials:
Four Wheel Drive (4WD) Systems
DESCRIPTION AND OPERATION
All Wheel Drive (AWD) Systems
The AWD system consists of the following:
PTU
Rear driveshaft
AWD relay module
Rear axle with ATC solenoid
Torque from the engine is transferred through the transmission to the PTU.
This torque is transferre ...
Driver and passenger airbags
WARNING: Never place your arm or any objects over an airbag
module. Placing your arm over a deploying airbag can result in
serious arm fractures or other injuries. Objects placed on or over the
airbag inflation area may cause those objects to be propelled by the
airbag into your face and torso c ...
In-Vehicle Repair
Intake Manifold
Removal
With vehicle in NEUTRAL, position it on a hoist. For additional
information, refer to Section 100-02.
Loosen the 4 retainers and remove the underbody shield.
Disconnect the battery ground cable. For additional information, refer
to Section 414-01.
...
