The headlamps on your vehicle are properly aimed at the assembly plant.
If your vehicle has been in an accident, an authorized dealer should check the alignment of your headlamps.
Vertical Aim Adjustment
1. Park the vehicle directly in front of a wall or screen on a level surface, approximately 25 feet (7.6 meters) away.
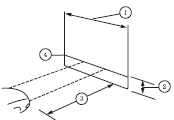
• (1) 8 feet (2.4 meters)
• (2) Center height of lamp to ground
• (3) 25 feet (7.6 meters)
• (4) Horizontal reference line
2. Measure the height of the headlamp bulb center from the ground and mark an 8 foot (2.4 meter) horizontal reference line on the vertical wall or screen at this height (a piece of masking tape works well). The center of the lamp is marked by a 3 millimeter circle on the headlamp lens.
3. Turn on the low beam headlamps to illuminate the wall or screen and open the hood.
To see a clearer light pattern for adjusting, you may want to block the light from one headlamp while adjusting the other.

On the wall or screen you will observe a flat zone of high intensity light located at the top of the right hand portion of the beam pattern.
If the top edge of the high intensity light zone is not at the horizontal reference line, the headlamp will need to be adjusted.
4. Locate the vertical adjuster on each headlamp. Using a Phillips number 2 screwdriver, turn the adjuster either clockwise or counterclockwise in order to adjust the vertical aim of the headlamp.
5. Close the hood and turn off the lamps.
HORIZONTAL AIM IS NOT REQUIRED FOR THIS VEHICLE AND IS NOT ADJUSTABLE.
 Air filter(s)
WARNING: To reduce the risk of vehicle damage and/or personal
burn injuries, do not start your engine with the air cleaner
removed and do not remove it while the engine is running.
When changing th ...
 Changing a bulb
Lamp Assembly Condensation
Exterior lamps are vented to accommodate normal changes in pressure.
Condensation can be a natural by-product of this design. When moist air
enters the lamp assembly th ...
Other materials:
Steering Column Switches
SPECIFICATIONS
Torque Specifications
DESCRIPTION AND OPERATION
Steering Column Switches
Overview
The steering column switches are located on or around the steering column,
giving the driver the ability to control various vehicle functions and remain
focused on the task of driving. Depending on ve ...
Changing a road wheel
WARNING: The use of tire sealants may damage your tire
pressure monitoring system and should not be used. However,
if you must use a sealant, have an authorized dealer install a new tire
pressure monitoring system sensor and valve stem.
WARNING: See Tire Pressure Monitoring System in this
chapt ...
Horn
SPECIFICATIONS
Torque Specifications
DESCRIPTION AND OPERATION
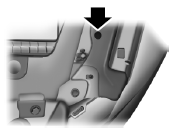
Horn
Component Location
Overview
The horn emits an audible tone when the driver air bag module is pressed. The
horn output is controlled by a relay, which is integral to the BCM.
System Operation
System Diagram
Horn Operation
T ...
