Lamp Assembly Condensation
Exterior lamps are vented to accommodate normal changes in pressure.
Condensation can be a natural by-product of this design. When moist air enters the lamp assembly through the vents, there is a possibility that condensation can occur when the temperature is cold. When normal condensation occurs, a thin film of mist can form on the interior of the lens. The thin mist eventually clears and exits through the vents during normal operation. Clearing time may take as long as 48 hours under dry weather conditions.
These are examples of acceptable condensation: ŌĆó Presence of thin mist (no streaks, drip marks or droplets).
ŌĆó Fine mist covers less than 50% of the lens.
These are examples of unacceptable moisture (usually caused by a lamp water leak): ŌĆó Water puddle inside the lamp.
ŌĆó Large water droplets, drip marks or streaks present on the interior of the lens.
Take your vehicle to a dealer for service if any of the above conditions of unacceptable moisture are present.
Replacing headlamp bulbs
WARNING:
Handle a halogen headlamp bulb carefully and keep out of childrenŌĆÖs reach. Grasp the bulb only by its plastic base and do not touch the glass. The oil from your hand could cause the bulb to break the next time the headlamps are operated.
Note: If the bulb is accidentally touched, it should be cleaned with rubbing alcohol before being used.
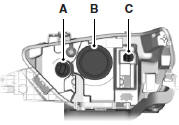
Headlamp:
A. Front parking lamp/turn signal bulb
B. Low/High beam headlamp bulb
C. Sidemarker bulb
Low/High beam bulbs:
1. Make sure the headlamp switch is in the off position, then open the hood.
2. Reach in behind the headlamp assembly to access the bulbs and connectors.
3. Remove service cap.
4. Remove bulb from the headlamp assembly by turning it counterclockwise, then pull it straight out.
Front parking lamp/turn signal/sidemarker bulbs:
1. Make sure headlamp switch is in the off position, then open the hood.
2. Reach in behind the headlamp assembly to access the bulb sockets and connectors.
3. Rotate the bulb socket counterclockwise and remove from the lamp assembly.
4. Carefully pull the bulb out of the socket and push in the new bulb.
Install the new bulbs in reverse order from the steps above.
Replacing HID headlamp bulbs (if equipped)
The headlamps on your vehicle use a ŌĆ£high intensity dischargeŌĆØ source.
These lamps operate at a high voltage. When the bulb is burned out, the bulb and starter capsule assembly must be replaced by your authorized dealer.
Replacing stop/tail/turn and sidemarker lamp bulbs
Your vehicle is equipped with a tail lamp assembly containing integral multiple light emitting diodes (LED) for the stop/tail/turn and sidemarker functions. If replacement is required, see your authorized dealer.
Replacing backup lamp bulbs

1. Make sure the headlamp switch is in the off position.
2. Remove the deck lid trim panel press pins and carefully pull the panel away to expose the backside of the backup lamp assembly.
3. Remove bulb socket by rotating it counterclockwise, then pull it out of the lamp assembly.
4. Pull the bulb straight from the socket.
5. Install the new bulb in reverse order.
Replacing high-mount brake lamp bulbs
Your vehicle is equipped with an LED high-mount brake lamp. It is designed to last the life of the vehicle. If replacement is required, it is recommended that you see your authorized dealer.
Replacing license plate lamp bulbs
1. Make sure the headlamp switch is in the off position.
2. Remove the two screws from the license plate lamp assembly.
3. Carefully pull the bulb out from the contacts.
Install new bulb(s) in reverse order.
Replacing supplemental park lamp bulbs
Your vehicle is equipped with an LED supplemental park lamp. It is designed to last the life of the vehicle. If replacement is required, it is recommended that you see your authorized dealer.
 Adjusting the headlamps
The headlamps on your vehicle are properly aimed at the assembly plant.
If your vehicle has been in an accident, an authorized dealer should
check the alignment of your headlamps.
Vertical Aim Ad ...
 Bulb specification chart
Replacement bulbs are specified in the chart below. Headlamp bulbs
must be marked with an authorized ŌĆ£D.O.T.ŌĆØ for North America and an
ŌĆ£EŌĆØ for Europe to ensure lamp performance, light bright ...
Other materials:
Horn
SPECIFICATIONS
Torque Specifications
DESCRIPTION AND OPERATION
Horn
Component Location
Overview
The horn emits an audible tone when the driver air bag module is pressed. The
horn output is controlled by a relay, which is integral to the BCM.
System Operation
System Diagram
Horn Operation
T ...
Removal
Engine
Special Tool(s)
WARNING: Do not smoke, carry lighted tobacco or have an open flame of any
type when working on or near any fuel-related component. Highly flammable
mixtures are always present and may be ignited. Failure to follow these
instructions may result in serious personal inj ...
Specifications, Description and Operation
SPECIFICATIONS
Torque Specifications
DESCRIPTION AND OPERATION
Headlamps
Overview
The headlamp system consists of:
Headlamp assemblies
Ballasts ( HID only)
Headlamp switch
Multifunction switch
BCM
SCCM
The headlamp system is a dual-beam pattern system. It consists of a single
rep ...
