WARNING:
To reduce the risk of vehicle damage and/or personal burn injuries, do not start your engine with the air cleaner removed and do not remove it while the engine is running.
When changing the air filter element, use only the air filter element listed. Refer to MotorcraftÂź Part Numbers in the Capacities and Specifications chapter.
For EcoBoost equipped vehicles: When servicing the air cleaner, it is important that no foreign material enter the air induction system. The engine and turbocharger are susceptible to damage from even small particles.
Refer to Scheduled Maintenance for the appropriate intervals for changing the air filter element.
Note: Failure to use the correct air filter element may result in severe engine damage. The customer warranty may be void for any damage to the engine if the correct air filter element is not used.
Changing the Air Filter Element

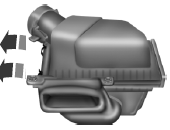
3.5L V6 engine
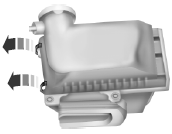
2.0L EcoBoostÂź engine
3.5L V6 SHO engine
1. Release the clamps that secure the air filter housing cover.
2. Carefully separate the two halves of the air filter housing.
3. Remove the air filter element from the air filter housing.
4. Wipe the air filter housing and cover clean to remove any dirt or debris and to ensure good sealing.
5. Install a new air filter element. Be careful not to crimp the filter element edges between the air filter housing and cover. This could cause filter damage and allow unfiltered air to enter the engine if not properly seated.
6. Replace the air filter housing cover and secure the clamps. Be sure that the air cleaner cover tabs are engaged into the slots of the air cleaner housing.
 Changing the wiper blades
1. Pull the wiper blade and arm away
from the glass.
2. Squeeze the locking tabs to release
the blade from the arm and pull the
blade away from the arm to remove it.
3. Attach the new blade ...
 Adjusting the headlamps
The headlamps on your vehicle are properly aimed at the assembly plant.
If your vehicle has been in an accident, an authorized dealer should
check the alignment of your headlamps.
Vertical Aim Ad ...
Other materials:
Disassembly and Assembly
Seat Backrest - Front
Disassembly
Seat Backrest - Trim Parts
Seat Backrest - Frame Parts With Manual Lumbar and Static Lumbar
Seat Backrest - Frame Parts With Power Lumbar
Seat Cushion - With Active Motion
NOTE: Refer to Seat Backrest - Front for recliner-to-seat track bolt
tig ...
Rear Disc Brake
SPECIFICATIONS
Torque Specifications
REMOVAL AND INSTALLATION
Brake Pads
Special Tool(s)
Material
Removal
WARNING:
Before beginning any service procedure in this section, refer to Safety Warnings
in Section 100-00. Failure to follow this instruction may result in serious
personal injury.
...
Information messages
Note: Depending on the vehicle options equipped with your vehicle, not
all of the messages will display or be available. Certain messages may be
abbreviated or shortened depending upon which cluster type you have.
Press the OK button to
acknowledge and remove some
messages from the informatio ...
