
WARNING:
The gases around the battery can explode if exposed to flames, sparks, or lit cigarettes. An explosion could result in injury or vehicle damage.
WARNING:
Batteries contain sulfuric acid which can burn skin, eyes and clothing, if contacted.
Do not attempt to push-start your automatic transmission vehicle.
Automatic transmissions do not have push-start capability. Attempting to push-start a vehicle with an automatic transmission may cause transmission damage.
When the battery is disconnected or a new battery is installed, the automatic transmission must relearn its shift strategy. As a result, the transmission may exhibit a combination of firm and soft shifts. This operation is considered normal and will not affect function or durability of the transmission. Over time, the adaptive learning process will fully update transmission operation.
Preparing Your Vehicle
Note:
Use only a 12–volt supply to start your vehicle.
Note:
Do not disconnect the battery of the disabled vehicle as this could damage the vehicle’s electrical system.
1. Park the booster vehicle close to the hood of the disabled vehicle making sure the two vehicles do not touch. Set the parking brake on both vehicles and stay clear of the engine cooling fan and other moving parts.
2. Check all battery terminals. Remove the positive terminal cover (if equipped) and any excessive corrosion before you attach the battery cables. Ensure that vent caps are tight and level.
3. Turn the heater fan on in both vehicles to protect from any electrical surges. Turn all other accessories off.
Connecting the Jumper Cables
WARNING:
Do not connect the end of the second cable to the negative (-) terminal of the battery to be jumped. A spark may cause an explosion of the gases that surround the battery.
Note
: Do not attach the negative (-) cable to fuel lines, engine rocker covers, the intake manifold or electrical components as grounding points.
Note:
In the illustration, the vehicle on the bottom is used to designate the assisting (boosting) battery.
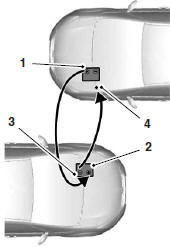
1. Connect the positive (+) jumper cable to the positive (+) terminal of the discharged battery.
2. Connect the other end of the positive (+) cable to the positive (+) terminal of the assisting battery.
3. Connect the negative (-) cable to the negative (-) terminal of the assisting battery.
4. Make the final connection of the negative (-) cable to an exposed metal part of the stalled vehicle’s engine, away from the battery and the carburetor or fuel injection system.
Ensure that the cables are clear of fan blades, belts, moving parts of both engines, or any fuel delivery system parts.
Jump Starting
1. Start the engine of the booster vehicle and run the engine at a moderately increased speed.
2. Start the engine of the disabled vehicle.
3. Once the disabled vehicle has been started, run both engines for an additional three minutes before disconnecting the jumper cables.
Removing the Jumper Cables
Note: In the illustration, the vehicle on the bottom is used to designate the assisting (boosting) battery.
Remove the jumper cables in the reverse order that they were connected.
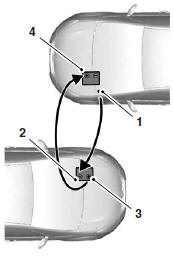
1. Remove the jumper cable from the ground metal surface.
2. Remove the jumper cable on the negative (-) terminal of the booster vehicle’s battery.
3. Remove the jumper cable from the positive (+) terminal of the booster vehicle’s battery.
4. Remove the jumper cable from the positive (+) terminal of the disabled vehicle’s battery.
After the disabled vehicle has been started and the jumper cables removed, allow it to idle for several minutes so the engine computer can relearn its idle conditions.
 Fuel cut-off switch
WARNING: Failure to inspect and if necessary repair fuel leaks
after a collision may increase the risk of fire and serious injury.
Ford Motor Company recommends that the fuel system be inspected b ...

Other materials:
Using snow chains
Your Taurus SHO may be equipped with summer tires to provide
superior performance on wet and dry roads. Summer tires do not have
the Mud and Snow (M+S or M/S) tire traction rating on the tire side
wall. Since summer tires do not have the same traction performance as
All-season or Snow tires, For ...
In-Vehicle Repair
Intake Manifold
Removal
With vehicle in NEUTRAL, position it on a hoist. For additional
information, refer to Section 100-02.
Loosen the 4 retainers and remove the underbody shield.
Disconnect the battery ground cable. For additional information, refer
to Section 414-01.
...
Safety Warnings
Review carefully the General Service Health and Safety Precautions below before
beginning any repair. Following these general service warnings are specific
system warnings that must be carefully reviewed before beginning work on any
listed system.
General Service Health and Safety Precautions
& ...
