
SPECIFICATIONS
Material
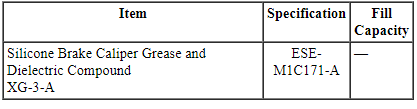
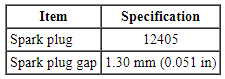
General Specifications
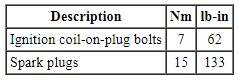
Torque Specifications
DESCRIPTION AND OPERATION
Engine Ignition
Component Location
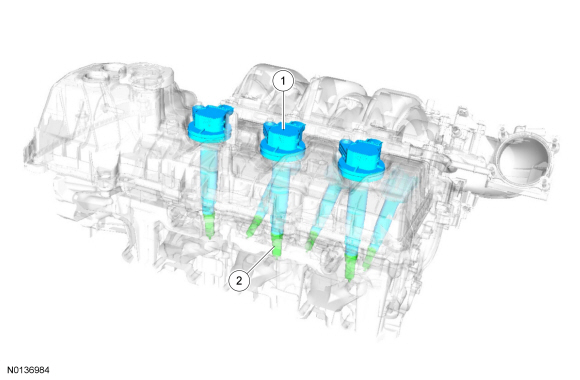
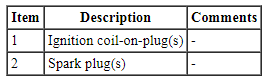
System Operation
REFER to the PC/ED manual section 1 Description and Operation.
Component Description
REFER to the PC/ED manual section 1 Description and Operation.
DIAGNOSIS AND TESTING
Engine Ignition
For PCM DTCs, REFER to Section 303-14 PCM DTC Chart. For driveability symptoms without DTCs, refer to the PC/ED manual, section 3 Symptom Charts.
REMOVAL AND INSTALLATION
Ignition Coil-On-Plug
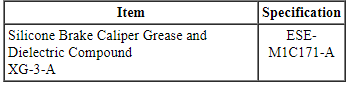
Material
Removal and Installation
RH side
NOTE: Removal steps in this procedure may contain installation details.
- NOTE: The upper intake manifold must be removed to access the RH
ignition coil-on-plugs.
Remove the upper intake manifold. For additional information, refer to Section 303-01A.
Both sides
- NOTE: When removing the ignition coil-on-plugs, a slight twisting
motion will break the seal and ease removal.
NOTE: Before installing the ignition coil-on-plug apply a small amount of dielectric grease to the inside of the ignition coil-on-plug boots.
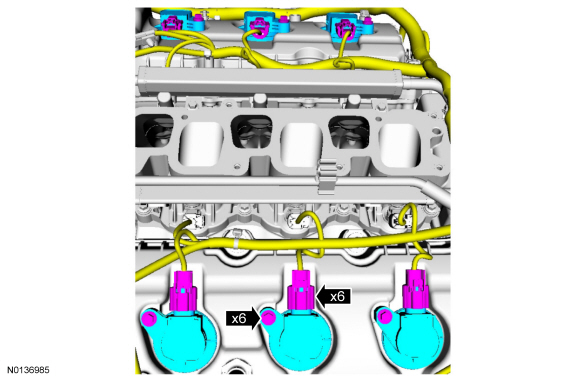
- Tighten to 7 Nm (62 lb-in).
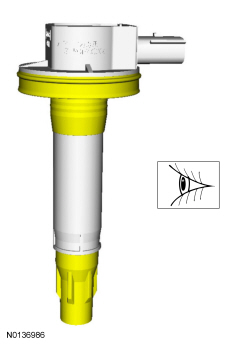
- Inspect the ignition coil-on-plug rubber seals and boots for cracks, rips, or tears. Replace any damaged coil-on-plug rubber seals or boots.
- To install, reverse the removal procedure.
Spark Plugs
Removal and Installation
NOTE: Removal steps in this procedure may contain installation details.
- Remove the 6 ignition coil-on-plugs. For additional information, refer to Ignition Coil-On-Plug.
- NOTICE: Only use hand tools when removing or installing the
spark plugs or damage can occur to the cylinder head or spark plug.
NOTICE: The spark plug procedure must be followed exactly or damage to the cylinder head and spark plug will result.
NOTICE: Do not remove the spark plugs when the engine is hot or cold soaked. Spark plug thread or cylinder head damage can occur. Make sure the engine is warm (hand touch after cooling down) prior to spark plug removal.
NOTE: Use compressed air to remove any foreign material in the spark plug well before removing the spark plugs.
- Tighten to 15 Nm (133 lb-in).
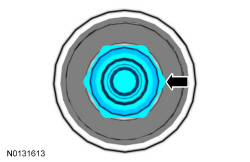
- Inspect the spark plugs. For additional information, refer to Section 303-00.
- To install, reverse the removal procedure.
 Starting System
SPECIFICATIONS
General Specifications
Torque Specifications
DESCRIPTION AND OPERATION
Starting System
Starting System - without Push Button Start
Overview
The starter system controls the cranking o ...
 Engine Ignition - 3.5L GTDI
SPECIFICATIONS
Material
General Specifications
Torque Specifications
a Refer
to the procedure in this section.
DESCRIPTION AND OPERATION
Engine Ignition
3.5L GTDI
System Operation
R ...
Other materials:
Daytime running lamps
WARNING: Always remember to turn on your headlamps at
dusk or during inclement weather. The Daytime Running Lamp
(DRL) system does not activate the tail lamps and generally may not
provide adequate lighting during these conditions. Failure to activate
your headlamps under these conditions may re ...
Rear Drive Halfshafts
SPECIFICATIONS
Torque Specifications
a Refer to the procedure in this section.
DESCRIPTION AND OPERATION
Rear Drive Halfshafts
The halfshafts consist of the following components:
Inner CV joints
Outer CV joints
Interconnecting shafts
The halfshafts are splined on the outboard stub s ...
General Procedures
Solenoid Body Identification Procedure
Original Solenoid Body Service Tag
Using the scan tool, select Powertrain, Transmission and Transmission
Solenoid Body Identification from the toolbox icon and follow the
instructions displayed on the scan tool.
The solenoid body identification screen di ...
