Transaxle - Overhaul
Special Tool(s)
Material
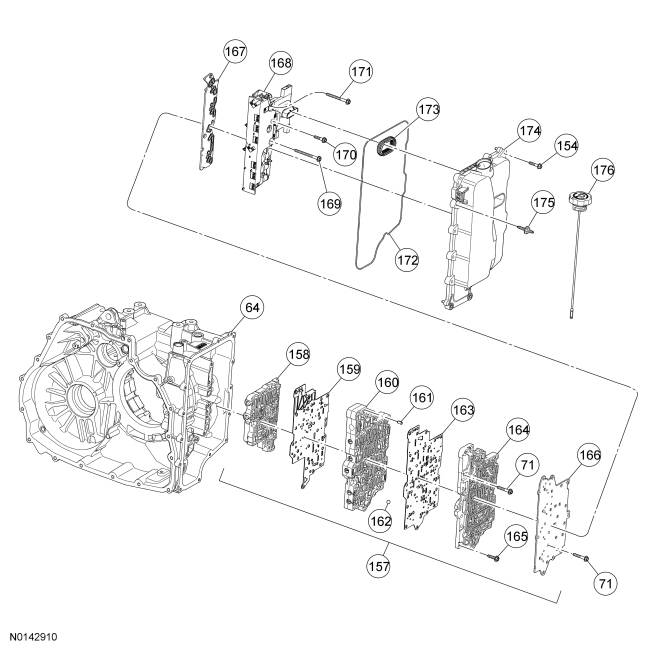
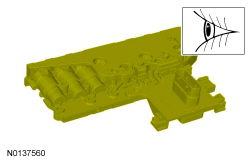
Disassembled Views
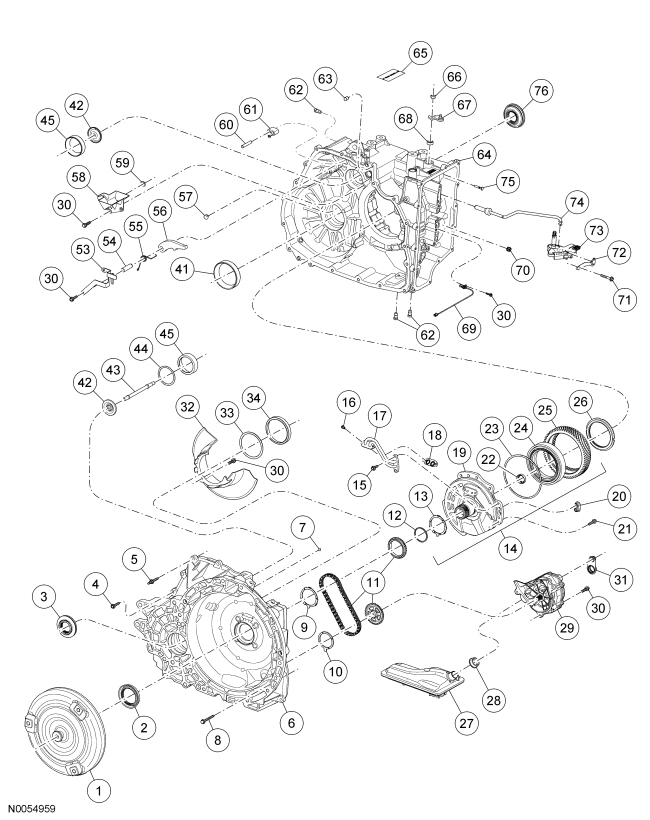
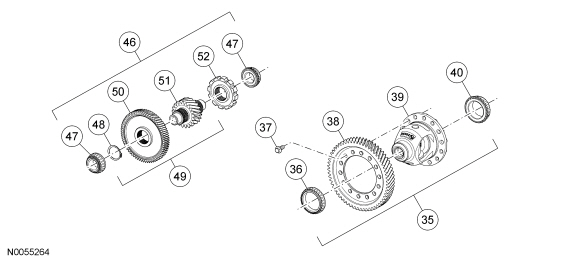
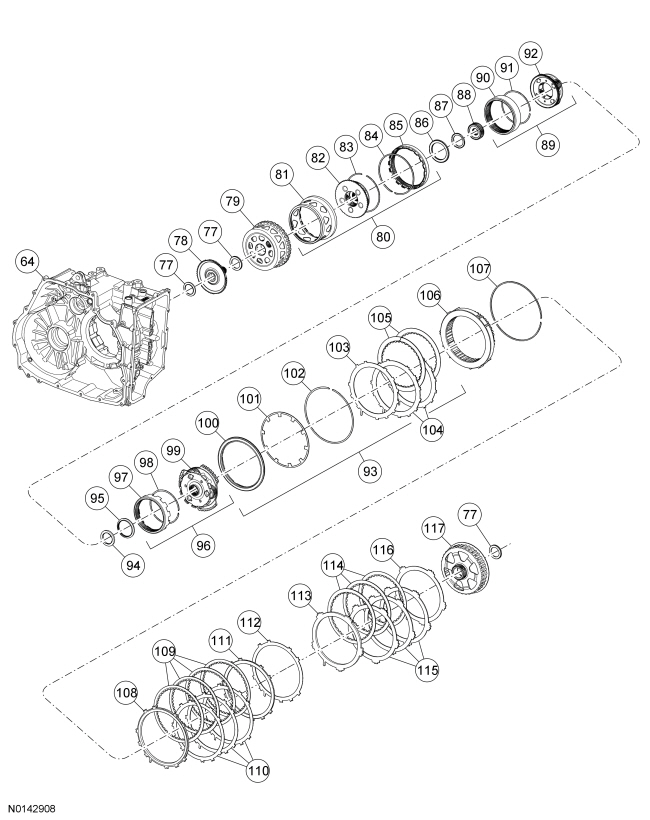
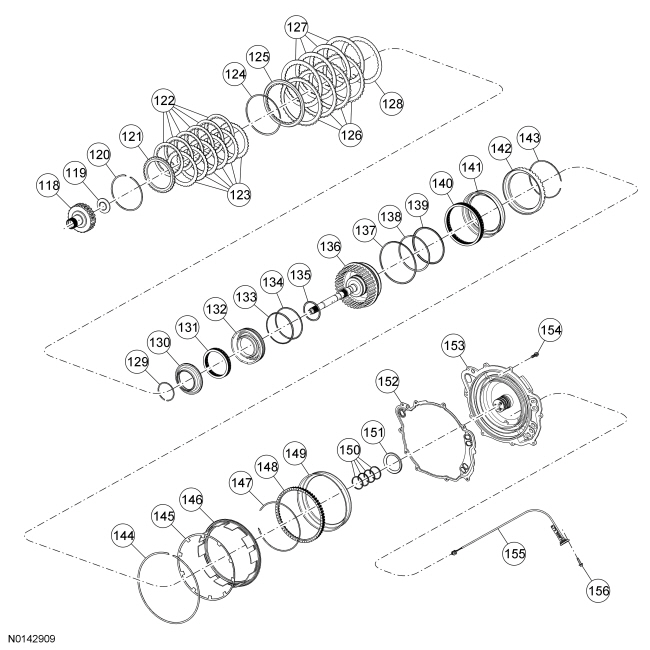
All vehicles
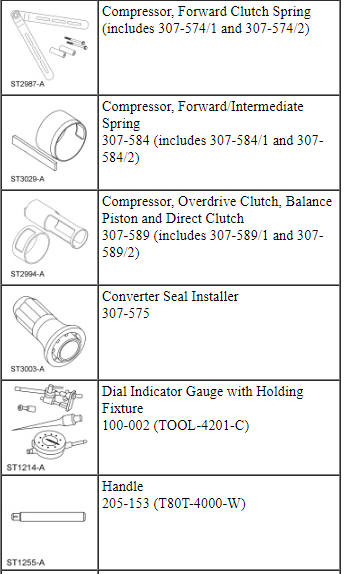
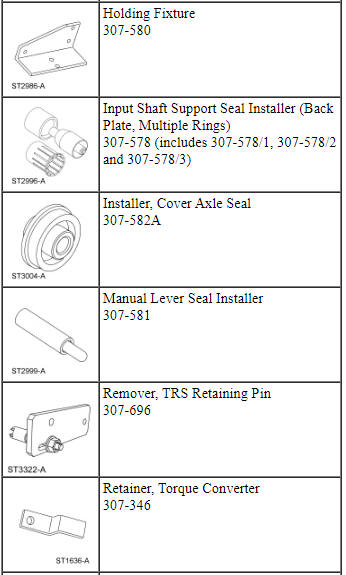
- Special Tool(s): Holding Fixture 307-580

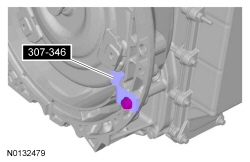
- Special Tool(s): Retainer, Torque Converter 307-346
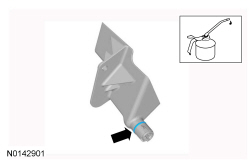
- NOTICE: The torque converter is heavy. Be careful not to drop
it or damage will result.
NOTICE: Only thread the bolts 6 to 8 turns or do not exceed 12 mm (0.472 in) into the torque converter. If the bolts are threaded too far, damage to the torque converter clutch surface can occur causing torque converter failure.
- NOTICE: Do not use water-based cleaners or mineral spirits to
clean or flush the torque converter or transmission damage will occur. Use
only clean transmission fluid designated for the transmission and torque
converter being serviced.
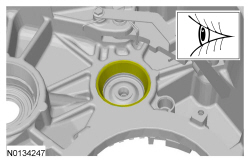
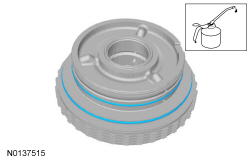
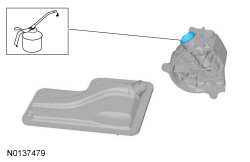
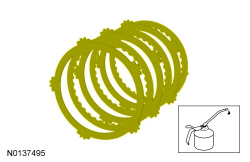
Clean and inspect the torque converter for damage.
- Inspect the sealing surface for a groove worn from the seal. Install a new torque converter if necessary.
- A new or remanufactured torque converter must be installed if one or
more of the following statements is true:
- A torque converter malfunction has been determined based on complete diagnostic procedures.
- The torque converter stud or studs, impeller hub or bushing are damaged.
- The torque converter exhibits external discoloration (due to overheating).
- There is evidence of transmission assembly or fluid
contamination due to the following transmission or converter failure
modes.
- Major metallic failure
- Multiple clutch plates or band failures
- Sufficient component wear which results in metallic contamination
- Water or antifreeze contamination
- If none of the above conditions are present, continue with the following fluid inspection.
- Pour a small amount of transmission fluid from the torque converter onto an absorbent white tissue or through a paper filter.
- Examine the fluid for contaminants. The fluid must be free of metallic contaminants.
- NOTICE: Do not use water-based cleaners or mineral spirits
to clean or flush the torque converter or transmission damage will
occur.
If the fluid passed inspection:
- drain the remaining fluid from the torque converter.
- using only the recommended transmission fluid, add 1.9L (2 qt) of clean fluid into the converter and agitate by hand.
- thoroughly drain the fluid.
- NOTE: Note the location of the studbolts for assembly.
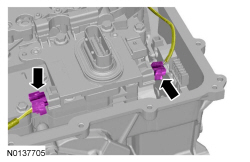
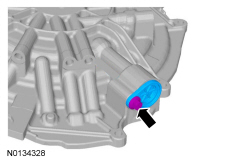
- Slide the TR sensor electrical connector lock tab over.
- NOTICE: Handle the solenoid body with care or damage to the solenoid body may occur.
- Clean and inspect the main control valve body for damage. If damage is found install a new main control valve body. If the main control valve body is not damaged, disassemble the main control valve body and clean it. Refer to Main Control - Overhaul.
- Discard the specified component. Follow local disposal regulations.


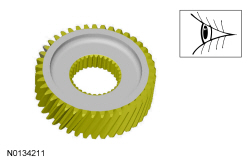
- Check for damage or excessive wear. Visual check.

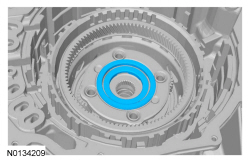
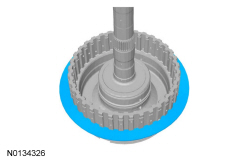
- NOTE: The location of the tab on the bottom pressure plate is aligned with the gap for the low OWC snap ring.
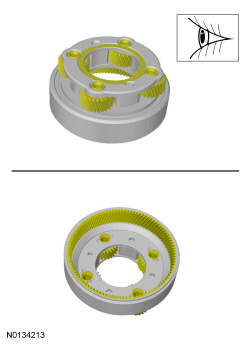
- Check that the bearings spin freely and do not move back and forth or side to side excessively. Check for damage or excessive wear. Visual check.

- Check for damage or excessive wear. Visual check.

- Check that the bearings spin freely and do not move back and forth or side to side excessively. Check for damage or excessive wear. Visual check.


- Check that the bearings spin freely and do not move back and forth or side to side excessively. Check for damage or excessive wear. Visual check.
- Check for damage or excessive wear. Visual check.
- Check for damage or excessive wear. Visual check.

- NOTE: Note the orientation of the snap ring for assembly. The
snap ring gap must fit around the tab of the low/reverse clutch pressure
plate.
Visual check.


- NOTICE: Do not clean in water or with water-based solvents.
Damage to the component may occur.
NOTE: The low OWC cannot be disassembled.
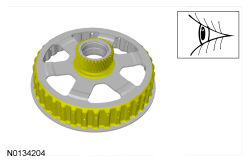
Check for cracks and damaged splines. The internal splined section should rotate counterclockwise and lock when rotated clockwise. Visual check.
- Check for burned or excessively worn surface. Visual check.
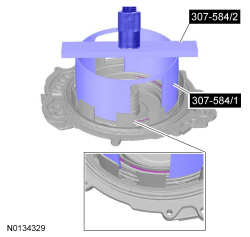
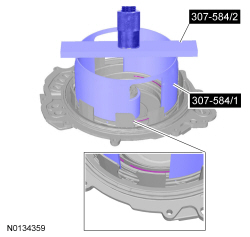
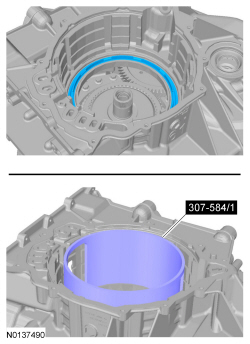
- NOTE: Install the Compressor, Forward/Intermediate Spring 307-584
(307-584/1 and 307-584/2) with the stepped end of the cylinder facing upward
when compressing the forward clutch piston return spring.
Compress the forward clutch piston return spring.
Special Tool(s): Compressor, Forward/Intermediate Spring 307-584 307-584 (includes 307-584/1 and 307-584/2), Compressor, Forward Clutch Spring 307-574 (includes 307-574/1 and 307-574/2)
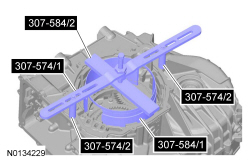
- NOTE: The Compressor, Forward/Intermediate Spring 307-584 (307-584/1 and 307-584/2) and the Compressor, Forward Clutch Spring 307-574 (307-574/1 and 307-574/2) are not shown for clarity.
- Long-nosed pliers. Discard the specified component. Follow local disposal regulations.
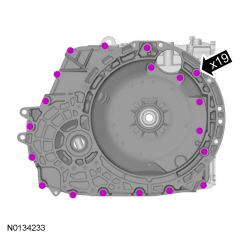
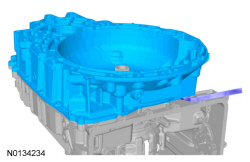
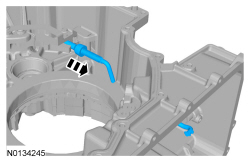
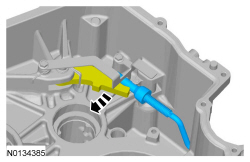
- NOTICE: Carefully pry on the transmission torque converter housing and the case to separate the torque converter housing from the case. Do not pry up on the silicone sealant mating surfaces, damage to the mating surfaces may occur. Carefully lift the torque converter housing off the dowel pins.
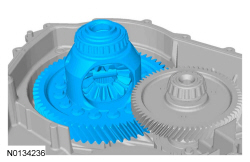
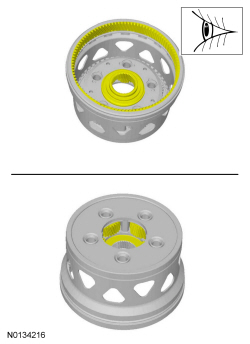
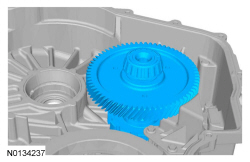
- NOTICE: If a differential bearing is damaged, a new bearing
and bearing cup must be installed on both sides of the transfer shaft or
excessive noise or transmission failure can occur.
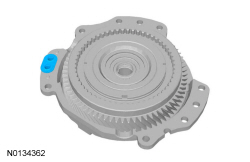
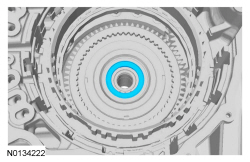
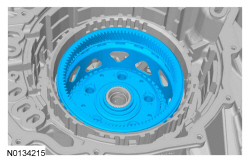
Check the bearings for excessive wear or damage and inspect the ring gear for damage. Install new bearings or a ring gear on the differential if damage or excessive wear is found. Refer to Differential Gear Assembly. If the differential bearings are replaced the bearing races in the transmission case and the torque converter housing must also be replaced. Refer to Transaxle Case and Torque Converter Housing. If the differential ring gear is replaced, the transfer shaft must also be replaced. Refer to Transfer Shaft and Gear. Visual check.
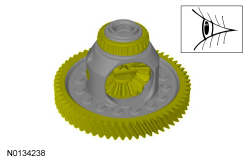
- NOTICE: If a transfer shaft bearing is damaged, a new bearing
and bearing cup must be installed on both sides of the transfer shaft or
excessive noise or transmission failure can occur.
Check the bearings for excessive wear or damage and inspect the park pawl wheel, transfer shaft and transfer shaft input gear for damage. Install new bearings, park pawl wheel, transfer shaft or transfer shaft input gear if damage or excessive wear is found. Refer to Transfer Shaft and Gear. If the transfer shaft bearings are replaced the bearing races in the transmission case and the torque converter housing case must also be replaced. Refer to Transaxle Case and Torque Converter Housing. If the transfer shaft is replaced, the differential ring gear must also be replaced. Refer to Differential Gear Assembly. Visual check.
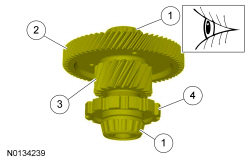
- Bearings
- Transfer shaft input gear
- Transfer shaft
- Park pawl wheel
- Discard the specified component. Follow local disposal regulations.
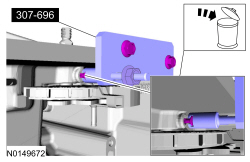
- Special tool(s): Remover, TRS Retaining Pin 307-696.
- Discard the specified component. Follow local disposal regulations.
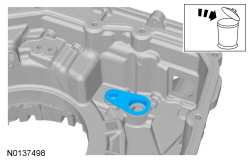
- NOTICE: If the transfer shaft bearing cup is damaged, a new
bearing and bearing cup must be installed on both sides of the transfer
shaft or excessive noise or transmission failure can occur.
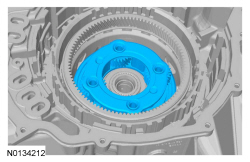
Check the transmission case side transfer shaft bearing cup for damage. If the transmission case side transfer shaft bearing cup is damaged, install a new bearing cup. Refer to Transaxle Case. If a new bearing cup is installed in the transmission case, install a new transfer shaft bearing cup in the torque converter housing. Refer to Torque Converter Housing. Install new bearings on the transfer shaft. Refer to Transfer Shaft and Gear. Visual check.
- Discard the specified component. Follow local disposal regulations.
- NOTICE: If the differential bearing cup is damaged, a new
bearing and bearing cup must be installed on both sides of the differential
or excessive noise or transmission failure can occur.
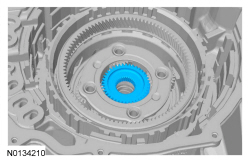
Check the transmission case side differential bearing cup for damage. If the transmission case side differential bearing cup is damaged, install a new bearing cup. Refer to Transaxle Case. If a new bearing cup is installed in the transmission case, install a new differential bearing cup in the torque converter housing. Refer to Torque Converter Housing. If a new bearing cup was installed, the differential bearings must also be replaced. Refer to Differential Gear Assembly. Visual check.

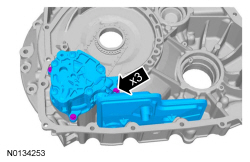
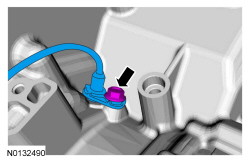
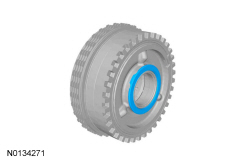
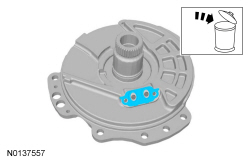
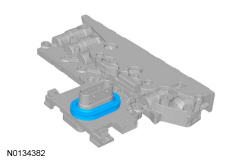
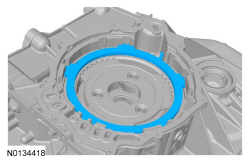
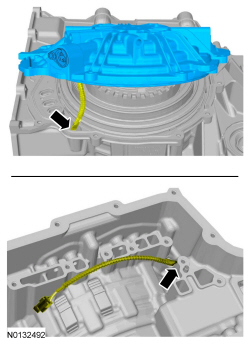
- NOTE: Note the orientation of the fluid filter to the fluid pump.
Discard the specified component. Follow local disposal regulations.
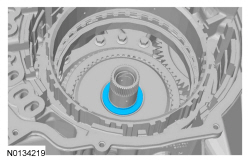
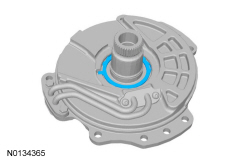
- Pull the filter out of the bore of the fluid pump.
- If the filter seal did not come off with the filter, remove the seal from the pump.
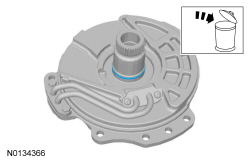
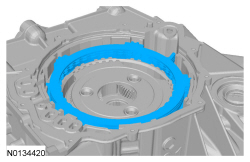
- Clean and inspect the components of the pump assembly for wear or damage. Inspect the fluid drained from the pump for excessive metal or foreign material. If excessive wear, damage or excessive metal is found, replace the fluid pump as an assembly.

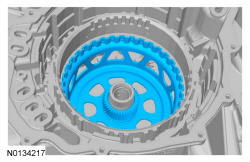
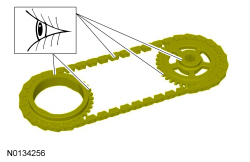
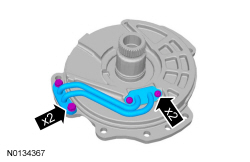
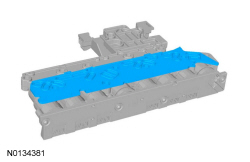
- Check the pump chain and sprocket assembly for damage or wear. Visual
check.
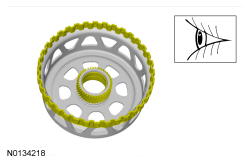
- Check the drive chain for wear, damage, stretching or tightness of the chain links.
- Check the chain sprockets for excessive wear in the chain contact areas and thrust washer areas.

- NOTICE: If the transfer shaft bearing cup is damaged, a new
bearing and bearing cup must be installed on both sides of the transfer
shaft or excessive noise or transmission failure can occur.
Check the torque converter housing side transfer shaft bearing cup for damage. If the torque converter housing side transfer shaft bearing cup is damaged, install a new bearing cup. Refer to Torque Converter Housing. If a new bearing cup is installed in the torque converter housing, install a new transfer shaft bearing cup in the transmission case. Refer to Transaxle Case. Install new bearings on the transfer shaft. Refer to Transfer Shaft and Gear. Visual check.

FWD vehicles
- Discard the specified component. Follow local disposal regulations.

All vehicles
- NOTICE: If the differential bearing cup is damaged, a new
bearing and bearing cup must be installed on both sides of the differential
or excessive noise or transmission failure can occur.
Check the torque converter housing side differential bearing cup for damage. If the torque converter housing side differential bearing cup is damaged, install a new bearing cup. Refer to Torque Converter Housing. If a new bearing cup is installed in the torque converter housing, install a new differential bearing cup in the transmission case. Refer to Transaxle Case. If a new bearing cup was installed, the differential bearings must also be replaced. Refer to Differential Gear Assembly. Visual check.
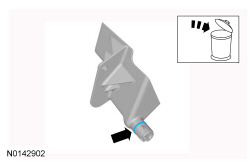
- Discard the specified component. Follow local disposal regulations.
General Equipment: Dent Puller.
- Clean and inspect the transmission case and torque converter housing for damage and install a new transmission case or torque converter housing if necessary. If a new transmission case or torque converter housing is installed, refer to Transaxle Case for bearing cup installation and Torque Converter Housing for torque converter housing bearing cup installation and differential/transfer gear bearing shim measurement.

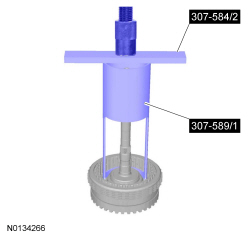
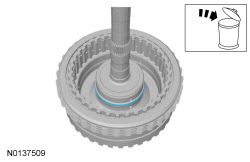
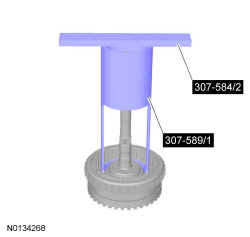
- Compress the overdrive piston return spring.
Special Tool(s): Compressor, Overdrive Clutch, Balance Piston and Direct Clutch 307-589 (307-589/1), Compressor, Forward/Intermediate Spring 307-584 (307-584/2)
General Equipment: Shop Press
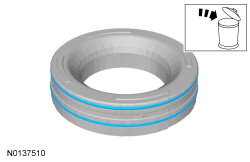
- Discard the specified component. Follow local disposal regulations.

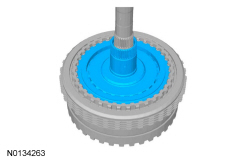
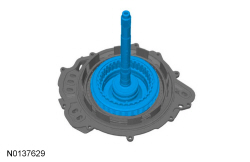
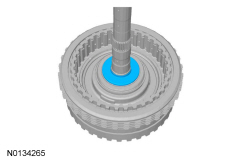
- Install the No. 1 thrust bearing on the overdrive/direct clutch
assembly.
Shop Supplies: Petroleum Jelly.
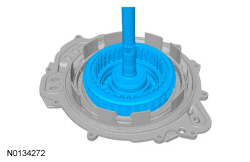
- Install the overdrive/direct clutch assembly in the rear cover.
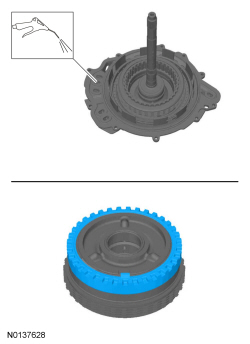
- Air Blow Gun.
- Discard the specified component. Follow local disposal regulations.
- Discard the specified component. Follow local disposal regulations.
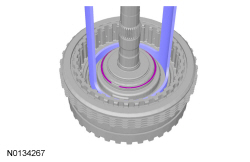
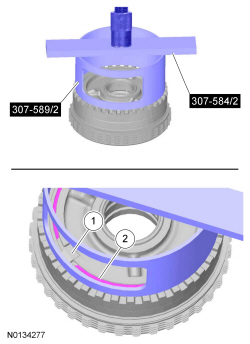
- NOTICE: Only compress the direct clutch piston return spring
far enough to take the tension from the direct clutch cylinder off the snap
ring. If the piston is compressed too far, the piston alignment tab may be
broken off.
Special Tool(s): Compressor, Overdrive Clutch, Balance Piston and Direct Clutch 307-589 (307-589/2), Compressor, Forward/Intermediate Spring 307-584 (307-584/2)
General Equipment: Shop Press- Do not contact the overdrive/direct clutch hub and shaft assembly with the direct clutch cylinder.
- Remove the snap ring.

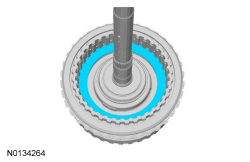
- Install the No. 1 thrust bearing on the overdrive/direct clutch
assembly.
Shop Supplies: Petroleum Jelly.

- Install the overdrive/direct clutch assembly in the rear cover.
- Apply 483 kPa (70.05 psi) of air pressure. Air Blow Gun.
- Discard the specified component. Follow local disposal regulations.
- Discard the specified component. Follow local disposal regulations.
- Discard the specified component. Follow local disposal regulations.


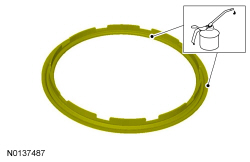
- Apply the specified lubricant to the specified component.
- Apply the specified lubricant to the specified component.
Shop Supplies: Petroleum Jelly.

- Apply the specified lubricant to the specified component.
Shop Supplies: Petroleum Jelly.
- Apply the specified lubricant to the specified component.
Shop Supplies: Petroleum Jelly.
- NOTICE: Only compress the direct clutch piston return spring
far enough to install the direct clutch cylinder snap ring. If the piston is
compressed too far, the piston alignment tab may be broken off.
NOTE: Align the tab on the direct clutch cylinder with the slot on the overdrive/direct clutch hub and shaft assembly.
Special Tool(s): Compressor, Overdrive Clutch, Balance Piston and Direct Clutch 307-589 (307-589/2), Compressor, Forward/Intermediate Spring 307-584 (307-584/2)
General Equipment: Shop Press- Do not contact the overdrive/direct clutch hub and shaft assembly with the direct clutch cylinder.
- Install the snap ring.
- Apply the specified lubricant to the specified component.
Shop Supplies: Petroleum Jelly.
- Apply the specified lubricant to the specified component.
Shop Supplies: Petroleum Jelly.
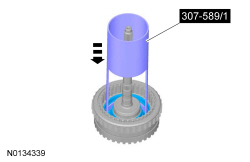
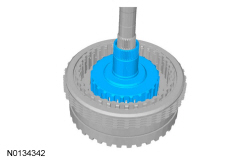
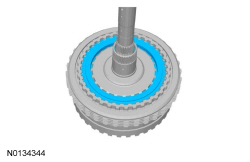
- NOTE: Push the overdrive clutch piston in the cylinder by hand
using the Compressor, Overdrive Clutch, Balance Piston and Direct Clutch
307-589/1.
Special Tool(s): Compressor, Overdrive Clutch, Balance Piston and Direct Clutch 307-589 (307-589/1)
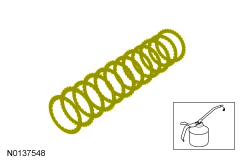
- NOTE: Install the overdrive clutch piston return spring so that the holes are facing upward.
- Apply the specified lubricant to the specified component.
Shop Supplies: Petroleum Jelly.
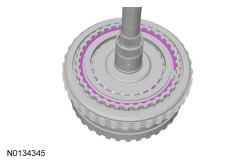
- Compress the overdrive clutch piston return spring.
Special Tool(s): Compressor, Overdrive Clutch, Balance Piston and Direct Clutch 307-589 (307-589/1), Compressor, Forward/Intermediate Spring 307-584 (307-584/2)
General Equipment: Shop Press

- Apply the specified lubricant to the specified component.
- Special Tool(s): Compressor, Forward/Intermediate Spring 307-584
(307-584/1 and 307-584/2)
General Equipment: Shop Press
- Discard the specified component. Follow local disposal regulations.
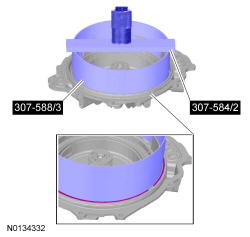
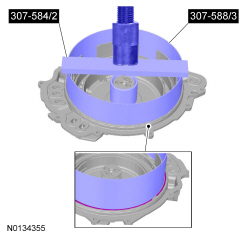
- Special Tool(s): Compressor, Forward/Intermediate Spring 307-584
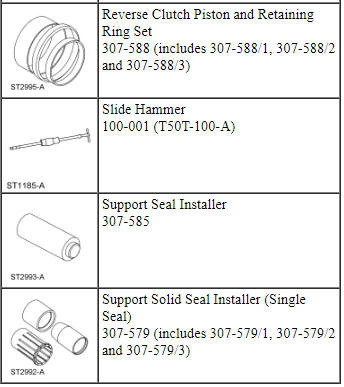
(307-584/2), Reverse Clutch Piston and Retaining Ring Set 307-588
(307-588/3)
General Equipment: Shop Press
- Discard the specified component. Follow local disposal regulations.
- Discard the specified component. Follow local disposal regulations.

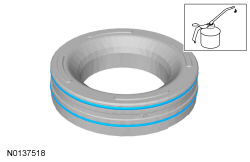
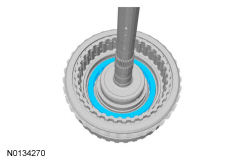
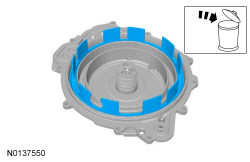
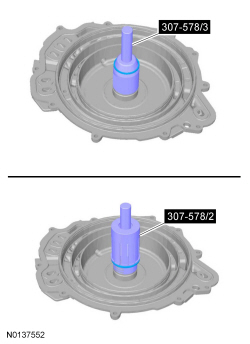
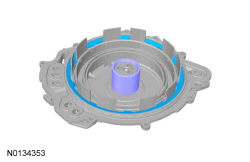
- Install new Teflon seals. Adjust the Input Shaft Support Seal Installer
(Back Plate, Multiple Rings) 307-578/3 and repeat step to install the other
3 seals.
Special Tool(s): Input Shaft Support Seal Installer (Back Plate, Multiple Rings) 307-578 (307-578/2, 307-578/3)
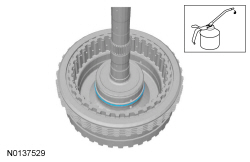
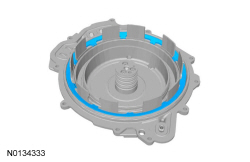
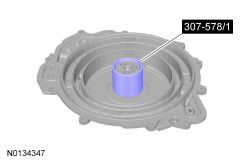
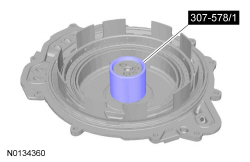
- Size the 4 Teflon seals.
Special Tool(s): Input Shaft Support Seal Installer (Back Plate, Multiple Rings) 307-578 (307-578/1)
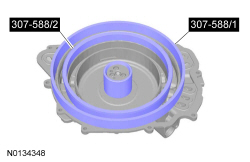
- Special Tool(s): Reverse Clutch Piston and Retaining Ring Set 307-588 (307-588/1 and 307-588/2).
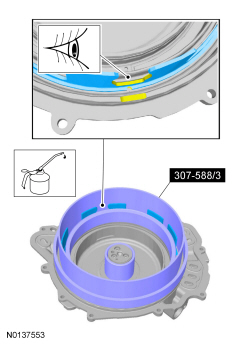
- Align the piston bleed hole with the indentation in the cover and push
the piston in the cylinder using the Reverse Clutch Piston and Retaining
Ring Set 307-588/3. Apply the specified lubricant to the specified
component. Visual check.
Shop Supplies: Petroleum Jelly.
Special Tool(s): Reverse Clutch Piston and Retaining Ring Set 307-588 (307-588/3)
- NOTE: Install the low/reverse piston return spring with the tabs facing down.
- NOTE: Make sure the snap ring is fully seated in the groove
before releasing the pressure on the return spring.
Special Tool(s): Compressor, Forward/Intermediate Spring 307-584 (307-584/2) and the Reverse Clutch Piston and Retaining Ring Set (307-588) 307-588/3.
General Equipment: Shop Press
- Apply the specified lubricant to the specified component.
Shop Supplies: Petroleum Jelly.
- NOTE: Make sure the snap ring is fully seated in the groove
before releasing the pressure on the return spring.
Special Tool(s): Compressor, Forward/Intermediate Spring 307-584
- Special Tool(s): Input Shaft Support Seal Installer (Back Plate, Multiple Rings) 307-578 (307-578/1)
- Apply the specified lubricant to the specified component.
- Tighten to 12 Nm (106 lb-in).
- Discard the specified component. Follow local disposal regulations.
- Discard the specified component. Follow local disposal regulations.
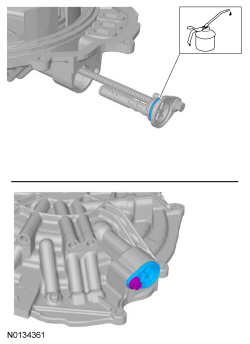
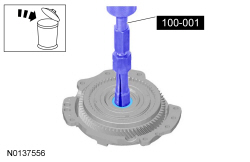
Special Tool(s): Slide Hammer 100-001 (T50T-100-A), Collet, 7/8 Inch to 1 Inch 303-D020 (D80L-100-R)
- Discard the specified component. Follow local disposal regulations.
- NOTE: Note the location of the Torx head and the hex head bolts for assembly.
- Discard the specified component. Follow local disposal regulations.
- Clean and inspect the stator support assembly for damage and install new, if necessary.
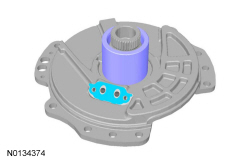
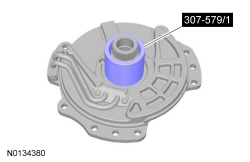
- Special Tool(s): Support Solid Seal Installer (Single Seal) 307-579 (307-579/2 and 307-579/3)

- Special Tool(s): Support Solid Seal Installer (Single Seal) 307-579 (307-579/1)
- NOTE: Install the Torx and the hex bolts in the correct
locations as noted during disassembly.
Hand tighten.
-
- Tighten to 7 Nm (62 lb-in).
-
- Tighten to 12 Nm (106 lb-in).
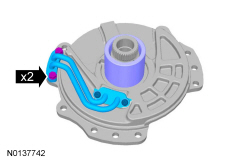
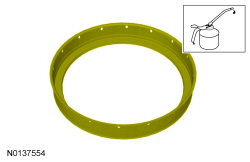
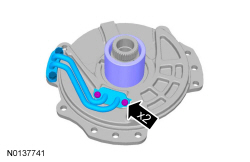
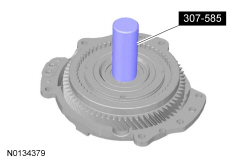
- Special Tool(s): Support Seal Installer 307-585.
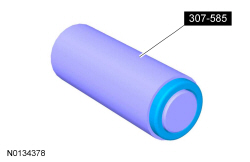
- Special Tool(s): Support Seal Installer 307-585.
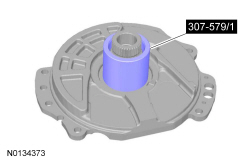
- Remove.
Special Tool(s): Support Solid Seal Installer (Single Seal) 307-579 (307-579/1)

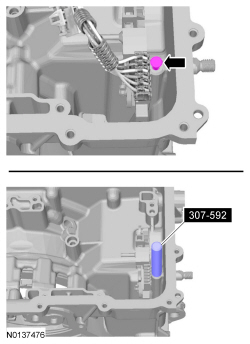
- NOTICE: The solenoid body should be handled with care or
damage to the solenoid body may occur.
NOTICE: Do not handle the solenoid body in the leadframe area or by the screens of the solenoid body filter or damage to the solenoid body may occur.
NOTICE: Use care not to break the alignment tabs when installing the solenoid body filter. Damage to the transmission will occur if the solenoid body is not correctly aligned.
Pull straight up from the alignment tabs. Discard the specified component. Follow local disposal regulations.
- Discard the specified component. Follow local disposal regulations.
- Check for damage. Visual check.
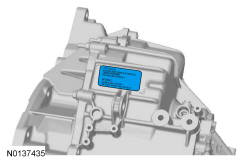
- If replacing the solenoid body, install the replacement service tag on the transmission case over the current solenoid body strategy tag.
- NOTICE: Do not handle the solenoid body in the leadframe area
or by the screens of the solenoid body filter or damage to the solenoid body
may occur.
NOTICE: Use care not to break the alignment tabs when installing the solenoid body filter. Damage to the transmission will occur if the solenoid body is not correctly aligned.
NOTICE: Make sure that the filter passage areas are clean of foreign material before installing the filter. Damage to the transmission will occur if the filter passages are not clean.
Push filter straight down onto the alignment tabs.
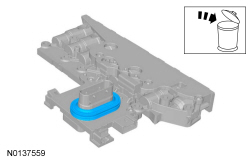
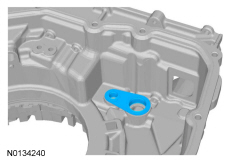
- Apply the specified lubricant to the specified component.
Special Tool(s): Manual Lever Seal Installer 307-581
Shop Supplies: Petroleum Jelly.
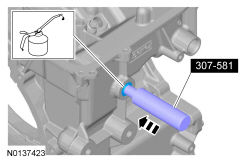
- Special Tool(s): Manual Lever Seal Installer 307-581
- Apply the specified lubricant to the specified component.
-
- Tighten to 12 Nm (106 lb-in).


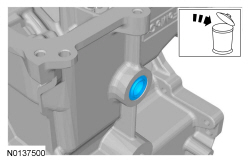
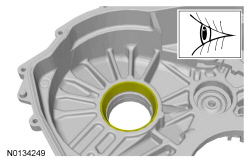
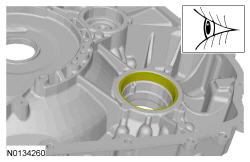
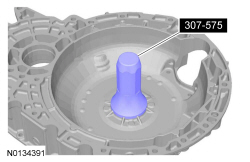
- Special Tool(s): Converter Seal Installer 307-575
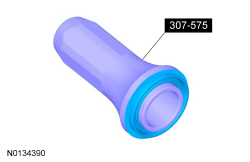
- NOTICE: Support the torque converter housing using blocks of
wood, or damage to the torque converter housing may occur.
Special Tool(s): Converter Seal Installer 307-575
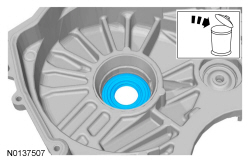
FWD vehicles
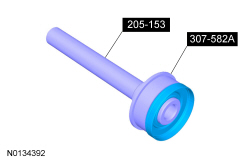
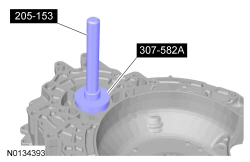
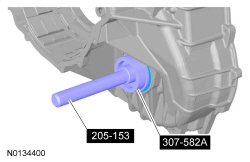
- Special Tool(s): Handle 205-153 (T80T-4000-W), Installer, Cover Axle Seal 307-582A
- NOTICE: Support the torque converter housing using blocks of
wood or damage to the torque converter housing may occur.
Special Tool(s): Handle 205-153 (T80T-4000-W), Installer, Cover Axle Seal 307-582A
All vehicles
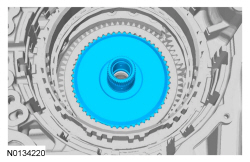
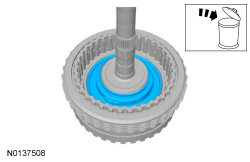
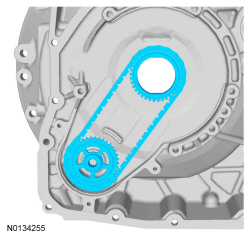
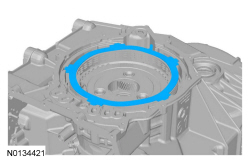
- NOTE: The dot on the pump sprocket is installed facing upward.
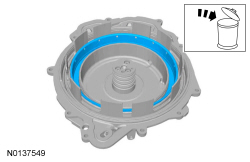
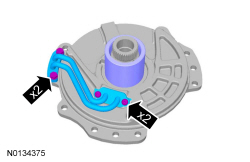
- Flush the pump with clean transmission fluid. Rotate the pump shaft by hand to clean the old transmission fluid out of the pump.
- Apply the specified lubricant to the specified component.
- NOTE: Install the filter in the correct orientation as noted in removal.
-
- Tighten to 12 Nm (106 lb-in).

- NOTE: Be sure that the pump drive chain is correctly engaged on
both sprockets.
- Tighten to 41 Nm (30 lb-ft).
-
- Tighten to 12 Nm (106 lb-in).
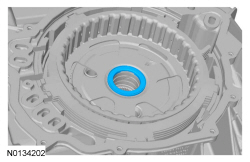
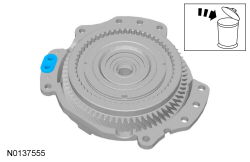
- Apply the specified lubricant to the specified component.
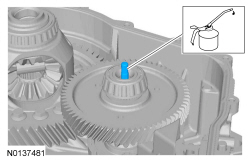
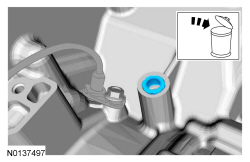
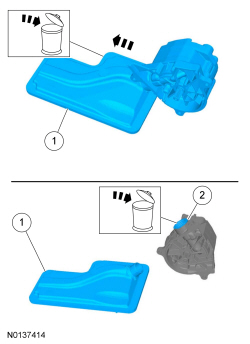
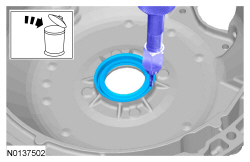
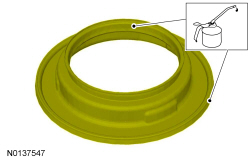
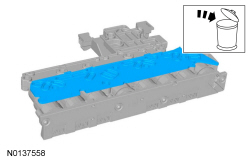
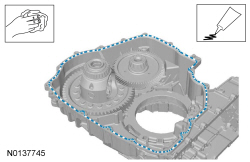
- Clean the specified component with the specified material. Apply the substance from the specified tube.
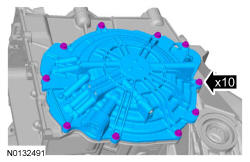
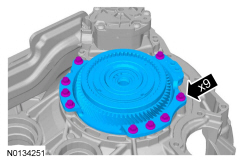
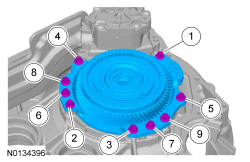
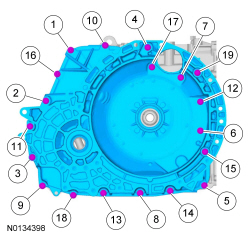
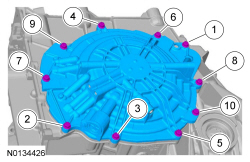
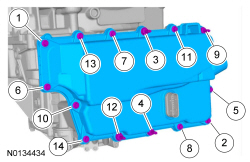
- NOTE: Hand tighten the bolts only.

- NOTE: The studbolts are 1 and 16 in the tightening sequence.
- Tighten to 24 Nm (18 lb-ft).
- Special Tool(s): Handle 205-153 (T80T-4000-W), Installer, Cover Axle Seal 307-582A
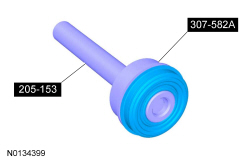
- Special Tool(s): Handle 205-153 (T80T-4000-W), Installer, Cover Axle Seal 307-582A
- Apply the specified lubricant to the specified component.
Shop Supplies: Petroleum Jelly.
- NOTE: Install the Compressor, Forward/Intermediate Spring
307-584/1 with the stepped end of the cylinder facing downward when pushing
the forward clutch piston into the bore.
Special Tool(s): Compressor, Forward/Intermediate Spring 307-584 (307-584/1)
- NOTE: Install the Compressor, Forward/Intermediate Spring with the stepped end of the cylinder facing upward when compressing the forward clutch piston return spring.

- NOTE: Install the Forward/Overdrive Spring Compressor with the
stepped end of the cylinder facing upward when compressing the forward
clutch piston return spring.
NOTE: Before compressing the forward clutch piston return spring, make sure the spring is centered.
Compress the forward clutch piston return spring.
Special Tool(s): Compressor, Forward Clutch Spring 307-574 (307-574/1 and 307-574/2), Compressor, Forward/Intermediate Spring 307-584 (includes 307-584/1 and 307-584/2)

- NOTE: The Compressor, Forward Clutch Spring and the Compressor,
Forward/Intermediate Spring not shown for clarity.
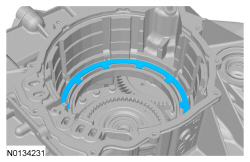
NOTE: The snap ring gap should be at the top of the transmission case.

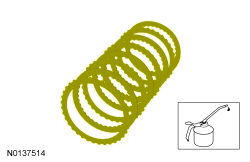
- Install the forward clutch wave spring.
- Apply the specified lubricant to the specified component.
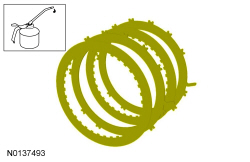
-
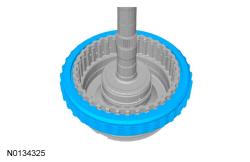
- Position the forward clutch pack assembly in the case.
- Make sure the alignment tab on the clutch pack is positioned in the correct location.
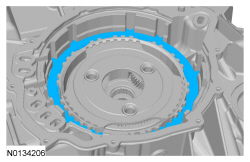
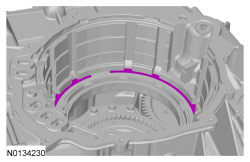
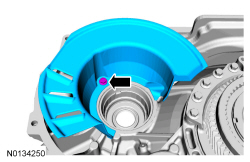
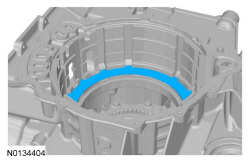
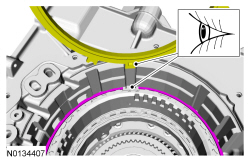
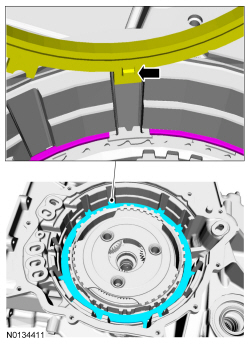
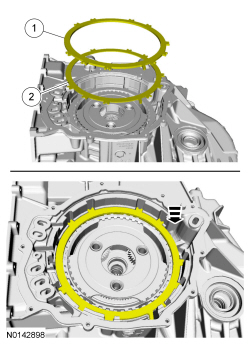
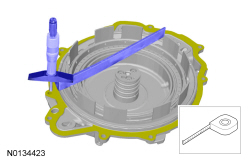
- NOTE: The low OWC snap ring gap must be positioned as shown so
that the low/reverse clutch pressure plate tab fits into the gap when it is
installed later in this procedure.
Visual check.
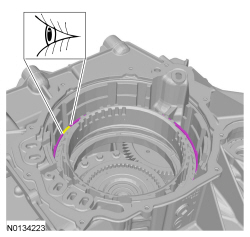
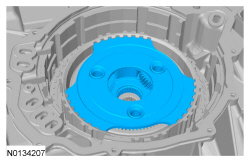
- Compare the position of the low OWC snap ring gap with the tab on the low/reverse clutch pressure plate to be sure that the gap is in the right position. Visual check.
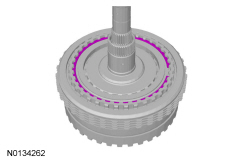
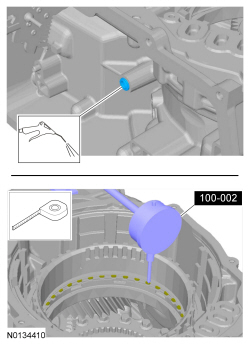
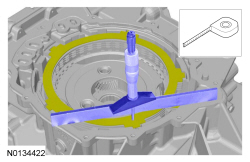
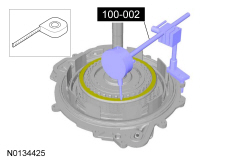
- Rest the plunger on a top friction disc tab.
Special Tool(s): Dial Indicator Gauge with Holding Fixture 100-002 (TOOL-4201-C)
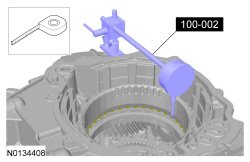
- Apply 483 kPa (70 psi) of air pressure to the forward clutch piston port
while recording the clutch pack clearance on the Dial Indicator. The
clearance should be between 0.85 mm (0.033 in) and 2.41 mm (0.094 in). If
the clearance is out of range, check the forward clutch pack and low OWC for
correct installation. If the forward clutch pack and low OWC is correctly
installed, install a new forward clutch pack. Air Blow Gun. Measure the
length or distance.
Special Tool(s): Dial Indicator Gauge with Holding Fixture 100-002 (TOOL-4201-C)


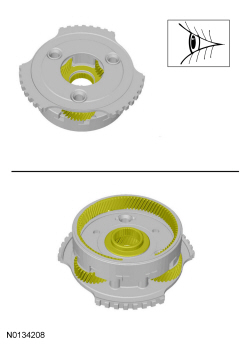
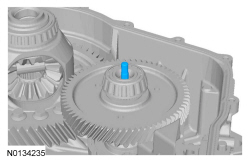
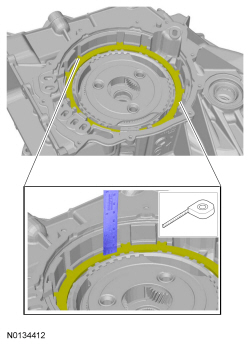
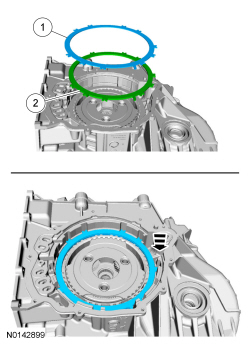
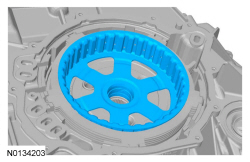
- NOTE: The groove on the center sun gear is installed facing up.


- NOTICE: Failure to align the tab on the bottom of the
low/reverse pressure plate with the gap in the low OWC snap ring may result
in damage to the transmission.
- Make sure the tab on the bottom of the pressure plate fits in the gap of the low OWC snap ring.
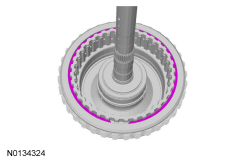
- Install the low/reverse clutch pressure plate.
- Measure the depth of the low/reverse clutch pressure plate where the tab fits into the gap of the low OWC snap ring and directly across from it. If the pressure plate is seated correctly, the depth should be the same. If the depths are different, rotate the snap ring so that the gap fits around the tab on the pressure plate. Measure the length or distance.
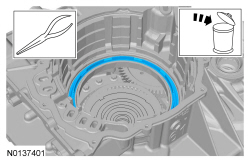
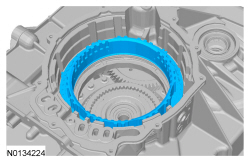
- Apply the specified lubricant to the specified component.
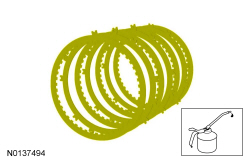
- Install the low/reverse clutch.
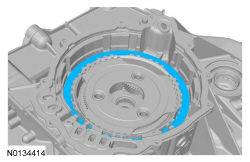
- NOTICE: The low/reverse clutch wave spring and pressure plate
are temporarily reversely installed to measure the low/reverse clutch
clearance.
Temporarily install the low/reverse clutch wave spring and pressure plate with the pressure plate on top of the wave spring.
- Pressure plate
- Wave spring
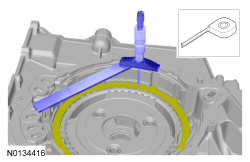
- Using a straightedge and the Depth Micrometer 303-D075 (D92P-4201-A), measure and record as measurement A, the distance from the transmission case deck surface to the low/reverse pressure plate. Measure the length or distance.
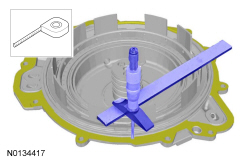
- Using the same straightedge and the Depth Micrometer 303-D075 (D92P-4201-A), measure and record as measurement B, the distance from the low/reverse clutch piston to the cover assembly deck surface. Measure the length or distance.
- Subtract measurement B from measurement A and add 1.6 mm (0.062 in), to compensate for the thickness of the gasket, to get the low/reverse clutch clearance. The clearance should be between 0.83 mm (0.032 in) and 2.43 mm (0.095 in). If the clearance is out of range, check the low/reverse clutch pack for correct installation. If the low/reverse clutch pack is correctly installed, install a new low/reverse clutch pack.

- NOTE: When the low/reverse clutch is correctly installed, the
wave spring is on top.
- Wave spring
- Pressure plate
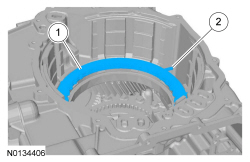
- Install the intermediate clutch pressure plate.
- Apply the specified lubricant to the specified component.
- Using a straightedge and the Depth Micrometer 303-D075 (D92P-4201-A), measure and record as measurement A, the distance from the transmission case deck surface to a low point on the intermediate clutch wave spring. Measure the length or distance.
- Using the straightedge and the Depth Micrometer 303-D075 (D92P-4201-A), measure and record as measurement B, the distance from the intermediate clutch piston to the cover assembly deck surface. Measure the length or distance.
- Subtract measurement B from measurement A and add 1.6 mm (0.062 in), to compensate for the thickness of the gasket, to get the intermediate clutch clearance. The clearance should be between 0.99 mm (0.038 in) and 2.56 mm (0.1 in). If the clearance is out of range, check the intermediate clutch pack for correct installation. If the intermediate clutch pack is correctly installed, install a new intermediate clutch pack.


- Install the No. 1 thrust bearing on the overdrive/direct clutch
assembly.
Shop Supplies: Petroleum Jelly.

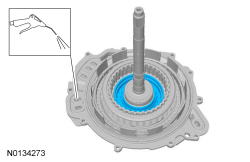
- Position the overdrive/direct clutch assembly in the cover assembly, install the Dial Indicator Gauge with Holding Fixture 100-002 (TOOL-4201-C) plunger on the overdrive clutch pressure plate. Apply 483 kPa (70 psi) of air pressure to the overdrive clutch piston port while recording the clutch pack clearance on the Dial Indicator. The clearance should be between 1.13 mm (0.044 in) and 2.28 mm (0.089 in). If the clearance is out of range, check the overdrive clutch pack for correct installation. If the overdrive clutch pack is correctly installed, install a new overdrive clutch pack. Measure the length or distance.
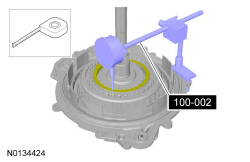
- Position the Dial Indicator Gauge with Holding Fixture 100-002 (TOOL-4201-C) on the direct clutch pressure plate. Apply 483 kPa (70 psi) of air pressure to the direct clutch piston port while recording the clutch pack clearance on the Dial Indicator. The clearance should be between 0.98 mm (0.038 in) and 2.34 mm (0.092 in). If the clearance is out of range, check the direct clutch pack for correct installation. If the direct clutch pack is correctly installed, install a new direct clutch pack. Measure the length or distance.
-
- Tighten to 12 Nm (106 lb-in).
-
- Tighten to 12 Nm (106 lb-in).
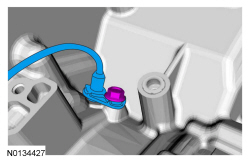
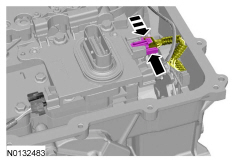
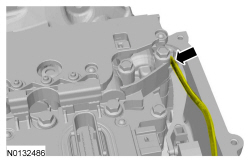
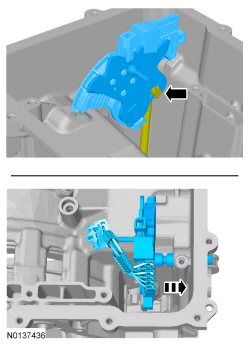
- NOTICE: Be careful not to pinch the TSS , OSS or TR sensor
wiring harnesses under the valve body, or damage to the wiring harness or
connectors may occur.
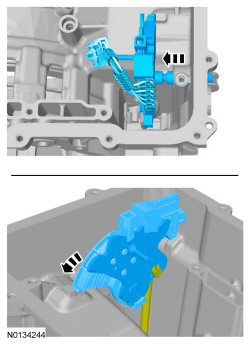
NOTE: Make sure that the manual pin (part of the TR sensor) is correctly installed in the manual valve.
- Manual pin
- Manual valve
-
- Tighten to 12 Nm (106 lb-in).
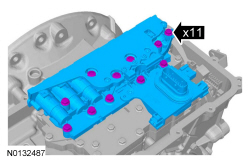
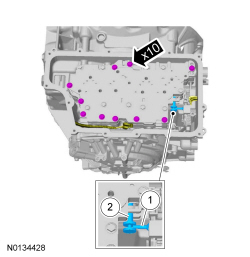
- NOTICE: Make sure not to pinch the TSS , OSS or TR sensor
wiring harnesses behind the solenoid body when positioning the solenoid body
in place.
Hand-tighten only.
- 42 mm (1.653 in) bolt
- 63 mm (2.48 in) bolts
- 80 mm (3.149 in) bolts
- 95 mm (3.74 in) bolts
-
- Tighten to 12 Nm (106 lb-in).


- Connect the TR sensor electrical connector and slide the lock tab to the LOCK position.
- Check for damage. Visual check.
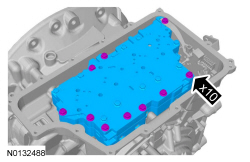
- NOTE: Install the studbolts in the correct locations as noted during disassembly.

-
- Tighten to 12 Nm (106 lb-in).
- NOTICE: Only thread the bolts 6 to 8 turns or do not exceed 12
mm (0.472 in) in the torque converter. If the bolts are threaded too far,
damage to the torque converter clutch surface can occur, causing torque
converter failure.
Install two 10 mm x 1.50 bolts into the torque converter 6 to 8 turns to assist in handling the torque converter and install the torque converter in the transmission.

- Special Tool(s): Retainer, Torque Converter 307-346

Main Control - Overhaul
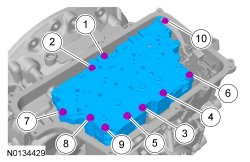
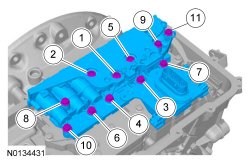
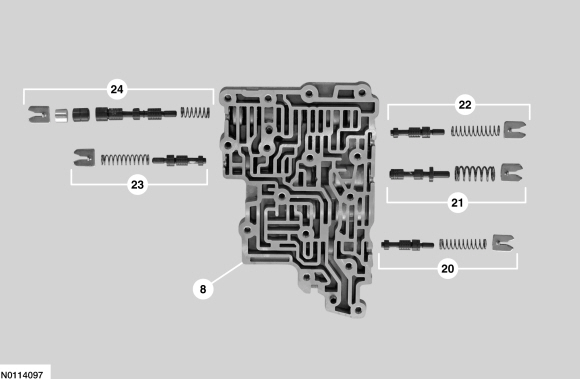
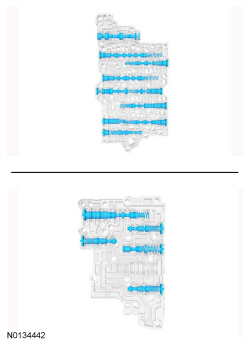
Valve Body
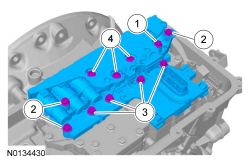
Lower Valve Body
- Discard the specified component. Follow local disposal regulations.
- Discard the specified component. Follow local disposal regulations.
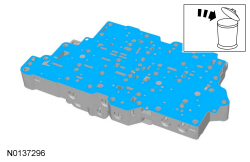
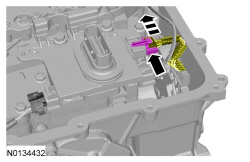
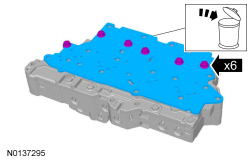
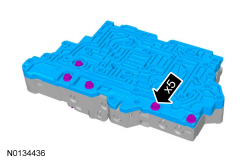
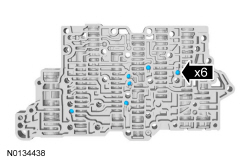
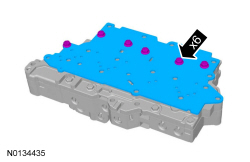
- NOTE: Note the location of the check balls for assembly.
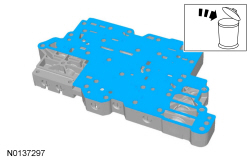
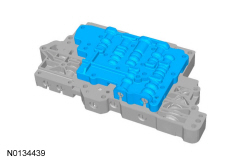
- Remove the lower valve body assembly.

- Discard the specified component. Follow local disposal regulations.
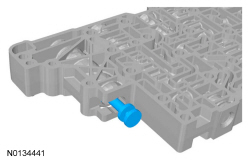
- NOTICE: Remove the valves by tapping the valve body on the
palm of the hand to slide the valves out of the bores. It may be necessary
to remove the valves and springs using a pick. If it is necessary to use a
pick, use extreme caution to prevent damaging the valves or valve bores. If
necessary, disassemble parts of the main control valve body in small groups.
Take special care when handling the main control components, since they are
the most precise and delicate parts of the transmission. Neatly arrange the
parts as they are removed to avoid mixing similar pieces.
NOTE: Do not stone or polish any valves. If the valves do not move freely, install a new assembly.
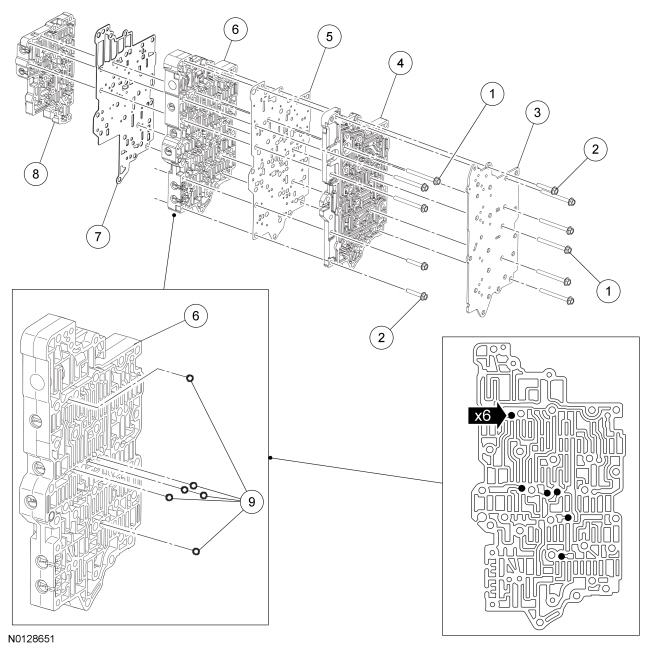
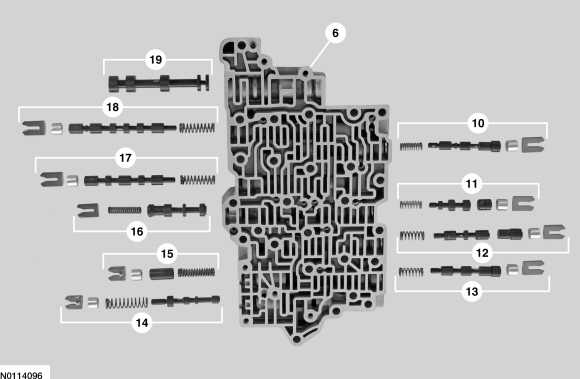
Remove the individual valves and springs from the main control valve body and lower valve body by removing the retaining clips. See the Valve Body and Lower Valve Body illustrations at the beginning of this procedure for valve and spring locations. Clean valves, springs, main control valve body and lower valve body.
- NOTE: Do not stone or polish any valves. If the valves do not
move freely during assembly, install a new valve body.
Install the valve body valves, springs and retaining clips in the main control valve body and lower valve body. See the Valve Body and Lower Valve Body illustrations at the beginning of this procedure for valve and spring locations.


- NOTE: Install the check balls in the correct location as noted during disassembly.


-
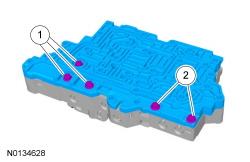
- 63 mm (2.48 in) bolts
- 35 mm (1.377 in) bolts
-
- Tighten to 12 Nm (106 lb-in).

-
- 63 mm (2.48 in) bolts
- 35 mm (1.377 in) bolts

-
- Tighten to 12 Nm (106 lb-in).
 Removal and Installation
Main Control Valve Body
Material
Removal
With the vehicle in NEUTRAL, position it on a hoist. Refer to Section
100-02.
Remove the main control cover. Refer to Main Control Cover - 3. ...
 Disassembly and Assembly of Subassemblies
Transaxle Case
Special Tool(s)
Exploded View
Disassembly
Special Tool(s): Remover/Installer, Front Wheel Hub 204-069
(T81P-1104-C), Transfer Gear Bearing Race Remover 307-577
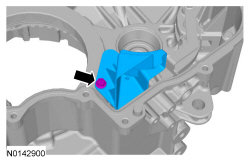
Punch a ho ...
Other materials:
Interior mirrors
WARNING: Do not adjust the mirror when your vehicle is
moving.
Note: Do not clean the housing or glass of any mirror with harsh
abrasives, fuel or other petroleum or ammonia based cleaning products.
You can adjust the interior mirror to your preference. Some mirrors also
have a second pivot p ...
Starting and Stopping the Engine
GENERAL INFORMATION
WARNING: Extended idling at high engine speeds can produce
very high temperatures in the engine and exhaust system,
creating the risk of fire or other damage.
WARNING: Do not park, idle, or drive your vehicle on dry grass
or other dry ground cover. The emission system heats ...
Specifications, Description and Operation, General Procedures
SPECIFICATIONS
Material
General Specifications
Torque Specifications
a Tighten to 10 Nm (89 lb-in) plus an additional 720 degrees.
b Tighten to 16 Nm (142 lb-in) plus an additional 180 degrees.
c Refer to the procedure in this section.d Tighten to 5 Nm (44 lb-in) plus a ...
