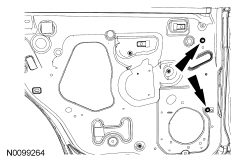
Glass, Frames and Mechanisms - Exploded View, Front Door
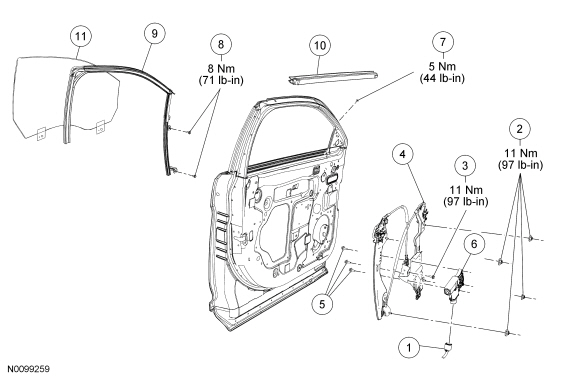
- For additional information, refer to the procedures in this section.
Window Glass - Front Door
Removal and Installation
NOTE: The power window regulator motor must be de-initialized, then initialized whenever the LH/RH front (SHO, Limited) or LH front (SE, SEL) motor is removed from the window regulator drum housing, a new window regulator is installed, a new window glass is installed, a new top run is installed or for any operation in which grease or lubricants are applied to the window regulator or glass run. For additional information, refer to Window Motor Initialization in this section.
- Remove the window control switch. For additional information, refer to Window Control Switch in this section.
- Remove the front door trim panel and front door window garnish moulding. For additional information, refer to Door Trim Panel - Front in Section 501-05.
- Remove the water shield.
- Remove the front door speaker. Refer to the appropriate section in Group 415 for the procedure.
- Remove the interior door glass weatherstrip.
- Temporarily install the window control switch and lower the window glass to access the glass-to-regulator clamp locking tabs.
- Using a suitable tool, push each glass-to-regulator clamp locking tab
inward then gently lift the glass upward slightly to release the glass from
the regulator clamp.
- To install, gently push the glass down into the clamps until an audible click is heard, indicating the glass has seated correctly into the glass clamps.
- Tip the front of the glass down and pull the front door window glass out through the top outboard side of the door.
- To install, reverse the removal procedure.
- The power window regulator motor must be de-initialized, then initialized whenever the LH/RH front (SHO, Limited) or LH front (SE, SEL) door glass is removed from the vehicle. For additional information, refer to Window Motor Initialization in this section.
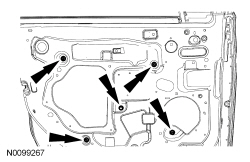
Window Regulator and Motor - Front Door
Removal and Installation
NOTE: The power window regulator motor must be de-initialized, then initialized whenever the LH/RH front (SHO, Limited) or LH front (SE, SEL) motor is removed from the window regulator drum housing, a new window regulator is installed, a new window glass is installed, a new top run is installed or for any operation in which grease or lubricants are applied to the window regulator or glass run. For additional information, refer to Window Motor Initialization in this section.
- Remove the window control switch. For additional information, refer to Window Control Switch in this section.
- Remove the front door trim panel. For additional information, refer to Section 501-05.
- Remove the water shield.
- Remove the front door speaker. Refer to the appropriate section in Group 415 for the procedure.
- Temporarily install the window control switch and lower the window glass to access the glass-to-regulator clamp locking tabs.
- Using a suitable tool, push each glass-to-regulator clamp locking tab
inward then gently lift the glass upward slightly to release the glass from
the regulator clamp.
- To install, gently push glass down into the clamps until an audible click is heard, indicating the glass has seated correctly into the glass clamps.
- Tape the window in the full UP position.
- Disconnect the window motor electrical connector.
- Remove the 5 window regulator fasteners and the window regulator and
motor assembly from the door.
- To install, tighten to 11 Nm (97 lb-in).
- To install, reverse the removal procedure.
- If installing a new LH/RH front (SHO, Limited) or LH front (SE, SEL) front window regulator and motor, it must be initialized. For additional information, refer to Window Motor Initialization in this section. If installing the original front window motor, it must be de-initialized, then initialized. For additional information, refer to Window Motor Initialization in this section.
Window Regulator Motor - Front Door
Removal and Installation
NOTE: The power window regulator motor must be de-initialized, then initialized whenever the LH/RH front (SHO, Limited) or LH front (SE, SEL) motor is removed from the window regulator drum housing, a new window regulator is installed, a new window glass is installed, a new top run is installed or for any operation in which grease or lubricants are applied to the window regulator or glass run. For additional information, refer to Window Motor Initialization in this section.
- Remove the front door regulator and motor assembly. For additional information, refer to Window Regulator and Motor - Front Door in this section.
- Remove the 3 regulator motor screws and the regulator motor.
- To install, reverse the removal procedure.
- If installing a new LH/RH front (SHO, Limited) or LH front (SE, SEL) window regulator motor, it must be initialized. For additional information, refer to Window Motor Initialization in this section. If installing the original front window motor, it must be de-initialized, then initialized. For additional information, refer to Window Motor Initialization in this section.
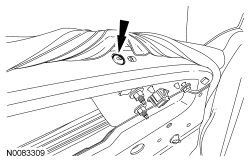
Door Glass Top Run - Front
Removal and Installation
NOTE: The power window regulator motor must be de-initialized, then initialized whenever the LH/RH front (SHO, Limited) or LH front (SE, SEL) motor is removed from the window regulator drum housing, a new window regulator is installed, a new window glass is installed, a new top run is installed or for any operation in which grease or lubricants are applied to the window regulator or glass run. For additional information, refer to Window Motor Initialization in this section.
NOTE: If installing a new door glass top run, the door glass top run and door glass run retainer are replaced as an assembly.
- Remove the front door window glass. For additional information, refer to Window Glass - Front Door in this section.
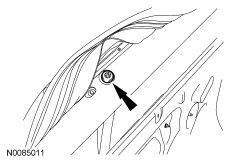
- Remove the exterior mirror assembly. For additional information, refer to Section 501-09.
- Remove the front door glass top run.
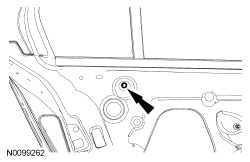
- Remove the door glass run retainer top screw.
- To install, tighten to 5 Nm (44 lb-in).
- Remove the tape covering the access hole, then remove the 2 door glass
run retainer bolts.
- To install, tighten to 8 Nm (71 lb-in).
- Remove the door glass run retainer through the large opening in the door.
- To install, reverse the removal procedure.
- The power window regulator motor must be de-initialized, then initialized whenever the LH/RH front (SHO, Limited) or LH front (SE, SEL) door glass top run is removed from the vehicle. For additional information, refer to Window Motor Initialization in this section.
Glass, Frames and Mechanisms - Exploded View, Rear Door
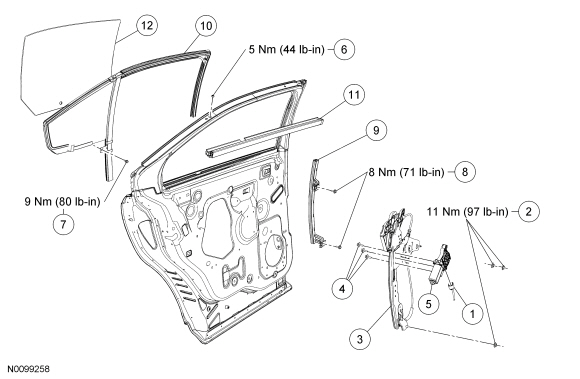
- For additional information, refer to the procedures in this section.
Window Glass - Rear Door
Removal and Installation
- Remove the rear door fixed glass. For additional information, refer to Window Glass - Fixed, Rear Door in this section.
- Temporarily install the window control switch and position the window glass to access the glass-to-regulator clamp locking tab.
- Using a suitable tool, push the glass-to-regulator clamp locking tab
inward then gently lift the glass upward slightly to release the glass from
the regulator clamp.
- To install, gently push the glass down into the clamp until an audible click is heard, indicating the glass has seated correctly into the glass clamp.
- Remove the door window glass out through the top outboard side of the door.
- To install, reverse the removal procedure.
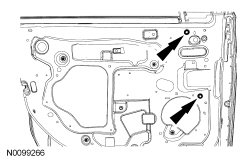
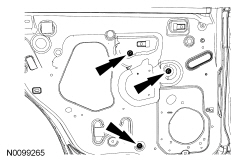
Window Regulator and Motor - Rear Door
Removal and Installation
- Remove the window control switch. For additional information, refer to Window Control Switch in this section.
- Remove the rear door trim panel. For additional information, refer to Section 501-05.
- Remove the water shield.
- Temporarily install the window control switch and lower the window glass to access the glass-to-regulator clamp locking tab.
- Using a suitable tool, push the glass-to-regulator clamp locking tab
inward then gently lift the glass upward slightly to release the glass from
the regulator clamp.
- To install, gently push the glass down into the clamp until an audible click is heard, indicating the glass has seated correctly into the glass clamp.
- Tape the window in the full UP position.
- Disconnect the window motor electrical connector.
- Remove the 3 window regulator fasteners and the window regulator and
motor assembly from the door.
- To install, tighten to 11 Nm (97 lb-in).
- To install, reverse the removal procedure.
Window Regulator Motor - Rear Door
Removal and Installation
- Remove the rear door regulator and motor assembly. For additional information, refer to Window Regulator and Motor - Rear Door in this section.
- Remove the 3 regulator motor screws and the regulator motor.
- To install, reverse the removal procedure.
Door Glass Run and Bracket - Rear
Removal and Installation
- NOTE: The door glass run and bracket is part of the rear window
fixed glass assembly and cannot be serviced separately.
Remove the rear door fixed glass. For additional information, refer to Window Glass - Fixed, Rear Door in this section.
Door Glass Run Retainer - Rear
Removal and Installation
- Remove the rear door window glass. For additional information, refer to Window Glass - Rear Door in this section.
- Remove the 2 door glass run retainer bolts.
- To install, tighten to 8 Nm (71 lb-in).
- Remove the glass run retainer through the large opening in the door.
- To install, reverse the removal procedure.
Window Control Switch
Removal and Installation
NOTE: Removal steps in this procedure may contain installation details.
- NOTE: Driver front shown, all others similar.
- To install, reverse the removal procedure.
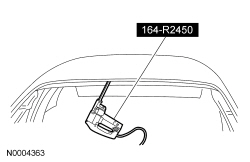
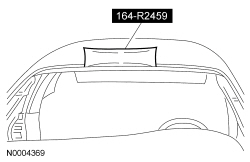
Window Glass - Rear
Special Tool(s)
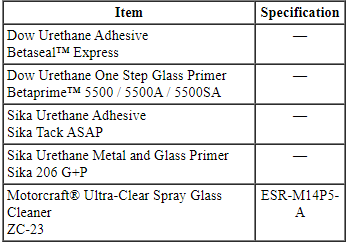
Material


Removal
WARNING: Wear eye and ear protection when servicing a vehicle. Failure to follow this instruction may result in serious personal injury.
WARNING: Wear protective gloves when handling components or parts that have pointed or sharp edges. Failure to follow this instruction may result in serious personal injury.
- Remove the rear parcel shelf and rear assist handles. For additional information, refer to Section 501-05.
- Pull down on the back of the headliner to release the hidden fasteners from the body. Refer to the Headliner exploded view in Section 501-05 for fastener location.
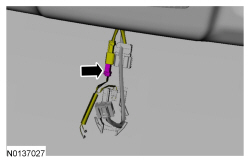
- Disconnect the 2 rear window defrost electrical connectors.
- NOTE: Lubricate the existing urethane adhesive with water to aid
the Deluxe Windshield Removal Tool while cutting.
Using the Deluxe Windshield Removal Tool, place the flat side of the knife against the rear window glass window. Start cutting the glass at the top and work toward the corners.

- Using The Pumper, distance the rear window glass from the body.
- Using the Deluxe Windshield Removal Tool, cut the remaining urethane adhesive and remove the window glass.
Installation
NOTE: For additional material guidelines, refer to the manufacturer's installation information.
- Dry fit the rear window glass to the existing urethane adhesive bead on the body pinch weld. Align the rear window glass in the opening for a uniform fit.
- Use a non-permanent pencil to make alignment marks on the rear window glass at the setting blocks and the body to aid in the installation alignment of the rear window glass.
- Remove the rear window glass and place on a stable surface.
- WARNING:
Repair any corrosion found on the pinch weld. The pinch weld is a structural
component of the vehicle. Corrosion left unrepaired may reduce the
structural integrity of the vehicle. Failure to follow this instruction may
result in serious injury to vehicle occupant(s).
NOTE: Avoid scratching the pinch weld. Repair all minor scratches or exposed metal on the pinch weld following the manufacturer's instructions. Use the same brand pinch weld primer, glass primer and urethane adhesive.
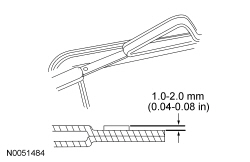
Using an appropriate tool, trim the urethane adhesive leaving a 1 mm to 2 mm (0.04 in to 0.08 in) base of original equipment urethane adhesive on the pinch weld.
- Using a soft brush or vacuum, remove any dirt or foreign material from the pinch weld.
- If installing the original rear window glass, remove the excess urethane adhesive.
- Clean the inside of the rear window glass surface with glass cleaner.
- NOTE: Be sure to use the same brand and cure-rate products for
the urethane adhesive and glass primer. Do not mix different brands of
urethane adhesive and glass primer. Refer to the Material Chart in this
procedure.
If installing a new rear window glass, apply glass primer according to manufacturer's instructions. Allow at least 6 minutes to dry.
- Cut the urethane adhesive applicator tip to specification.

- NOTE: Use either a high-ratio, electric or battery-operated caulk
gun that will apply the urethane adhesive with less effort and continuous
bead.
Apply urethane adhesive on top of the existing trimmed urethane adhesive bead on the pinch weld, starting and ending at the bottom of the rear window opening near the center, making sure there are no gaps in the bead.

- NOTICE: Before positioning the rear window glass, open vehicle
windows to prevent the air pressure of closing doors from affecting the
urethane adhesive bond.
Install the rear window glass on the vehicle aligning it with the markings made previously.
- WARNING:
Improper curing of the urethane adhesive may adversely affect glass
retention, which is important for restraint system performance during a
crash. Carefully follow the urethane adhesive manufacturer's curing
instructions. Do not drive the vehicle until the urethane adhesive seal has
cured. Failure to follow these instructions may result in serious injury to
vehicle occupant(s) during a crash.
After the urethane adhesive has cured, check the rear window glass seal for air or water leaks through the urethane adhesive bead and add urethane adhesive as necessary.
- Connect the 2 rear window defrost electrical connectors.
- Install the headliner, parcel shelf and rear assist handles. For additional information, refer to Section 501-05.
- Clean the interior and exterior rear window glass with glass cleaner.
Window Glass - Fixed, Rear Door
Removal and Installation
NOTE: The door glass run and bracket is part of the rear window fixed glass assembly and cannot be serviced separately.
- Lower the door glass to the full DOWN position.
- Remove the window control switch. For additional information, refer to Window Control Switch in this section.
- Remove the rear door trim panel and rear door window garnish moulding. For additional information, refer to Door Trim Panel - Rear in Section 501-05.
- Remove the water shield.
- Remove the interior door glass weatherstrip.
- Remove the rear door window glass top run screw.
- To install, tighten to 5 Nm (44 lb-in).
- Remove tape and then remove the rear door fixed window glass bolt.
- To install, tighten to 9 Nm (80 lb-in).
- NOTE: The door glass run and bracket is part of the rear window
fixed glass assembly and cannot be serviced separately.
Remove the rear door fixed window glass.
- Position aside the door glass run.
- Tip the front of the fixed glass assembly down and pull the assembly out through the top outboard side of the door.
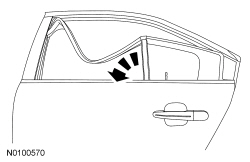
- To install, reverse the removal procedure.
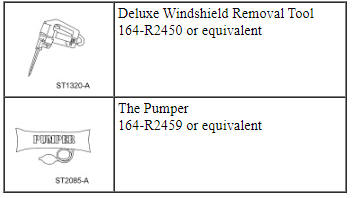
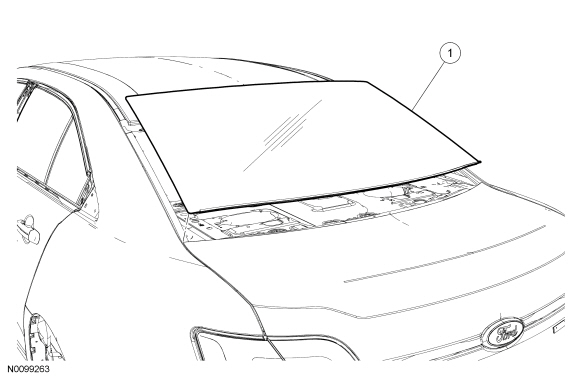
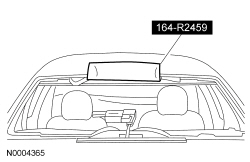
Windshield Glass
Special Tool(s)

Material
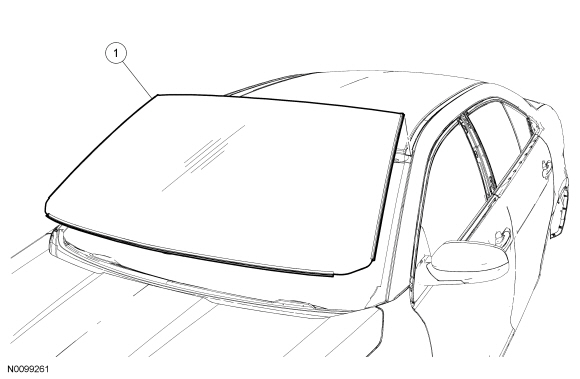

Removal
- Remove the upper cowl panel grille. Refer to Section 501-02.
- Remove the overhead console. Refer to Section 501-12.
- If equipped with rain sensitive wipers, remove the rain sensor. Refer to Section 501-16.
- If not equipped with rain sensitive wipers, remove the interior rear view mirror. Refer to Section 501-09
- Disconnect the rain sensor/windshield camera defroster harness.

- Remove the LH and RH A-pillar trim panels. Refer to Section 501-05.
- Remove the passenger front assist handle.
- Remove the LH and RH sun visors.
- Lower the front portion of the headliner and block with a suitable material.
- WARNING:
Wear eye and ear protection when servicing a vehicle. Failure to follow this
instruction may result in serious personal injury.
WARNING: Wear protective gloves when handling components or parts that have pointed or sharp edges. Failure to follow this instruction may result in serious personal injury.
NOTE: Lubricate the existing urethane adhesive with water to aid the Deluxe Windshield Removal Tool while cutting.
Using the Deluxe Windshield Removal Tool, cut the urethane adhesive from the windshield glass starting at the top center and working toward the bottom corners.
- Using The Pumper, distance the windshield glass from the body.
- Using the Deluxe Windshield Removal Tool, cut the remaining urethane adhesive and remove the windshield glass.
Installation
NOTE: For additional material guidelines, refer to the manufacturer's installation information.
- Dry fit the windshield glass to the existing urethane adhesive bead on the body pinch weld. Align the windshield glass in the opening for a uniform fit.
- Use a non-permanent pencil to make alignment marks on the windshield glass at the setting blocks (if equipped) and the body to aid in the installation alignment of the windshield glass.
- Remove the windshield glass and place on a stable surface.
- WARNING:
Repair any corrosion found on the pinch weld. The pinch weld is a structural
component of the vehicle. Corrosion left unrepaired may reduce the
structural integrity of the vehicle. Failure to follow this instruction may
result in serious injury to vehicle occupant(s).
NOTE: Avoid scratching the pinch weld. Repair all minor scratches or exposed metal on the pinch weld following manufacturer's instructions. Use the same brand pinch weld primer, glass primer and urethane adhesive.
Using a suitable knife, trim the urethane adhesive leaving a 1 mm to 2 mm (0.04 in to 0.08 in) base of original equipment urethane adhesive on the pinchweld.

- Using a soft brush or vacuum, remove any dirt or foreign material from the pinch weld.
- If installing the original windshield glass, remove the excess urethane adhesive.
- Clean the inside of the windshield glass surface with glass cleaner.
- NOTE: Be sure to use the same brand and cure-rate products for
the urethane adhesive and glass primer. Do not mix different brands of
urethane adhesive and glass primer. Refer to the Material Chart in this
procedure.
If installing a new windshield glass, apply glass primer according to manufacturer's instructions. Allow at least 6 minutes to dry.
- Cut the urethane adhesive applicator tip to specification.
- NOTE: Use either a high-ratio, electric or battery-operated caulk
gun that will apply the urethane adhesive with less effort and continuous
bead.
Apply urethane adhesive on top of the existing trimmed urethane adhesive bead on the pinch weld, starting and ending at the bottom of the windshield near the center, making sure there are no gaps in the bead.
- NOTICE: Before positioning the windshield glass, open vehicle
windows to prevent the air pressure of closing doors from affecting the
urethane adhesive bond.
Install the windshield glass on the vehicle aligning it with the markings made previously.
- WARNING:
Improper curing of the urethane adhesive may adversely affect glass
retention, which is important for restraint system performance during a
crash. Carefully follow the urethane adhesive manufacturer's curing
instructions. Do not drive the vehicle until the urethane adhesive seal has
cured. Failure to follow these instructions may result in serious injury to
vehicle occupant(s) during a crash.
After the urethane adhesive has cured, check the windshield glass seal for air or water leaks through the urethane adhesive bead and add urethane adhesive as necessary.
- Position the front portion of the headliner.
- Install the LH and RH sun visors.
- Install the passenger front assist handle.
- Install the LH and RH A-pillar trim panels.
- Connect the rain sensor/windshield camera defroster harness.
- If equipped with rain sensitive wipers, install the rain sensor.
- If not equipped with rain sensitive wipers, install the interior rear view mirror.
- Connect the electrical connectors and install the overhead console.
- Install the upper cowl panel grille.
- Clean the interior and exterior windshield glass with glass cleaner.
 General Procedures
Window Grid Wire Repair
General Equipment
Material
NOTE: The grid line material is not embedded into the glass, but is
baked to the glass surface and consequently can be scraped off. An undama ...
 Instrument Panel and Console
SPECIFICATIONS
Torque Specifications
REMOVAL AND INSTALLATION
Instrument Panel - Exploded View
Instrument Panel Trim Panel and Fasteners
Instrument Panel Finish and Trim Panels
Instrument Panel U ...
Other materials:
Ford Extended Service Plan
PROTECT YOURSELF FROM THE RISING COST OF VEHICLE REPAIRS
WITH A FORD EXTENDED SERVICE PLAN.
SERVICE PLANS (U.S. only)
More than 32 Million Ford and Lincoln owners have discovered the
powerful protection Ford ESP. It is the only extended service plan
backed by Ford Motor Company, and provides pe ...
Side And Rear Vision
DESCRIPTION AND OPERATION
Blind Spot Monitoring
Component Location
Exterior rear view mirror
SOD-R and SOD-L
Overview
BLIS is a vehicle feature that aids the driver in assessing whether another
vehicle is within an area (blind zone) to either side of the vehicle extending
rearwa ...
General Procedures
Valve Clearance Check
Remove the RH fender splash shield. For additional information, refer
to Section 501-02.
Remove the valve cover. For additional information, refer to Valve
Cover in this section.
NOTE: Turn the engine clockwise only, and only use the crankshaft
...
