Note:
The temporary mobility kit sealant compound in the canister is to be used for one tire only. See your Ford authorized dealer for additional replacement sealant canisters.
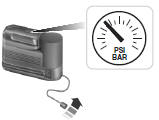
Your vehicle may be equipped with a temporary mobility kit (located in the spare tire well in the trunk). The temporary mobility kit consists of an air compressor to reinflate the tire and a sealing compound in a canister that will effectively seal most punctures caused by nails or similar objects. This kit will provide a temporary seal allowing you to drive your vehicle up to 120 miles (200 km) at a maximum speed of 50 mph (80 km/h).
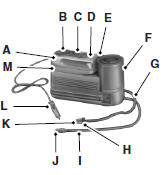
A. Air compressor (inside)
B. Diverter knob
C. On/Off button
D. Air pressure gauge
E. Deflation button
F. Sealant bottle/canister
G. Sealant filling clear tube
H. Sealant tube – tire valve connector
I. Yellow cap tool
J. Air compressor hose
K. Air hose – tire valve connector
L. Accessory power plug
M. Casing/housing
General Information
WARNING:
Failure to follow these guidelines could result in an increased risk of loss of vehicle control, injury or death.
Note:
Do not use the temporary mobility kit if a tire has become severely damaged by driving the vehicle with a tire that has insufficient air pressure. Only punctured areas located within the tire tread can be sealed with the temporary mobility kit.
Do not attempt to repair punctures larger than 1⁄4 inch (6 millimeters) or damage to the tire’s sidewall. The tire may not completely seal.
Loss of air pressure may adversely affect tire performance. For this reason: • Note:
Do not drive the vehicle above 50 mph (80 km/h).
• Note:
Do not drive further than 120 miles (200 kilometers). Drive only to your closest authorized dealer or tire repair shop to have your tire inspected.
• Drive carefully and avoid abrupt steering maneuvers.
• Periodically monitor tire inflation pressure in the affected tire; if the tire is losing pressure, have the vehicle towed.
• Read the information in the Tips for Use of the Temporary Mobility Kit section to make sure of safe operation of the temporary mobility kit and your vehicle.
Tips for Use of the Temporary Mobility Kit
Read the following list of tips to ensure safe operation of the temporary mobility kit: • Before operating the temporary mobility kit, make sure your vehicle is safely off the road and away from moving traffic. Turn on the hazard lights.
• Always set the parking brake to make sure the vehicle doesn’t move unexpectedly.
• Do not remove any foreign objects, such as nails or screws, from the tire.
• When using the temporary mobility kit, leave the engine running (only if the vehicle is outdoors or in a well-ventilated area) so the compressor does not drain the vehicle’s battery.
• Do not allow the compressor to operate continuously for more than 15 minutes. This will help prevent the compressor from overheating.
• Never leave the temporary mobility kit unattended when it is operating.
• Sealant compound contains latex. Make sure that you use the non-latex gloves provided to avoid an allergic reaction.
• Keep the temporary mobility kit away from children.
• Only use the temporary mobility kit when the ambient temperature is between -40°F (-40°C) and 158°F (70°C).
• Only use the sealing compound before the use by date. The use by date is on the lower right hand corner of the label located on the sealant canister (bottle). Check the use by date regularly and replace the canister after four years.
• Do not store the temporary mobility kit unsecured inside the passenger compartment of the vehicle as it may cause injury during a sudden stop or crash. Always store the kit in its original location.
• After sealant use, an authorized Ford dealer must replace the tire pressure monitoring system sensor and valve stem on the wheel.
• When inflating a tire or other objects, use the black air hose only.
Do not use the transparent hose which is designed for sealant application only.
• Operating the temporary mobility kit could cause an electrical disturbance in radio, CD, and DVD player operation.
What to Do When a Tire Is Punctured
A tire puncture within the tire’s tread area can be repaired in two stages with the temporary mobility kit: • In the first stage, the tire will be reinflated with a sealing compound and air. After the tire has been reinflated, you will need to drive the vehicle a short distance (about 4 miles [6 kilometers]) to distribute the sealant in the tire.
• In the second stage, check the tire pressure and adjust, if necessary, to the vehicle’s tire inflation pressure.
First Stage: Reinflating the Tire with Sealing Compound and Air
WARNING:
Do not stand directly over the temporary mobility kit while inflating the tire. If you notice any unusual bulges or deformations in the tire’s sidewall during inflation, stop and call roadside assistance.
WARNING:
If the tire does not inflate to the recommended tire pressure within 15 minutes, stop and call roadside assistance.
Preparation
Park the vehicle in a safe, level and secure area, away from moving traffic. Turn the hazard lights on. Apply the parking brake and turn the engine off. Inspect the flat tire for visible damage.
Sealant compound contains latex. To avoid any allergic reactions, use the non-latex gloves located in the accessory box on the underside of the temporary mobility kit housing.
Do not remove any foreign object that has pierced the tire. If a puncture is located in the tire sidewall, stop and call roadside assistance.
1. Remove the valve cap from the tire valve.
2. Unwrap the clear tube from the compressor housing.
3. Remove the tube cap and fasten the metal connector of the tube to the tire valve, turning clockwise. Make sure the connection is tightly fastened.
4. Plug the power cable into the 12-volt power point in the vehicle.
5. Remove the warning sticker found on the canister and place it on the top of the instrument panel or the center of the dash.
6. Note: Start the engine only if the vehicle is outdoors or in a well-ventilated area.
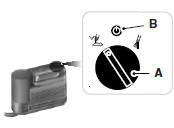
7. Push and turn dial (A) counterclockwise to the sealant position. Turn on the kit by pressing the on button (B).
8. Inflate the tire to the pressure listed on the Tire Label located on the driver’s door or the door jamb area.
Note: When the sealing compound is first added into the tire, the air pressure gauge reading on the compressor unit may indicate a higher value; this is normal and should be no reason for concern. The pressure will drop after about 30 seconds of operation. The tire pressure has to be checked with the compressor in the OFF position to get the correct tire pressure reading.
9. When the recommended tire pressure is reached, turn off the kit by pressing the on and off button, then disconnect the kit from the tire valve and the power point. Re-install the valve cap on the tire valve, place the tube cap on the metal connector, and return the kit to the stowage area.
10. Note: Immediately and cautiously, drive the vehicle 4 miles (6 kilometers) to distribute the sealant evenly inside the tire. Do not exceed 50 mph (80 km/h).
Note: If you experience any unusual vibration, ride disturbance or noise while driving, reduce your speed until you can safely pull off to the side of the road to call for roadside assistance. Note: Do not proceed to the second stage of this operation.
11. After 4 miles (6 kilometers), stop and check the tire pressure.
See Second Stage: Checking Tire Pressure.
Second Stage: Checking Tire Pressure
WARNING:
The power plug may get hot after use and should be handled carefully while unplugging.
Check the air pressure of your tires as follows: 1. Remove the valve cap from the tire valve.
2. Unhook the black hose from the side of the compressor and fasten firmly on the valve stem by turning clockwise.
WARNING: I
f you are proceeding from the First stage: Reinflating the tire with sealing compound and air section and have injected sealant in the tire and the pressure is below 20 psi (1.4 bar), stop and call roadside assistance. If tire pressure is above 20 psi (1.4 bar), continue to the next step.
3. Turn the dial clockwise to the air position. Turn on the kit by pressing the on/off button.
4. Adjust the tire to the recommended inflation pressure from the tire label located on the driver’s door or door jamb area.
Pressing the deflation button near the sealant canister removes air from the tire.
Note: The tire pressure has to be checked with the compressor in the off position to get the correct tire pressure reading.
5. Turn the compressor off by pressing the on/off button.
6. Unplug the hoses, re-install the valve cap on the tire and return the kit to the stowage area.
What to do after the Tire has been Sealed
After using the temporary mobility kit to seal your tire, replace the sealant canister and clear tube (hose). Sealing compound and spare parts can be obtained and replaced at an authorized Ford Motor Company dealership or tire dealer. Empty sealant bottles may be disposed of at home. However, liquid residue from the sealing compound should be disposed by your local Ford Motor Company dealership or tire dealer, or in accordance with local waste disposal regulations.
Note: After the sealing compound has been used, the maximum vehicle speed is 50 mph (80 km/h) and the maximum driving distance is 120 miles (200 km). Inspect the sealed tire immediately.
Note: After sealant use, the TPMS sensor and valve stem on the wheel must be replaced by an authorized Ford dealer.
You can check the tire pressure any time within the 120 miles (200 km) by performing the procedure from Second stage: Checking tire pressure listed previously.
Removal of the sealant canister from the temporary mobility kit

1. Unwrap the clear tube from the compressor housing.
2. Press the button located on the temporary mobility kit compressor housing below the canister while pulling up on the sealant canister.
Installation of the sealant canister to the temporary mobility kit
1. Align the sealant canister with the temporary mobility kit housing.
2. Once aligned, seat the sealant canister by lightly pushing down until you hear an audible click.
3. Wrap the clear tube around the compressor housing.
Note:
If you experience any difficulties with the removal or installation of the sealant canister, consult your Ford Motor Company authorized dealer for assistance.
Be sure to check the sealant compound’s use-by date regularly.
The use-by date is on the lower right hand corner of the label located on the sealant canister.
The sealant canister should be replaced after four years.
 Changing a road wheel
WARNING: The use of tire sealants may damage your tire
pressure monitoring system and should not be used. However,
if you must use a sealant, have an authorized dealer install a new tire
pressure m ...
 Technical specifications
Wheel Lug Nut Torque Specifications
WARNING: When a wheel is installed, always remove any
corrosion, dirt or foreign materials present on the mounting
surfaces of the wheel or the surface of the wh ...
Other materials:
Daytime running lamps
WARNING: Always remember to turn on your headlamps at
dusk or during inclement weather. The Daytime Running Lamp
(DRL) system does not activate the tail lamps and generally may not
provide adequate lighting during these conditions. Failure to activate
your headlamps under these conditions may re ...
Specifications, Description and Operation
SPECIFICATIONS
Torque Specifications
DESCRIPTION AND OPERATION
Airbag and Safety Belt Pretensioner Supplemental Restraint System (SRS)
Air Bag and Safety Belt Pretensioner SRS Components (Illustration 1 of 2)
Air Bag and Safety Belt Pretensioner SRS Components (Illustration 2 ...
Transaxle/Transmission Cooling - 6F35
SPECIFICATIONS
Material
Torque Specifications
DESCRIPTION AND OPERATION
Transaxle Cooling
The transmission fluid cooling system consists of the following:
OTA transmission fluid cooler
Front transmission fluid cooler tube assembly
Rear transmission fluid cooler tube assembly
Transmission ...
