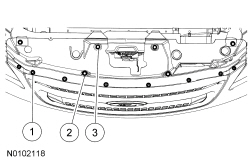
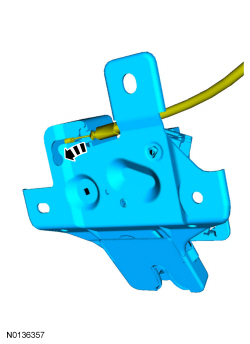
Hood Latch
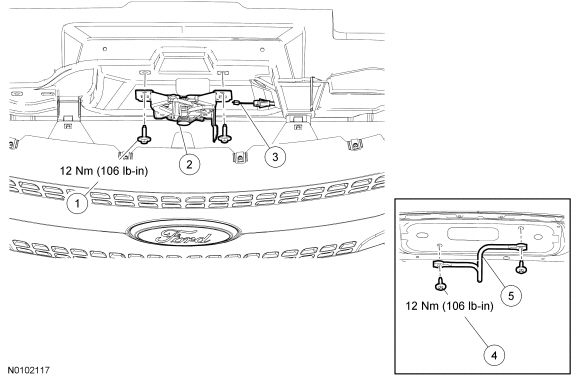
Removal and Installation
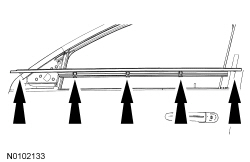
- Remove the upper radiator sight shield.
- Remove the 8 screws.
- Remove the 4 bolts.
- Remove the 2 pin-type retainers.
- NOTE: Mark the position of the hood latch prior to removing the
hood latch bolts.
Remove the 2 bolts and position the hood latch aside to gain access to the hood latch release cable.
- To install, tighten to 12 Nm (106 lb-in).
- Disconnect the hood latch release cable and remove the hood latch.
- To install, reverse the removal procedure.
- When the hood latch is installed, the latch adjustment must be checked to make sure the latch is aligned correctly.
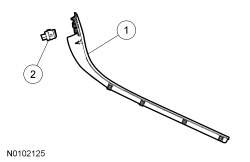
Hood Latch Release Handle
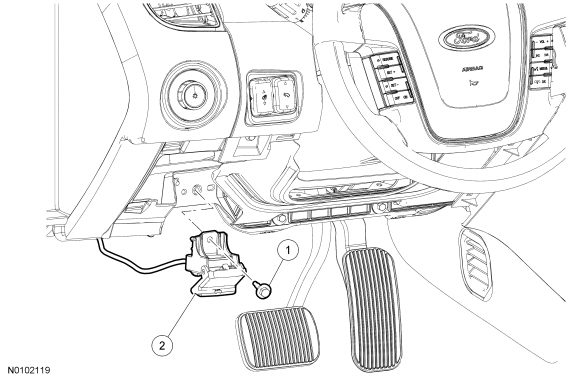

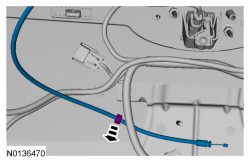
Hood Latch Release Cable Routing
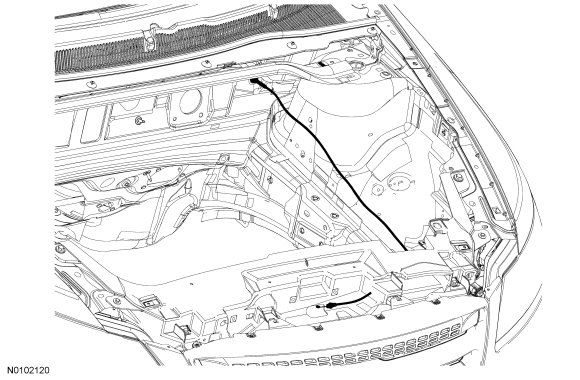
Removal and Installation
- Remove the hood latch. For additional information, refer to Hood Latch in this section.
- Remove the air cleaner.
- Remove the battery tray.
- Release the hood latch release cable routing clips.
- Remove the BCM.
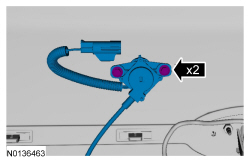
- Remove the hood latch release handle bolt.
- Release the hood latch release cable grommet from the dash panel.
- Remove the hood latch release handle and cable assembly.
- To install, reverse the removal procedure.
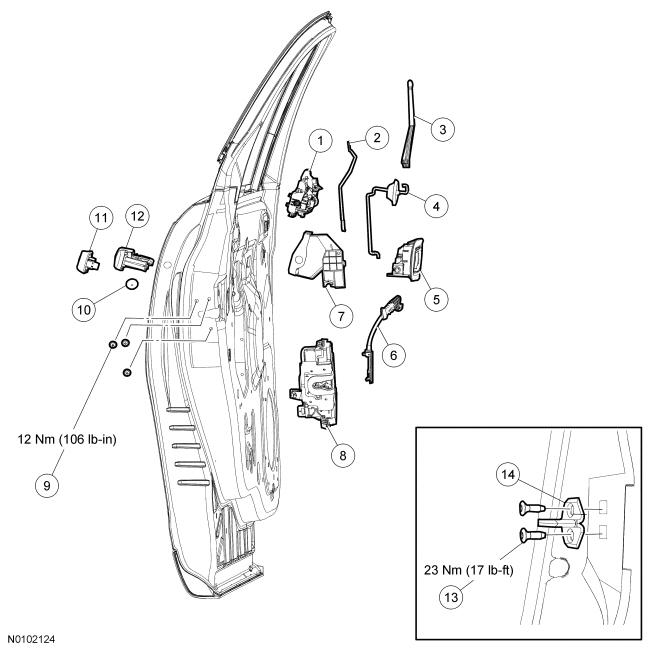
Front Door Handles, Locks and Latches - Exploded View
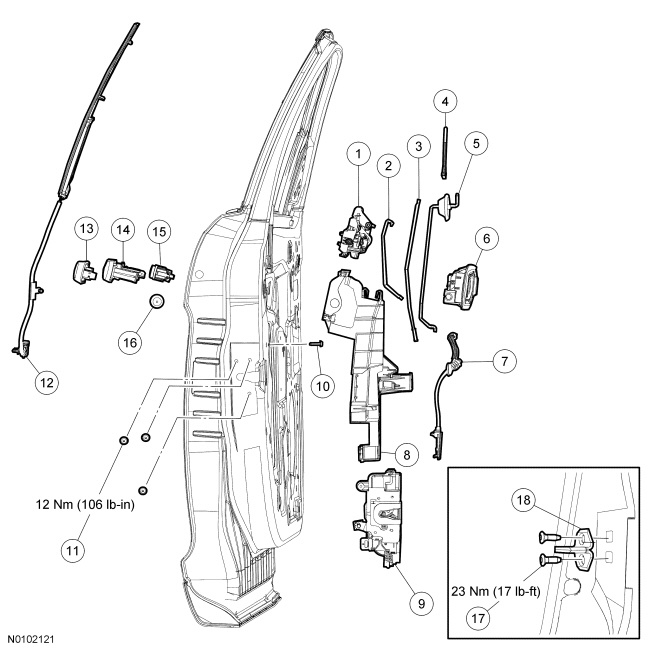
- For additional information, refer to the procedures in this section.
Front Door Latch
Removal and Installation
WARNING: Disconnect the window regulator motor connector before working inside the vehicle doors. Service actions inside the door (such as door latch, handle or lock cylinder service) or operating the remote keyless entry (RKE) fob may activate the windows on vehicles equipped with global open/close. Serious injury to hands or arms may occur if a window motor is activated during service. Failure to follow these instructions may result in serious personal injury.
NOTE: The door glass must be completely raised.
- Remove the front door trim panel. For additional information, refer to Section 501-05.
- Position the watershield aside.
- Disconnect the window regulator motor electrical connector.
- Remove the exterior door handle. For additional information, refer to Exterior Door Handle in this section.
- If equipped, remove the door lock cylinder. For additional information, refer to Door Lock Cylinder in this section.
- Disconnect the front door latch actuator electrical connector.
- Remove the door lock rod extension from the rod.
- Push the door lock rod and grommet through the door panel.
- Push the interior door handle cable and grommet through the door panel, and pull them back out through the door panel access hole.
- Remove the door latch carrier screw.

- Remove the 2 window glass rear track nuts.
- To install, tighten to 11 Nm (97 lb-in).

- NOTICE: To prevent the front door glass from breaking, do not
use excessive force when pushing on the window glass track.
Push the lower window glass track stud through the door panel and move the bottom of the glass track toward the front of the vehicle.
- Loosen the exterior door handle reinforcement bolt.
- To install, tighten to 7 Nm (62 lb-in).

- Slide the exterior front door handle reinforcement to the front of the vehicle and push inside the door.
- Remove the 3 front door latch bolts.
- To install, tighten to 12 Nm (106 lb-in).
- Remove the complete latch, carrier, and handle reinforcement assembly from the door.
- Detach the lock cylinder rod from the lock cylinder lever (if equipped).
- Open the clip and disconnect the exterior front door handle actuating rod.
- Unclip and remove the front door latch from the carrier.
- To install, reverse the removal procedure.
Interior Door Handle
NOTE: LH front shown, other doors similar.

Removal and Installation
- Remove the door trim panel. For additional information, refer to Section 501-05.
- Release the clips and remove the interior door handle.
- To install, reverse the removal procedure.
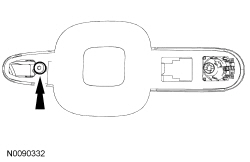
Exterior Door Handle
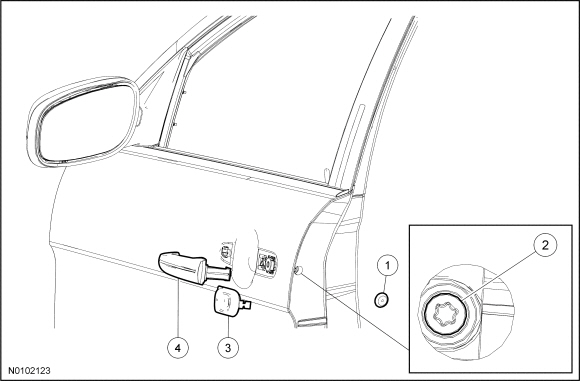
Removal and Installation
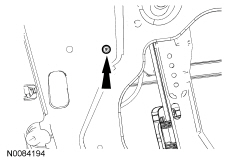
- Remove the plug from the rear of the door.
- Loosen, but do not remove the exterior door handle bezel retaining screw and remove the exterior door handle bezel.
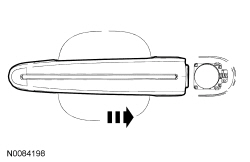
- NOTE: Slide the exterior door handle rearward to release.
Remove the exterior door handle.
- To install, reverse the removal procedure.
Door Latch Release Cable
Removal and Installation
WARNING: Disconnect the window regulator motor connector before working inside the vehicle doors. Service actions inside the door (such as door latch, handle or lock cylinder service) or operating the remote keyless entry (RKE) fob may activate the windows on vehicles equipped with global open/close. Serious injury to hands or arms may occur if a window motor is activated during service. Failure to follow these instructions may result in serious personal injury.
NOTE: The door glass must be completely raised.
- Remove the door trim panel.
- Position the water shield aside.
- Disconnect the window regulator motor electrical connector.
- For the driver door, remove the door lock cylinder. For additional information, refer to Door Lock Cylinder in this section.
- For the passenger doors, remove the exterior door handle. For additional information, refer to Exterior Door Handle in this section.
- Disconnect the door latch actuator electrical connector.
- Remove the door lock rod extension from the rod.
- Push the door lock rod and grommet through the door panel.
- Push the interior door handle cable and grommet through the door panel, and pull them back out through the door panel access hole.
- On the front doors, remove the door latch carrier screw.
- Loosen the exterior door handle reinforcement bolt.
- To install, tighten to 7 Nm (62 lb-in).
- Slide the exterior door handle reinforcement to the front of the vehicle and push inside the door.
- Remove the 3 door latch bolts.
- To install, tighten to 12 Nm (106 lb-in).
- Lower the complete latch, carrier, and handle reinforcement assembly to access the cable connection on the latch.
- Press the tab and pull the cable housing away from the latch.
- Unhook the cable from the latch lever.

- To install, reverse the removal procedure.
Door Handle Reinforcement - Exterior, Front
Removal and Installation
WARNING: Disconnect the window regulator motor connector before working inside the vehicle doors. Service actions inside the door (such as door latch, handle or lock cylinder service) or operating the remote keyless entry (RKE) fob may activate the windows on vehicles equipped with global open/close. Serious injury to hands or arms may occur if a window motor is activated during service. Failure to follow these instructions may result in serious personal injury.
NOTE: The door glass must be completely raised.
- Remove the front door trim panel. For additional information, refer to Section 501-05.
- Position the water shield aside.
- Disconnect the window regulator motor electrical connector.
- For the driver door, remove the door lock cylinder. For additional information, refer to Door Lock Cylinder in this section.
- For the passenger door, remove the exterior door handle. For additional information, refer to Exterior Door Handle in this section.
- Disconnect the front door latch actuator electrical connector.
- Remove the door lock rod extension from the rod.
- Push the door lock rod and grommet through the door panel.
- Push the interior door handle cable and grommet through the door panel, and pull them back out through the door panel access hole.
- Remove the door latch carrier screw.

- Remove the 2 window glass rear track nuts.
- To install, tighten to 11 Nm (97 lb-in).

- NOTICE: To prevent the front door glass from breaking, do not
use excessive force when pushing on the window glass track.
Push the lower window glass track stud through the door panel and move the bottom of the glass track toward the front of the vehicle.
- Loosen the exterior door handle reinforcement bolt.
- To install, tighten to 7 Nm (62 lb-in).

- Slide the exterior front door handle reinforcement to the front of the vehicle and push inside the door.
- Remove the 3 front door latch bolts.
- To install, tighten to 12 Nm (106 lb-in).
- Remove the complete latch, carrier, and handle reinforcement assembly from the door.
- Detach the lock cylinder rod from the lock cylinder lever (if equipped).
- Open the clip and disconnect the exterior front door handle actuating rod.
- Unclip and remove the exterior front door handle reinforcement from the carrier.
- To install, reverse the removal procedure.
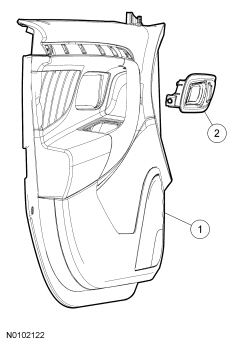
Rear Door Handles, Locks and Latches - Exploded View
- For additional information, refer to the procedures in this section.
Rear Door Latch
Removal and Installation
WARNING: Disconnect the window regulator motor connector before working inside the vehicle doors. Service actions inside the door (such as door latch, handle or lock cylinder service) or operating the remote keyless entry (RKE) fob may activate the windows on vehicles equipped with global open/close. Serious injury to hands or arms may occur if a window motor is activated during service. Failure to follow these instructions may result in serious personal injury.
NOTE: The door glass must be completely raised.
- Remove the rear door trim panel. For additional information, refer to Section 501-05.
- Position the water shield aside.
- Disconnect the window regulator motor electrical connector.
- Remove the exterior door handle. For additional information, refer to Exterior Door Handle in this section.
- Disconnect the rear door latch actuator electrical connector.
- Remove the door lock rod extension from the rod.
- Push the door lock rod and grommet through the door panel.
- Push the inside door handle cable and grommet through the door panel, and pull them back out through the door panel access hole.
- Loosen the exterior door handle reinforcement bolt.
- To install, tighten to 7 Nm (62 lb-in).

- Slide the exterior front door handle reinforcement to the front of the vehicle and push inside the door.
- Remove the 3 rear door latch bolts.
- To install, tighten to 12 Nm (106 lb-in).
- Remove the complete latch, carrier, and handle reinforcement assembly from the door.
- Open the clip and disconnect the exterior rear door handle actuating rod.
- Unclip and remove the rear door latch from the carrier.
- To install, reverse the removal procedure.
Door Handle Reinforcement - Exterior, Rear
Removal and Installation
WARNING: Disconnect the window regulator motor connector before working inside the vehicle doors. Service actions inside the door (such as door latch, handle or lock cylinder service) or operating the remote keyless entry (RKE) fob may activate the windows on vehicles equipped with global open/close. Serious injury to hands or arms may occur if a window motor is activated during service. Failure to follow these instructions may result in serious personal injury.
NOTE: The door glass must be completely raised.
- Remove the rear door trim panel. For additional information, refer to Section 501-05.
- Position the water shield aside.
- Disconnect the window regulator motor electrical connector.
- Remove the exterior door handle. For additional information, refer to Exterior Door Handle in this section.
- Disconnect the rear door latch actuator electrical connector.
- Remove the door lock rod extension from the rod.
- Push the door lock rod and grommet through the door panel.
- Push the inside door handle cable and grommet through the door panel, and pull them back out through the door panel access hole.
- Loosen the exterior door handle reinforcement bolt.
- To install, tighten to 7 Nm (62 lb-in).

- Slide the exterior front door handle reinforcement to the front of the vehicle and push inside the door.
- Remove the 3 rear door latch bolts.
- To install, tighten to 12 Nm (106 lb-in).
- Remove the complete latch, carrier, and handle reinforcement assembly from the door.
- Open the clip and disconnect the exterior rear door handle actuating rod.
- Unclip and remove the exterior door handle reinforcement from the carrier.
- To install, reverse the removal procedure.
Luggage Compartment Lid Release Switch
- Floor console finish moulding
- Interior luggage compartment lid release switch
Removal and Installation
- Remove the passenger side floor console finish moulding. For additional information, refer to Section 501-12.
- Release the tabs and remove the luggage compartment lid release switch.
- To install, reverse the removal procedure.
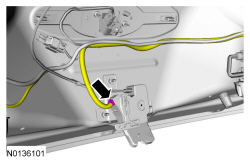
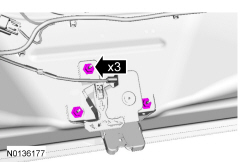
Luggage Compartment Lid Latch
Removal and Installation
NOTE: Removal steps in this procedure may contain installation details.
- If equipped.
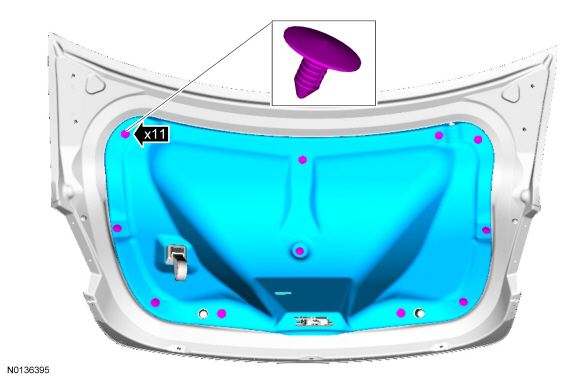
-
- To install, tighten to 9 Nm (80 lb-in).
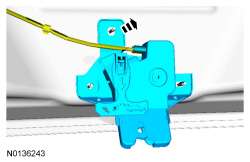
- To install, reverse the removal procedure.
Luggage Compartment Lid Lock Cylinder
Removal and Installation
NOTE: Individual lock cylinders are repaired by discarding the inoperative lock cylinder and building a new lock cylinder using the appropriate lock repair package. The lock repair package includes a detailed instruction sheet to build the new lock cylinder to the current key code of the vehicle.
NOTE: Removal steps in this procedure may contain installation details.
- Remove the luggage compartment lid latch. For additional information, refer to Luggage Compartment Lid Latch in this section.

-
- To install, tighten to 7 Nm (62 lb-in).
- To install, reverse the removal procedure.
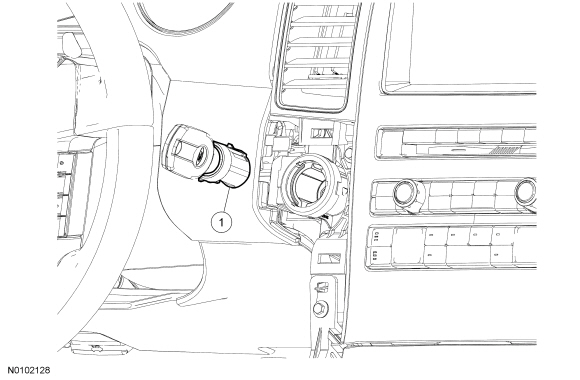
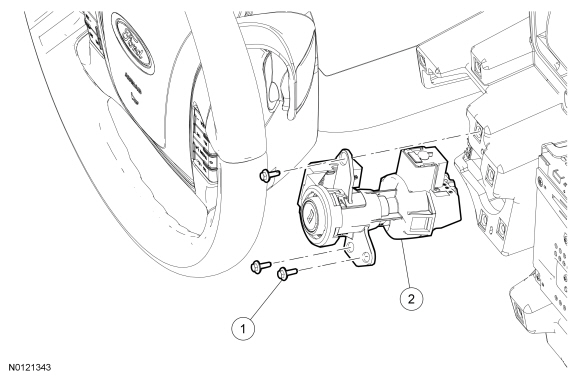
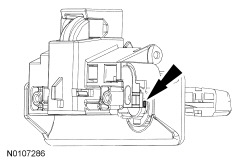
Ignition Lock Cylinder

Removal and Installation
NOTE: For non-functional ignition lock cylinders, the ignition lock cylinder housing has to be replaced. For additional information, refer to Ignition Lock Cylinder Housing in this section.
- Remove the floor console LH finish moulding. For additional information, refer to Console - Floor Trim Panels, Moulding And Fasteners exploded view in Section 501-12.
- Insert the ignition key and turn it to the ACC position.
- Using a suitable tool, press the release pin on the top side of the ignition lock cylinder housing and remove the ignition lock cylinder.

- If a new lock cylinder with keys is replaced, the new Passive Anti-Theft System (PATS) keys must be programmed. For additional information, refer to Key Programming Using Diagnostic Equipment in Section 419-01B.
- To install, reverse the removal procedure.
Ignition Lock Cylinder Housing
Ignition Lock Cylinder Housing

Ignition Switch
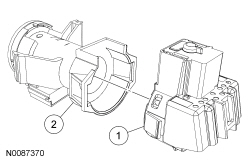

Removal and Installation
- Remove the center instrument panel finish panel. For additional information, refer to Section 501-12.
- Remove the 3 ignition lock cylinder housing screws.
- Position the ignition lock cylinder housing, disconnect the electrical connectors and remove the ignition lock cylinder housing.
- Press the 2 locking tabs and separate the ignition switch from the ignition lock cylinder housing.
- To install, reverse the removal procedure.
- The new Passive Anti-Theft System (PATS) keys must be programmed. For additional information, refer to Key Programming Using Diagnostic Equipment in Section 419-01B.
Door Lock Cylinder
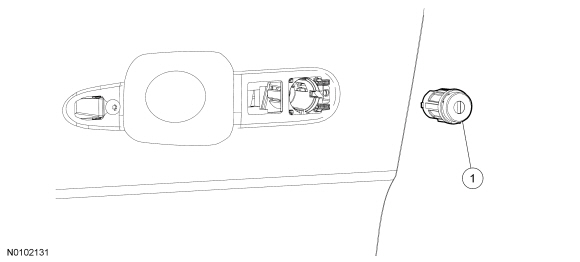

Removal and Installation
NOTE: Individual lock cylinders are repaired by discarding the inoperative cylinder and building a new lock cylinder using the appropriate lock repair package. The lock repair package includes a detailed instruction sheet to build the current key code of the vehicle.
- Remove the exterior door handle. For additional information, refer to Exterior Door Handle in this section.
- NOTE: Upon installation, make sure that the d-slot in the lock
cylinder lines up with the d-slot in the lock cylinder lever.
Release the tab and remove the door lock cylinder.
- To install, reverse the removal procedure.
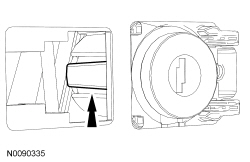
Door Lock Control Switch
Removal and Installation
NOTE: Removal steps in this procedure may contain installation details.
- Remove the interior door handle. For additional information, refer to Interior Door Handle in this section.
- NOTE: Driver front shown, all others similar.
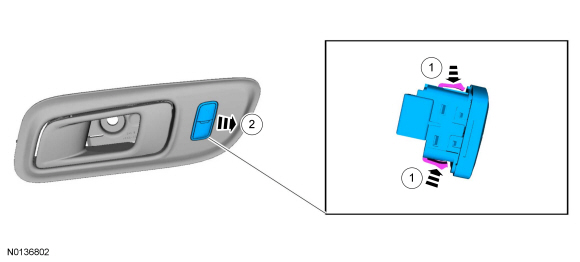
- To install, reverse the removal procedure.
Glove Compartment Lock Cylinder
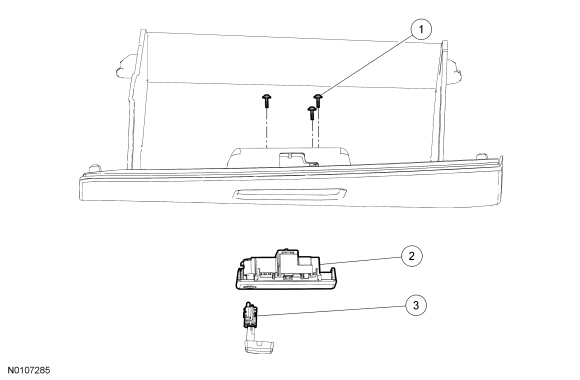
- Open the glove compartment.
- Remove the 3 glove compartment latch screws.
- With a firm, quick motion, pull on the glove compartment latch handle to remove the latch from the glove compartment.
- Insert a key into the glove compartment lock cylinder and place in the unlock position.
- Using a suitable tool (such as a small flat-bladed screwdriver), press in on the glove compartment lock cylinder tumbler.
- Pull out on the key and lock cylinder to remove the lock cylinder from the latch.
- To install, reverse the removal procedure.
Keyless Entry Keypad
Removal and Installation
WARNING: Disconnect the window regulator motor connector before working inside the vehicle doors. Service actions inside the door (such as door latch, handle or lock cylinder service) or operating the remote keyless entry (RKE) fob may activate the windows on vehicles equipped with global open/close. Serious injury to hands or arms may occur if a window motor is activated during service. Failure to follow these instructions may result in serious personal injury.
- Remove the exterior mirror. For additional information, refer to Section 501-09.
- Lower the door glass all the way to the bottom of its travel.
- NOTE: The exterior window glass molding is a one time use. A new
exterior window glass molding will need to be installed.
Release the tabs, then lift up and remove the exterior window glass moulding.
- Remove the front door trim panel. For additional information, refer to Section 501-05.
- Position the water shield aside.
- Raise the door glass all the way to the top of its travel.
- Disconnect the window regulator motor electrical connector.
- Remove the door lock cylinder. For additional information, refer to Door Lock Cylinder in this section.
- Disconnect the front door latch actuator electrical connector.
- Remove the door lock rod extension from the rod.
- Push the door lock rod and grommet through the door panel.
- Push the interior door handle cable and grommet through the door panel, and pull them back out through the door panel access hole.
- Remove the door latch carrier screw.

- Remove the 2 window glass rear track nuts.
- To install, tighten to 11 Nm (97 lb-in).

- NOTICE: To prevent the front door glass from breaking, do not
use excessive force when pushing on the window glass track.
Push the lower window glass track stud through the door panel and move the bottom of the glass track toward the front of the vehicle.
- Loosen the exterior door handle reinforcement bolt.
- To install, tighten to 7 Nm (62 lb-in).

- Slide the exterior front door handle reinforcement to the front of the vehicle and push inside the door.
- Remove the 3 front door latch bolts.
- To install, tighten to 12 Nm (106 lb-in).
- Remove the complete latch, carrier and handle reinforcement assembly from the door.
- Disconnect the keyless entry keypad electrical connector and unclip the connector from the door.
- Unclip the keyless entry keypad harness from the door.
- Connect the window regulator motor electrical connector.
- Lower the window glass all the way to the bottom of its travel.
- NOTE: The keyless entry keypad is attached to the door with
double-sided tape.
Using a suitable tool such as a trim removal tool, remove the keyless entry keypad.
- To install, reverse the removal procedure.
Driver Door Module (DDM)
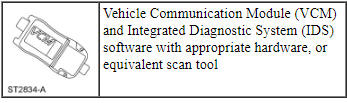
Special Tool(s)
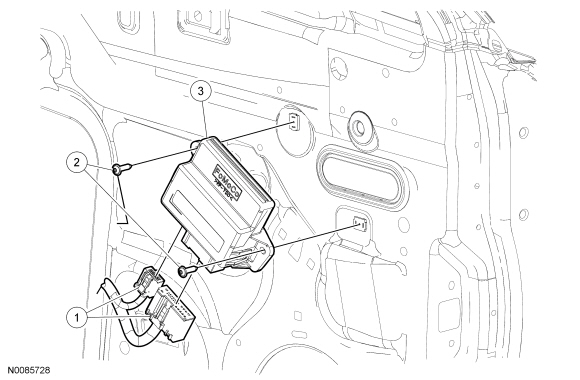
Removal and Installation
- NOTE: This step is necessary only if the Driver Door Module (DDM)
is being replaced.
NOTE: Prior to the replacement of the module, it is necessary to upload the module configuration information to the scan tool. This information must be downloaded into the new module after installation. For additional information, refer to Section 418-01.
Upload the module configuration information from the DDM. For additional information, refer to Section 418-01.
- Remove the LH door trim panel. For additional information, refer to Section 501-05.
- Position the water shield aside and disconnect the DDM electrical connectors.
- Remove the 2 screws and the DDM.
- To install, reverse the removal procedure.
 General Procedures
Remote Keyless Entry (RKE) Transmitter Programming
NOTE: The Remote Keyless Entry (RKE) transmitter of the Integrated
Keyhead Transmitter (IKT) is programmed automatically during the Passive
An ...

Other materials:
General Procedures
Solenoid Body Identification Procedure
Original Solenoid Body Service Tag
Using the scan tool, select Powertrain, Transmission and Transmission
Solenoid Body Identification from the toolbox icon and follow the
instructions displayed on the scan tool.
The solenoid body identification screen di ...
Interior Trim and Ornamentation
SPECIFICATIONS
Material
Torque Specifications
DIAGNOSIS AND TESTING
Sunshade
Special Tool(s)
Principles of Operation
Power Sunshade
The power sunshade system consists of the following:
Sunshade switch
Sunshade module
Sunshade motor
Sunshade assembly
Pressing the sunshade switch (a single po ...
Fuse specification chart
Power Distribution Box
WARNING: Always disconnect the battery before servicing high
current fuses.
WARNING: To reduce risk of electrical shock, always replace the
cover to the power distribution box before reconnecting the
battery or refilling fluid reservoirs.
The power distribution box is lo ...
