Heated Seats
WARNING:
Persons who are unable to feel pain to the skin because of advanced age, chronic illness, diabetes, spinal cord injury, medication, alcohol use, exhaustion, or other physical conditions, must exercise care when using the seat heater. The seat heater may cause burns even at low temperatures, especially if used for long periods of time. Do not place anything on the seat that insulates against heat, such as a blanket or cushion, because this may cause the seat heater to overheat. Do not puncture the seat with pins, needles, or other pointed objects because this may damage the heating element which may cause the seat heater to overheat. An overheated seat may cause serious personal injury.
The heated seats will only function when the engine is running.
Note: Do not do the following: ŌĆó Place heavy objects on the seat
ŌĆó Operate the seat heater if water or any other liquid is spilled on the seat. Allow the seat to dry thoroughly.
To operate the heated seats:

Press the heated seat symbol to cycle through the various heat settings and off. Warmer settings are indicated by more indicator lights.
If the engine falls below 350 RPM while the heated seats are on, the feature will turn itself off. You will need to reactivate it.
Ventilated Seats
The ventilated seats will only function when the engine is running.
To operate the ventilated seats:

Press the ventilated seat symbol to cycle through the various cooling settings and off. Cooler settings are indicated by more indicator lights.
If the engine falls below 350 RPM while the ventilated seats are on, the feature will turn itself off. You will need to reactivate it.
Note: When the heated or ventilated front seat is active, you will be able to hear the fan operating inside the seat. This is normal.
Heated and Ventilated Seat Air Filter Replacement (If Equipped)
The climate controlled seat system includes air filters. You must replace them periodically. See the scheduled maintenance information.
Locate the filters under each front seat and access them from the second-row foot-well area. Move the front seats all the way forward and to the full up positions to ease access.
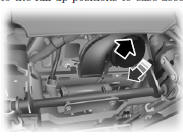
To remove an air filter: 1. Turn the vehicle off.
2. Push up on the outside rigid edge of the filter and rotate counterclockwise once the tabs are released, then remove the filter.
To install a filter: 1. First, position the filter in its housing making sure that the far forward end is all the way up in the housing.
2. Push in on the center of the outside edge of the filter and rotate up into the housing until it clips into position.
 Heated seats
WARNING: Persons who are unable to feel pain to the skin
because of advanced age, chronic illness, diabetes, spinal cord
injury, medication, alcohol use, exhaustion, or other physical conditions,
m ...
 Rear seats
Split-folding Rear Seat
WARNING: Before returning the seatback to its original position,
make sure that cargo or any objects are not trapped behind the
seatback. After returning the seatback to its ...
Other materials:
Troubleshooting
Your SYNC system is easy to use. However, should questions arise,
see the tables below.
Use the website at any time to check your phoneŌĆÖs compatibility,
register your account and set preferences as well as access a
customer representative via an online chat (during certain hours).
Visit w ...
Mobile communications equipment
Using mobile communications equipment is becoming increasingly
important in the conduct of business and personal affairs. However, you
must not compromise your own or othersŌĆÖ safety when using such
equipment. Mobile communications can enhance personal safety and
security when appropriately use ...
Stability Control
PRINCIPLES OF OPERATION
WARNING: Vehicle modifications involving braking system,
aftermarket roof racks, suspension, steering system, tire
construction and wheel or tire size may change the handling
characteristics of your vehicle and may adversely affect the
performance of the AdvanceTrac® sy ...
